October WATR …Lightpainting Part 3, Table -Top Subjects
Hi and welcome to this edition of Workshop at the Ranch. We are continuing this month with Part 3 of our Lightpainting series, and are about to explore perhaps the most useful of Lightpainting imagery, the Table-Top Subject. The tabletop size subject is exactly what it sounds like, a subject that fits on a table. It’s larger than a macro subject, but usually smaller than a live human subject. I find myself using a 24-70mm for many of my table-top size subjects. ![]()
The table-top size subject is commonly associated with product photography. Many catalog images of shoes, camping, or automotive products, household items, etc. comes to mind as suitable tabletop size subjects. I sometimes like to assemble a small theme setting. I love the old west and have made several theme settings containing spurs, boots, saddle, cowboy hats, etc. By arranging these theme items I can create a small scene that represents the by gone days of the old west. These tabletop scenes make beautiful decor prints and tend to be used for magazines, catalogs, and event programs. Lightpainting the tabletop subject does not require a studio, but are small enough scenes to be made in a room of your home. This manageable size of both subject and location, along with general usage for decorating walls and commercial publications makes the tabletop subject popular and perfect for the artistic technique of Lightpainting.
If you’ve just joined us for the first time here in Part 3 of our Lightpainting series I recommend reading through the July and August WATR articles containing Parts 1 and 2.
If you’ve Lightpainted before but your skills are a bit rusty then perhaps all you need is this short recap of the basics. Simply said, Lightpainting is the revealing of the subject from darkness with light. Lightpaintings in general make use of long exposure times like 1 second, 10 seconds, 30 seconds, 2 minutes, or more. During the long exposure a light source (ex: penlight, flashlight, or spotlight) is used to illuminate the subject and various elements of the scene. I apply the light from off camera angles rather than a direct hit of light from the camera’s location. This helps to create some shadows and depth to the image. The main subject of the scene usually receives the most light while the supporting elements receive less light. These are general basics but not hard fast rules.
Long exposure Lightpaintings will require using Manual Exposure settings. A tripod is also required so your camera is motionless during the long exposure time. Focus on your subject while the room lights are on. Then turn off the auto focus or Disengage the AF mode (I use Back Button AF) so the lens doesn’t search in the dark for the subject to focus on while you are Lightpainting. I use the camera’s self-timer to give myself 5 seconds or more after pressing the shutter before the exposure time begins. This prep time allows me to position my light source and gather my thoughts about Lightpainting the subject before the start of the exposure. I only activate the Long Exposure Noise Reduction mode in the camera’s custom settings if my long exposure exceeds 30 seconds (read your camera manual.) I make a homemade snoot for all my flashlights so the LED bulb isn’t seen in the picture and I can better control the spill of light. Apply the light from an off camera angle and not with the flashlight next to the camera or lens. Last month’s article also addressed how I determine what ISO, exposure time, and aperture settings I use. If you haven’t read the February Lightpainting Basics article, now would be a perfect time.
Is a completely dark environment required? No, but you need to make a “Blank Image” first. Basically, all you really need is a very underexposed image that allows enough time to Lightpaint the subject. For example, if the room you are working in allows you to make an exposure of ISO200, 30 seconds at f8 and the image that appears on the camera’s LCD screen looks so dark that I can’t see the subject, that is a blank image. The blank image should be dark enough so that when Lightpainting is added it makes a distinguishable difference. I always make a blank image without any applied light before I make the first Lightpainting. This is so I can see if there is any available ambient light, either helpful or unwanted, spilling into the scene. Sometimes I allow some ambient light to illuminate part of the scene by setting an exposure that produces an image where I can faintly see some of the subject. Then I will Lightpaint the subject or area of the scene I want the viewer to look at.
With all the basics once again fresh in our minds, let’s begin Lightpainting some Table-Top Subjects.![]()
Maine Life …Images 1-5 I have broken this Lightpainting down into a 5 image step-by-step process for teaching purposes. It is very important to remember that my Lightpaintings are one single image, not multiple separate images that are assembled in Photoshop to form one picture. Each of these 5 images illustrates an application of “X” seconds of light, all totaling 30 seconds of exposure time. The sea weathered rope, wooden buoys, lobster trap, and even the old plank boards’ combine to make a collective theme that represents the historic Maine coastal lifestyle. Let’s begin Lightpainting.
First … I collected the “subjects” or “props” and placed them in a nice arrangement. The props include an old Lobster Trap, wooden buoys, weathered rope, and even an old door that looks like a wooden dock for the props to sit on. With my props in place I secured my Nikon D3s to my tripod, composed the scene and then Auto Focused using the AF button on the back of the camera.
Using the Back Button AF allows me to disengage (turn off) the AF mechanism immediately after I take my thumb off of the AF button. This insures that the AF will not activate (search in the dark) while I’m Lightpainting. If you don’t use Back Button AF simply turn off the AF switch on the camera or lens. I will Auto Focus on the central area of the scene, the red stripe on the white buoy.
I chose ISO200, 30 seconds at f16 as my exposure. Why? First, 30 seconds is enough time to Lightpaint this small scene. Next, f16 is a broad depth of field that with a 24-70mm lens set at 24mm will result in the entire scene being in focus. And, ISO200 is perfectly clean and noise free … also, if my ISO was any higher I would start seeing some unwanted ambient light spill onto the scene. The unwanted light spills became visible when I made my Blank Image at ISO500.
Making a Blank Image is very important to start off with is very helpful. I turn out the room lights, press the shutter, and make a 30 second exposure without applying any light. I just want to see if there is any ambient light spilling in from under a door or through the window curtains. The room looks completely dark to my eye but sometimes light sneaks in from somewhere and can ruin, or perhaps even help an image on occasion. The Blank Image helps me determine these factors.![]()
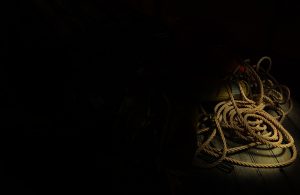 Image #1 – STEP 1 … I am now ready to Lightpaint. I set the self-timer to 5 seconds. This allows me 5 seconds from the time I press the shutter release button to step off camera to the right of the scene and be prepared to Lightpaint once the shutter opens. When the shutter opens for the 30 seconds of exposure time I turn on my Stylus LED penlight (see my Gear page: https://daveblackphotography.com/daves-gear/ and apply 3 seconds of light to the rope. The penlight is about 12 inches from the rope and I make sure to keep the penlight moving in a fluid / circular motion.
During this 3 seconds of light application the snoot of the Stylus penlight that I use helps to reduce the spill of light over the scene and it will also help prevent any lens flare. So, with 3 seconds of exposure time done I aim the Stylus to the next section of the scene, the buoys.![]()
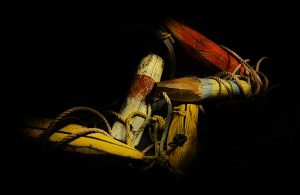 Image #2 – STEP 2 … The buoys are a larger area than the coiled rope and will require 9 seconds of Lightpainting from the Stylus. Each pocket of light is like a piece to a Lightpainting puzzle. This puzzle contains 5 pieces. I continue moving the penlight in an easy circular motion and actually make additional brush-like strokes of light on the buoys. With this 2nd piece of the puzzle complete I move the penlight to the next section, the rope in front of the yellow buoy.
![]()
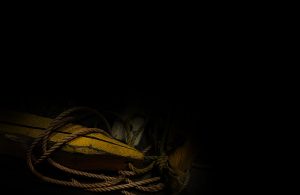 Image #3 – STEP 3 … This is a very small piece of the Lightpainting puzzle and only requires 2 seconds of brush-like strokes of light from the Stylus penlight. Now I move on to the lobster trap.
![]()
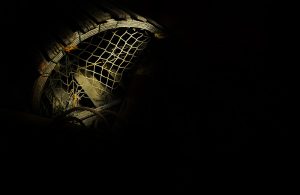 Image #4 – STEP 4 … So far I have been able to Lightpaint from my position off camera to the right side of the scene. I have been able to Lightpaint with the Stylus penlight from a distance of about 12-18 inches away from the rope and buoys. The lobster trap is farther away and so I turn off the penlight and walk between the camera and the Table-Top scene to position myself on the left side.
This uses up about 2 seconds of the exposure time. I do not appear in the picture because there is no light illuminating me. Once I get positioned off the left side of the scene I turn on the Stylus and begin applying light to the front of the lobster trap. I apply light for 6 seconds, mostly brush-like strokes across the net and curved edge of the trap. Once complete I step alongside the trap and start the final step, backlighting the trap.![]()
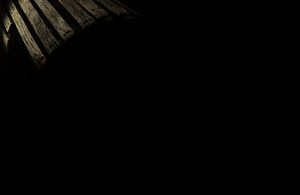 Image #5 – STEP 5 … By applying light to the top of the lobster trap from alongside and slightly behind I create some nice depth to the picture, but I must be careful and hold the penlight out of direct line-of-sight of the lens so as not to create any lens flare.. Backlighting usually requires twice the application of light in order to effectively illuminate the subject. So even though this is a small section it will require 8 seconds of light. This concludes the 30 seconds of exposure time with all 5 pieces of our Lightpainting puzzle complete the shutter closes and my Lightpainting appears on the LCD screen.
 ![]()
NOTE:
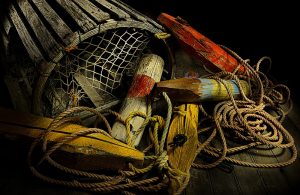 Image #6 – STEP 6 Maine Life … I critique each Lightpainting attempt. This is how I decide how I might improve it. More light here, less light there … or … hold the penlight closer, or hold it farther away. In effect, I am controlling the exposure when I apply the light. The closer the penlight is to the subject, the brighter the subject becomes … and … the farther away the penlight is, the darker the subject becomes. And, applying the light for longer period of time (ex:10 seconds instead of 2 seconds) or a shorter period of time (ex: 5 seconds instead of 15 seconds) also changes/controls the exposure.
I will likely make 15-20 Lightpaintings before the light is applied just the way I want it.
Lightpainting with circular motions and brush-like strokes gives the image a painterly quality. There are soft transitional edges from light to shadow, and a very stylized look. Nikon D3s, ISO200, 30 seconds at f16, Nikon 24-70mm lens, WB10,000K, Gitzo Carbon Fiber Tripod with Ball Head and Kirk “L” Bracket, Stylus LED penlight, SanDisk 32G Flash Card.![]()
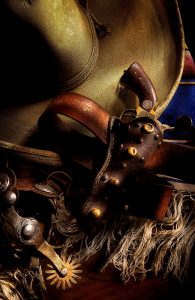 Image #7 Bandolero Light … Here is another Table-Top scene. As always I applied the light to the subjects from an Off Camera position. This application of Lightpainting has a soft window light quality, but I have highlighted a few props, or “supporting characters” of this western scene to draw your attention.
The general scene was Lightpainted using broad circular motions with the Stylus LED penlight from the upper right hand corner, about 20 inches away. I call this “dusting” because the motion is similar to that of using a feather duster. The dusting applies about 75% of the light, which means the image is still too dark. This uses up about 20 seconds of the 30 seconds exposure time.
Then I apply a 1-2 second application of light from very close range (5-10 inches) on the spur rowel and silver engravings, 3 of the four Conchos on the holster, and a highlight across the brim of the sombrero. Highlighting a few key areas, or components, or “supporting characters,” as I call them, within the general scene helps stylize the image and create a beautiful Rembrandt quality.
This is one of my favorite earlier Lightpaintings. Nikon D1x, ISO200, 30 seconds at f16, Nikon 17-55mm lens, WB Shade (no Kelvin scale available on a D1x), Gitzo Tripod with Ball Head and Kirk “L” Bracket, SanDisk Flash Card. ![]()
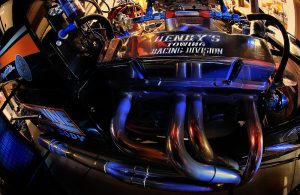
 Image #8 Engine Light … This Lightpainting looks much bigger than a Table-Top thanks to a Nikon 10.5mm Fisheye lens. This Lightpainting also breaks away from our traditional basic thought of needing a completely dark room to Lightpaint in.
This exposure is based around including the ambient light in the garage. I always use Manual Exposure settings when I Lightpaint, and for this image I set my Manual Exposure for the small 30 watt light bulb in the garage door opener that was dimly illuminating the garage.
For this Lightpainting I used my Base Line Exposure … ISO500, 30 seconds at f8 as explained in Lightpainting Part 1: The Basics. I made a “Blank Image” to determine if the ambient light of the garage was spilling too much onto the engine. The engine was still in dark shadowed silhouette, perfect for revealing its chrome parts with Lightpainting.
I again used the Stylus LED penlight product but added Blue and Red lighting on the exhaust pipes and selected portions of the engine. This was easily accomplished by using the Stylus Colored LED penlights of Blue and Red.
By including the available ambient light from the garage to be seen in the background the picture has far more depth and a sense of place than if I had an empty black background. I used the same Lightpainting procedures as before (circular motion, brush-like strokes, and dusting) and applied light to portions of the engine, body, and tires from my position off camera.
Because the background is illuminated I do not walk through the scene, but walk behind the camera to reposition myself from one side of the scene to the other. This is an older image but still one of my all time favorites. Nikon D200, ISO500, 30 seconds at f8, Nikon 10.5mm fisheye lens, WB Cloudy (no Kelvin scale available on a D200), Gitzo Tripod with Ball Head and Kirk “L” Bracket, SanDisk Flash Card.![]()
Well, I hope you have enjoyed Part 3 of our series. By now you should be ready to secure your camera to a tripod, grab your LED penlight, Auto Focus on the subject, turn off the AF, turn out the room lights, and begin making your own Lightpaintings. If you haven’t read the July and August articles titled Lightpainting Part 1 and Part 2 let me encourage you to do so. There you will find step-by-step basic explanations of how I approach Lightpainting. I hope you will join me next month here on Workshop at the Ranch for Lightpainting Part 4 when we expand our knowledge and learn how to Lightpaint the LIVE subject.
For links to Dave’s Gear page and his Lightpainting Penlights, Flashlights and Spotlights: https://daveblackphotography.com/daves-gear/
“There’s always more to learn.” Adios. Dave


