2018 November WATR …Lightpainting Part 4, the LIVE Human Subject

Hi and welcome to this edition of Workshop at the Ranch. We are continuing this month with Part 4 of our Lightpainting series with the Human Subject. I recommend that your Lightpainting basics be well established before taking on the challenge of Lightpainting the human subject. ![]()
All the steps we have been learning in this series continue to apply. A key ingredient to a successful Lightpainting of the human subject is the subject’s ability to hold still for the long exposure time. Any movement by your subject while being Lightpainted will result in a blurred image.
To accomplish this, make sure that your subject is comfortable so it is easier for them to remain motionless for the duration of the long exposure. Also make sure your subject is stabilized. Remember, your subject is posing in darkness, thus making balance difficult. Avoid having them in a freestanding pose without a means to “anchor” themselves to something. Having them sitting or leaning against a solid stationary object is very helpful, and increases the success rate of each Lightpainting.
The return to basics is always a cornerstone for success, therefore, if you’ve just joined us for the first time here in Part 4 of our Lightpainting series I recommend that you read through the past few months and read the articles Parts 1, 2, and 3. If you’ve Lightpainted before but your skills are a bit rusty then perhaps all you need is this short recap of the basics.
Simply said, Lightpainting is the revealing of the subject from darkness with light using a mobile light source. Lightpaintings in general, but not always, make use of long exposure times like 1 second, 10 seconds, 30 seconds, 2 minutes, or more. During the long exposure a light source (ex: penlight, flashlight, or spotlight) is used to illuminate the subject and various elements of the scene. Apply the light from off camera angles rather than a direct application of light from the camera’s location. This helps to create some highlights and shadows, reveals texture and bring depth to the image. The main subject of the scene usually receives the most light while the supporting elements receive less light. These suggestions are general basics, but not hard fast rules.
Long exposure Lightpaintings will require using a tripod to secure your camera so it is motionless during the long exposure time. Focus on your subject while the room lights are on. Then turn off the auto focus so the lens doesn’t search in the dark for the subject to focus on while you are Lightpainting. I use the camera’s self-timer to give myself 5 seconds or more after pressing the shutter before the exposure time begins. This prep time allows me to position my light source and gather my thoughts about Lightpainting the subject before the start of the exposure.
I only activate the Long Exposure Noise Reduction mode in the camera’s custom settings (read your camera manual) when the exposure time is more than 1 minute. I make a homemade snoot for all my flashlights so the LED bulb isn’t seen in the picture and I can better control the spill of light.
Apply the light from an off camera angle and not with the flashlight next to the camera or lens. I have already addressed how I determine my exposure, what ISO, exposure time, and aperture settings earlier in this series of article.
Is a completely dark environment required? No, but you need to make a test image or “Blank Image” first. Basically, all you really need is a very underexposed image that allows enough time to Lightpaint the subject.
For example, if the room you are working in allows you to make an exposure of ISO200, 30 seconds at f8 and the image that appears on the camera’s LCD screen looks so dark that I can’t see the subject, that is a “blank image.” The blank image should be dark enough so that when Lightpainting is added it makes a distinguishable difference.
I always make a blank image without any applied light before I make the first Lightpainting. This is so I can see if there is any available ambient light, either helpful or unwanted, spilling into the scene. Sometimes I allow some ambient light to illuminate part of the scene by setting an exposure that produces an image where I can faintly see some of the subject. Then I will Lightpaint the subject or area of the scene I want the viewer to look at.
All this being said I believe it is best for the photographer who is just learning to Lightpaint to begin with a dark environment and a dark blank image. It is easier to grasp the concept of Lightpainting when you are applying light onto the subject in a very dark room or outdoors at night.
With all the basics once again fresh in our minds, let’s begin Lightpainting the Human Subject.![]()
 Image 1 Irina’s Thoughts … Nikon D3s, ISO200, 30 seconds at f5.6, Nikon 24-70mm lens, WB 8330K, Manfrotto Tripod with Manfrotto 410 Geared Head and Kirk “L” Bracket, Stylus LED penlight (see Dave’s Gear page)
Remember that the success of Lightpainting a human subject heavily rests on the subject’s ability to hold perfectly still during a long exposure time. Think of Lightpainting a human subject as being similar to someone “sitting” for a portrait painting.
I have composed the scene with Irina comfortably “anchored.” By having her seated and also leaning against her piano she will be able to hold still for the 30 second exposure time. I’m now ready to make a test or “Blank Image” but in this case the blank image won’t be perfectly dark because of the lit candle on top of the piano.
The candle flame is key in the determination of this exposure. I want to see the flame, but not have it illuminate Irina. I made 3 test or blank images before arriving at an exposure that captured the flame as only a subtle glow and not an ambient spill of light on my subject.
My scene is set, the exposure has been determined, and my subject is in focus, now I’m ready to Lightpaint. I will always start with the subject’s face, hair and head area. I try to apply only a few seconds of light because this area of the subject is most likely to move during the long exposure. Once the face, hair and head are Lightpainted I never return to this area to add additional light later during the long exposure. Doing so will almost always result with a double exposure of the subject’s face because they will move.
Therefore, Lightpaint your subject’s face, hair, and head area in 3 seconds or less, then move on to other areas of the body and the scene. I set the camera’s self-timer to 5 seconds. This allows me 5 seconds from the time I press the shutter release button to step off camera to the left side of the scene and be prepared to Lightpaint once the shutter opens.
When the shutter opens for the 30 seconds of exposure time I turn on my LED penlight and apply 2 seconds of light to Irina’s face and hair, and about 2 seconds on the section of piano behind her head. The flashlight is about 2 feet from her face and I make sure to keep the flashlight moving in a smooth circular motion. During this 2 seconds of light application to her face and hair I use my Stylus LED penlight (see Dave’s Gear page) which has it’s own snoot to help control the spill of light and precisely control the light that illuminates just her face and the hair that surrounds her face.
So, with 2 seconds of exposure time gone I move the penlight to the next portion of her body, and apply 3 seconds of light to her upper torso, and 3 seconds on her arm and lap. I make sure I keep the penlight moving in a smooth circular motion so as to “feather” light onto my subject to create soft transitional edges.
I then concentrated 6 seconds of side-back light on the lacey dress material between her legs. This is not a direct back light because the flashlight bulb would appear in the picture. It is a side-back light applied with the flashlight just out of the view of the camera lens, but still slightly from behind my subject’s legs. I also apply 3 shafts of light by making diagonal brush strokes of Lightpainting to the dark curtain behind Irina. This takes up about 6 seconds of exposure time, roughly 2 seconds for each shaft of light. Then I turn off the penlight and walk through the scene to position myself just to the right of the piano. This consumes about 3 seconds …remember, it’s a dark room so I’m not seen in the picture.
I’m now in position to add some Lightpainting to the books, the front of the piano, and piano keys, about 7 seconds of time. The shutter closes and this completes the 30 second exposure.
It takes me about 5-10 attempts to get one image that I find acceptable, after which I begin fine tuning the process for 10 or more additional attempts. I usually find aspects of each attempt that I like. I keep those aspects in my mind as I apply the light to each Lightpainting. The end result is a Lightpainting that has all the best applied light to all the pieces of the puzzle, and a final Lightpainting that I’m excited about.
You might have great results instantly, or it may take you 10, 20, or 30 attempts, depending on your skill level and artistic eye. Don’t give up if a good image doesn’t come quickly.
“If you want a picture to look interesting, only light part of it.”
-Dave Black![]()
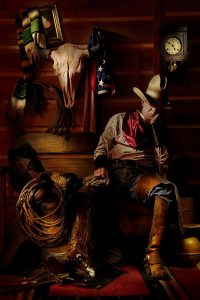
 Image 2 Quit’n Time … Nikon D3x, ISO500, 1 minute at f14, Nikon 24-70mm lens, WB8330K, Nikon Digital Cable Release (this allows me to make a long exposure of more than 30 seconds), Manfrotto Tripod with 410 Geared Head and Kirk “L” Bracket, Stylus LED penlight.
The previous quote “If you want a picture to look interesting, only light part of it” is a rule I tend to follow with all my lit images whether I use Strobes, Speedlights, or Lightpainting. By highlighting a few key sections, or objects, or “supporting characters,” as I call them, within the scene, the end result is a stylized image with beautiful painterly quality.
This sleeping cowboy and the scene he is sitting in is loaded with supporting characters to Lightpaint. For those who know me well, this location might look familiar. It is my office. The cowboy is a long time friend who doesn’t mind sitting for a spell while I Lightpaint. I began with about 3 seconds of light on the cowboy’s face and hat, and then moved to his scarf and upper torso, thigh area with chaps, lower legs with boots, and silver spur respectively. With his body complete I moved through the scene and applied light to all the variety of puzzle pieces. The buffalo skull, American flag, Mexican serape, and the photo in the upper left hand corner of my mother when she was a young ballerina all received 2-3 seconds of light. Then down to the bench, saddle, lariat, and the floor.
I then turn off the Stylus LED penlight and walk through the scene from the left side to the right. I turn on the penlight and finish the floor, then apply light to the brass spittoon, the clock face and brass pendulum all with a few seconds of light per character. That’s a lot to Lightpaint in 1 minute.
Each piece of the “Lightpainting puzzle” is important to the overall expression of the picture. Each piece of the Lightpainting puzzle is lit from about 2-3 feet away with the acceptation of the spur, clock face, and pendulum. To highlight these 3 characters I stepped well into the scene, and concentrated a direct application of light to each piece for 1 second from about 10-12 inches away.
The log wall doesn’t need any direct application of light because the general spill from Lightpainting all these characters was enough illumination to show the wall effectively. Sometimes I try and think like the great artist, Norman Rockwell, when I Lightpaint the LIVE human subject. ![]()
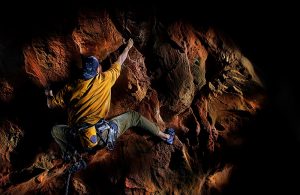
 Image 3 Spider Man … Nikon D3s, ISO500, 30 seconds at f11, Nikon 14-24mm lens, WB 7140K, Head and Kirk “L” Bracket, Stylus ProTac 2AA LED flashlight (see Dave’s gear page).
This is one of my earliest human subjects and a risky one for a Lightpainting because of the possibility of having the subject moving during the 30 second exposure time.
Brian is strong both physically and mentally with the ability to concentrate on holding still. Those combined attributes helped him remain perfectly motionless during the 30 second exposure time and thus make a very successful and unique Lightpainting.
He is only 12 feet off the ground. I am on a 16 foot ladder about 15 feet away. I’m positioned well off camera of course, to Brian’s right out of the frame and slightly higher than him. The camera’s self timer set for 20 seconds which gives me time to press the shutter and scramble up the ladder.
I could have used a wireless Pocket Wizard remote system to trigger the camera from my elevated perch, but I wanted to review each Lightpainting attempt on the LCD monitor, so up and down the ladder I went 15 times. Simply done, I merely Lightpainting making long diagonal brush strokes of light from the upper right hand corner to the lower left hand corner of the image. The natural contours of the rock face provided plenty of highlights and shadowed areas.
I also highlighted a few areas with 1-2 seconds of light on his right shoulder, chalk bag, and right shoe for a very painterly image of rock climbing.
Well, I hope you have enjoyed this LIVE human subject Lightpainting lesson. If you haven’t read my Workshop at the Ranch articles titled Lightpainting Part 1, Part 2, and Part 3 let me encourage you to do so. There you will learn the basics and find step-by-step basic explanations of how I approach Lightpainting for a variety of subjects.
Join me next month here on Workshop at the Ranch where there’s always more to learn. Adios. Dave
NOTE: See Dave’s Gear page on his website for list and links to all my penlights, flashlights, spotlights and other accessories I use for Lightpainting.


