August WATR …Lightpainting Part 2, Macro Subjects

Hi and welcome to this edition of Workshop at the Ranch. We are continuing this month with Part 2 of our WATR Lightpainting instructional series, and will be exploring the small world of Marco Lightpaintings.
![]() First let me answer the question, why Lightpaint? Why not use a strobe or flash? There is something about the way Lightpainting allows the photographer to feather and brush the light onto the subject that makes it distinctively different from a studio flashed image. By moving the light source continual swirling and brushing motion during the long exposure I can wrap light around my subject. I can create pockets of light and soft transitional edges in ways that other lighting systems cannot. The look is very stylized and unique, and produces a one of a kind image.
First let me answer the question, why Lightpaint? Why not use a strobe or flash? There is something about the way Lightpainting allows the photographer to feather and brush the light onto the subject that makes it distinctively different from a studio flashed image. By moving the light source continual swirling and brushing motion during the long exposure I can wrap light around my subject. I can create pockets of light and soft transitional edges in ways that other lighting systems cannot. The look is very stylized and unique, and produces a one of a kind image.
Let’s revisit a few Lightpainting Basics from last month’s article. Simply said, Lightpainting is the revealing of the subject from darkness with light. Lightpaintings in general make use of long exposure times like 1 second, 10 seconds, 30 seconds, 2 minutes, or more.
During the long exposure a light source (ex: penlight, flashlight, or spotlight) is used to illuminate the main subject and various elements of the scene. I apply the light from off camera angles rather than a direct light from the camera’s location. This helps to create some shadows and depth to the image. The main subject of the scene usually receives the most light while the supporting elements receive less light.
IMPORTANT: Lightpaintings will require using a tripod to secure your camera so it is motionless during the long exposure time. Focus on your subject while the room lights are on. Then turn off the auto focus so the lens doesn’t search in the dark for the subject to focus on while you are Lightpainting. I use the camera’s self-timer to give myself 5 seconds or more after pressing the shutter button before the exposure time begins. This prep time allows me to position my light source (flashlight) and gather my thoughts about Lightpainting the subject before the start of the exposure. For exposure times longer than 1 minute I will activate the Long Exposure Noise Reduction mode in the camera’s custom settings (read your camera manual.) I make a homemade snoot for all my flashlights so the LED bulb isn’t seen in the picture and I can better control the spill of light. Apply the light from an off camera angle. Last month’s article also addressed how I determine what ISO, exposure time, and aperture settings I use. If you haven’t read the July 2018 WATR article, “Lightpainting: The Basics,” now would be a perfect time.
Is a completely dark environment required? No, but you need to make a “Blank Image” first. Basically, all you really need is a VERY underexposed image to Lightpaint a subject. For example, with the lights turned OFF in the room you are working in, and you make an exposure of ISO500, 30 seconds at f8, the image that appears on the camera’s LCD screen should look completely dark or a least so dark that you can only “faintly” see the subject, … this would be a perfect Blank Image.
I always make a Blank Image without any applied light before I make the first Lightpainting. This is so I can see if there is any available ambient light, either helpful or unwanted, spilling into the scene. Sometimes I allow some ambient light to illuminate part of the scene by setting an exposure that produces an image where I can faintly see some of the subject. Then I will Lightpaint the subject or area of the scene I want the viewer to look at. All this being said I believe it is best for the photographer who is just learning to Lightpaint to begin with a completely dark environment and make a completely dark Blank Image with no ambient light seen on the camera’s LCD screen … This makes it is easier to grasp the concept of Lightpainting.
NOTE: This series of Lightpainting tutorials will feature images that I have made during the past several years, thus, you will see a variety of Nikon cameras used. This being said, my instructional teaching and Lightpainting technique remains the same today.
Also NOTE: I have updated this Lightpainting series with my current gear of penlights, flashlights and spotlights that I currently use as of 2018.
Penlights, Flashlights and Spotlights I use for Lightpainting as of 2018:
https://daveblackphotography.com/daves-gear/
With all the basics now fresh in our minds, let’s start out small and Lightpaint some Macro Subjects.![]()
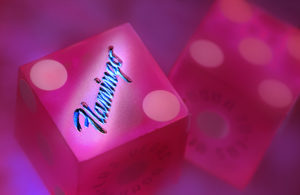
 Image #1 Flamingo Dice … Nikon D3s, ISO 200, 30 seconds at f18, Nikon 105mm Micro Lens, WB 5500K, Gitzo Carbon Fiber Tripod with SLIK Super Ball Head, Kirk “L” Bracket, Stylus penlight by Streamlight with homemade Slit Snoot and Stylus with tube snoot.
This small macro scene is about 2.5 inches wide. A flashlight would flood the entire subject with light, but I wanted to direct the viewer’s eye to the client’s product name, Flamingo. I used a single LED penlight called a Stylus penlight by Streamlight: https://www.streamlight.com/products/detail/index/stylus-ul-model
The Stylus beam was wider than the word Flamingo and would have spilled light over the dice so I made a cardboard snoot. By taping 2 pieces of thin cardboard together (each piece is 1.5 x 3 inches) and leaving both short ends open I could insert the Stylus into one end while the other end remained a narrow slit opening of 1/16 inch. I now had a “Slit Snoot” that produced a very thin shaft of light that I could control while Lightpainting my tiny macro subject. I can determine how much light to apply and where to apply it by reviewing each image on the camera’s LCD screen.
The closer the light source is to the subject, the brighter the subject becomes. Also said, the longer I spend illuminating my subject the brighter the subject becomes. Too much light or too much time spent applying light can overexpose or “burn” portions of the image. I try to keep the light source (Stylus) moving while applying the light, usually in a swirling or brushing motion. This helps soften the transitional edges between light and shadow, and creates a painterly quality to the picture. You are in effect “painting with light.”
For this 30 seconds exposure I applied a shaft of Lightpainting on the word Flamingo for about 3 seconds. The Stylus with my homemade slit snoot is about 3 inches away from the word Flamingo just out of the top center edge of the picture. With the remaining 27 seconds I picked up a second Stylus with its standard snoot that is included with the penlight purchase and taped a pink colored gel over the snoot opening. This allowed me to Lightpaint a broader beam width of pink light. I brushed the additional pink light over the entire scene from several angles.
The dice are resting on a glass pane so I also Lightpainted from underneath the dice as well which gave them a slight pinkish glow. Keep in mind that I did not apply light for the entire 30 seconds. I used only 3 seconds on the word Flamingo, and only 20 seconds of additional pink Lightpainting was needed for the remainder of the scene. I used up 3 seconds of exposure time when I set the Stylus with slit snoot down on the table and picked up the Stylus with the standard snoot. I used up 4 more seconds while repositioning the Stylus in 4 different lighting angles to the subject. All total=30 seconds.
NOTE: Trial and Error and Experimentation play a big role in the Lightpainting learning process. It might take you 20 attempts to get 1 Lightpainting you really like. The LCD screen on the back of the camera is going to help you determine how much light to apply and where to apply it. Keep making Lightpaintings and keep looking at the LCD screen to help guide your progress until you make a Lightpainting that has the “WOW” factor.![]()
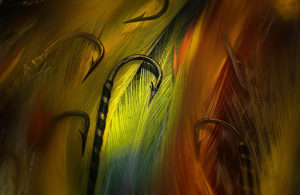
 Image #2 Fly Hooks … Nikon D3s, ISO400, 1 minute exposure at f8, Nikon 28-300mm VRII zoom lens at 300mm with a Kenko 36mm Extension Tube attached, WB 6700K, Gitzo Tripod, SLIK Super Ball Head with Kirk “L” Bracket, Stylus Penlight with homemade slit snoot.
This macro Lightpainting measures about 2 inches wide and will incorporate a very interesting technique I call “Soft Focus” I again used my Stylus with homemade slit snoot for this image of fly fishing hooks and fly feathers.
With my subject in perfect focus I precisely Lightpainted just the center hook and feathers for 7 seconds, I then Lightpainted some additional pockets of light across some of the surrounding hooks, but only for about 3 seconds each hook.
Then I did something special. With the Stylus turned off I manually unfocused the lens towards the infinity setting and then brushed an additional 15 seconds of Lightpainting over all the surrounding hooks but not the center hook. By applying additional light to the surrounding hooks and feathers that were intentionally Lightpainted while out of focus it created a softening of only those surrounding hooks and feathers. The center hook and feathers remained sharp because they did not receive any additional Lightpainting while the lens was out of focus.
Simply said, if I Lightpaint selected portions of the scene in focus, they will be captured sharp. Then during the same exposure if I unfocused the lens by a significant amount and Lightpaint other portions of the scene, those portions will be captured soft.
This technique should be done when a very dark environment or completely Blank Image can be achieved. If there is any available ambient light spilling onto the subject the “soft focus” process will create a blurry double exposure. Also know that this technique works best with wider aperture settings like f5.6, f4.0, f2.8 etc. which helps create a shallower depth of field, thus a more significant transition from sharp subject to soft focus scene. The soft focus technique further stylizes the image with an almost dream like effect. I have added this soft focus technique to many of my current Lightpaintings, and I love the results.
What’s does an Extension Tube do? Currently for my small scenes and macro work I am using extension tubes rather than a traditional macro lens. An extension tube increases the distance between the lens and camera sensor, which causes the lens to focus closer than its normal minimum focusing distance.
I am using the Kenko Extension Tubes for Nikon (also available for Canon) and purchased them in a very handy 3 pack with 12mm, 24mm and 36mm extension tubes. The Kenko product enables all the electronic functions and information, like auto focus, exposure, and data to work between the camera and lens. This set up gives me a zoom macro capability for about $185 for the variety 3 pack of extension tubes.
Why not just add some Gaussian Blur in Photoshop to the image? It has been my experience that creating a softening or blurred effect in Photoshop using Gaussian Blur or similar 3rd party plug-ins can sometimes cause a kind of ghost-like edge to the subject. By adding some additional Lightpainting to only some parts of the image after unfocusing the lens, (to infinity or to minimum focus distance if you want … they effect is different), a true dream like quality can be created. Keep in mind that when you use the soft focus technique you will need to refocus the lens on your subject after each Lightpainting is made. ![]()
 Image #3 Masters Light … Nikon D2x, ISO200, 10 seconds at f8, Nikon 70-200mm zoom lens with 1.4x teleconverter, WB 7140K, Gitzo Carbon Fiber Tripod with SLIK Super Ball Head and Kirk “L” Bracket, and Stylus penlight. (NOTE: Today (2018) I am using the Nikon D850 camera and a variety of NIKKOR lens with extension tubes to make my small scene and macro images.)
Lightpainting allows the photographer to Highlight the subject in an effort to help direct the viewers eye to that subject. In this image made on location at Augusta National during the 2004 Masters, the subject is the Masters logo.
I applied 2 seconds of Lightpainting to the Masters logo from about 5 inches away. Then I backed off to 12 inches and applied Lightpainting to the golf ball for 3 seconds. Finally I applied 5 seconds of Lightpainting to the grass for a total exposure time of 10 seconds.
NOTE: This Lightpainting dispels the myth that Lightpainting (or painting with light) must be done in a 100% dark environment. This Lightpainting was not made in a dark room. I simply set the ball in the grass under a tree near the first tee at Augusta National at about 6:00 AM as the sun was just illuminating the sky. I made several images for about 15 minutes before I nailed it with a tiny spot light on the Masters logo. The image was a nice addition to Golf Digest’s 2004 Masters coverage. ![]()
Well, I hope you have enjoyed this macro Lightpainting lesson. By now you should be ready to secure your camera to a tripod, grab your Stylus penlight flashlight, turn out the room lights, and begin making your own Lightpaintings. If you haven’t read last month’s article Lightpainting Part 1: The Basics let me encourage you to do so. There you will find step-by-step basic explanations of how I approach Lightpainting. I hope you will join me next month here on Workshop at the Ranch when we expand our knowledge and learn how to Lightpaint the Table-Top size subjects.
See you on Instagram: @daveblackphoto … Adios. Dave
Penlights, Flashlights and Spotlights I use for Lightpainting:


