 Hi and welcome to this edition of Workshop at the Ranch. Last month I posted an article about a workshop that I had taught in Arches, Utah. I included an image of the famous Balanced Rock that I lightpainted, and eventually conducted a lightpainting class for the workshop at that location. Many of you emailed me through my website and asked to learn more about lightpainting. Past issues of WATR (January 2003 and December 2004) have addressed this technique, but for those who are new to the WATR and for those that enjoy lightpainting, here is another tutorial on LIGHTPAINTING…..
Hi and welcome to this edition of Workshop at the Ranch. Last month I posted an article about a workshop that I had taught in Arches, Utah. I included an image of the famous Balanced Rock that I lightpainted, and eventually conducted a lightpainting class for the workshop at that location. Many of you emailed me through my website and asked to learn more about lightpainting. Past issues of WATR (January 2003 and December 2004) have addressed this technique, but for those who are new to the WATR and for those that enjoy lightpainting, here is another tutorial on LIGHTPAINTING…..
|
 Image #1 START SMALL … My suggestion is to start small and learn the basics before you tackle a large scale lightpainting with a model or giant outdoor landscape. The text for this image will act as our basic set up for lightpainting. A dark environment is needed so as to allow a long exposure which allows enough time to lightpaint. As with all lightpaintings I use a Tripod, usually a Gitzo carbon fiber tripod with a SLIK Super Ball Head and Kirk L Bracket to hold the camera motionless. I will set the camera on Self Timer. The self timer provides enough time, as much as 30 seconds, should I need to walk to the subject before the shutter opens. I will need to Pre Focus on my subject (the golf ball) and then turn off the auto focus so that when the shutter is tripped the auto focus won’t be searching in the dark while I am lightpainting. I will use a long exposure. How long? ….. Well, long enough to have enough time to lightpaint my subject and sometimes the entire scene. In the case of this golf ball, 2 seconds on the Masters logo, 3 seconds on the ball and 5 seconds on the grass, a total of 10 seconds of exposure time….in the case of something really big, a barn for example, 1 or 2 minutes might be needed. It all depends on how fast and how efficient you are at lightpainting. I will use the lowest ISO I can, 100 or 200 depending on your camera. I choose a White Balance …in this case Cloudy. I must turn on the Long Exposure Noise Reduction mode in my camera to prevent any noise build up in the image. For this image I used a Nikon 70-200mm VR Lens and a TC 14E 1.4 Teleconverter Zoomed to 200mm to create a small depth of field (a macro lens is also very useful). This shallow depth of field helps to concentrate my viewer’s eye on the Masters logo and not the grass. Now I am ready to determine the aperture and my exposure. For this image I want a dark environment so I can “REVEAL” the ball and grass with lightpainting. I do not want any ambient light to illuminate any part of this picture. I determine the exposure with the in camera meter, … An aperture of f2.8 at ISO200 with a 10 second exposure time would allow some ambient light in the scene, but I want it dark so I under expose by 3 stops …f8. I Take a shot and Take a look at the LED screen and I see that I have a picture that is completely DARK. Now the fun part. I want the Masters logo to be the main focus of attention. I will draw attention to it by adding a little light from a small pen light called a Stream Light Stylus. I found my Stream Light Stylus at a Batteries Plus store but I have seen them sold in automotive and hardware stores as well. I press the shutter …the self timer begins to count down 5, 4, 3, 2, 1, CLICK, the shutter opens (I am very close so I needed only a 5 second self timer setting to get myself ready to lightpaint) …I point the Stream Light at the Masters Logo about 5 inches away and turn it on for 2 seconds, then I pull the Stream Light back to 12 inches away from the ball and add 3 more seconds on the entire golf ball, I then moved the Stream Light to the side and revealed the grass with 5 seconds of light from about 12 inches away …CLICK, the shutter closes and my 10 second exposure is complete. The 2 seconds of light on the logo “Reveals” the logo perfectly while the additional 3 seconds on the ball reveal it a little less intensly as I pulled the Stream Light back from 5 inches to 12 inches from the ball (farther away means less light intensity). The 5 seconds of light from the Stream Light reveals some grass detail. I try and move the Stream Light (or any light source) in a swirling motion so as to feather the light on the subject (logo and ball) rather than holding the Stream Light still which results in over exposing and creates a hot spot. I will make 10 or so lightpaintings until I get the desired lighting effect and intensity I want. By lightpainting small objects you can easily become comfortable with the basic concept of lightpainting. Image #1 START SMALL … My suggestion is to start small and learn the basics before you tackle a large scale lightpainting with a model or giant outdoor landscape. The text for this image will act as our basic set up for lightpainting. A dark environment is needed so as to allow a long exposure which allows enough time to lightpaint. As with all lightpaintings I use a Tripod, usually a Gitzo carbon fiber tripod with a SLIK Super Ball Head and Kirk L Bracket to hold the camera motionless. I will set the camera on Self Timer. The self timer provides enough time, as much as 30 seconds, should I need to walk to the subject before the shutter opens. I will need to Pre Focus on my subject (the golf ball) and then turn off the auto focus so that when the shutter is tripped the auto focus won’t be searching in the dark while I am lightpainting. I will use a long exposure. How long? ….. Well, long enough to have enough time to lightpaint my subject and sometimes the entire scene. In the case of this golf ball, 2 seconds on the Masters logo, 3 seconds on the ball and 5 seconds on the grass, a total of 10 seconds of exposure time….in the case of something really big, a barn for example, 1 or 2 minutes might be needed. It all depends on how fast and how efficient you are at lightpainting. I will use the lowest ISO I can, 100 or 200 depending on your camera. I choose a White Balance …in this case Cloudy. I must turn on the Long Exposure Noise Reduction mode in my camera to prevent any noise build up in the image. For this image I used a Nikon 70-200mm VR Lens and a TC 14E 1.4 Teleconverter Zoomed to 200mm to create a small depth of field (a macro lens is also very useful). This shallow depth of field helps to concentrate my viewer’s eye on the Masters logo and not the grass. Now I am ready to determine the aperture and my exposure. For this image I want a dark environment so I can “REVEAL” the ball and grass with lightpainting. I do not want any ambient light to illuminate any part of this picture. I determine the exposure with the in camera meter, … An aperture of f2.8 at ISO200 with a 10 second exposure time would allow some ambient light in the scene, but I want it dark so I under expose by 3 stops …f8. I Take a shot and Take a look at the LED screen and I see that I have a picture that is completely DARK. Now the fun part. I want the Masters logo to be the main focus of attention. I will draw attention to it by adding a little light from a small pen light called a Stream Light Stylus. I found my Stream Light Stylus at a Batteries Plus store but I have seen them sold in automotive and hardware stores as well. I press the shutter …the self timer begins to count down 5, 4, 3, 2, 1, CLICK, the shutter opens (I am very close so I needed only a 5 second self timer setting to get myself ready to lightpaint) …I point the Stream Light at the Masters Logo about 5 inches away and turn it on for 2 seconds, then I pull the Stream Light back to 12 inches away from the ball and add 3 more seconds on the entire golf ball, I then moved the Stream Light to the side and revealed the grass with 5 seconds of light from about 12 inches away …CLICK, the shutter closes and my 10 second exposure is complete. The 2 seconds of light on the logo “Reveals” the logo perfectly while the additional 3 seconds on the ball reveal it a little less intensly as I pulled the Stream Light back from 5 inches to 12 inches from the ball (farther away means less light intensity). The 5 seconds of light from the Stream Light reveals some grass detail. I try and move the Stream Light (or any light source) in a swirling motion so as to feather the light on the subject (logo and ball) rather than holding the Stream Light still which results in over exposing and creates a hot spot. I will make 10 or so lightpaintings until I get the desired lighting effect and intensity I want. By lightpainting small objects you can easily become comfortable with the basic concept of lightpainting.
|
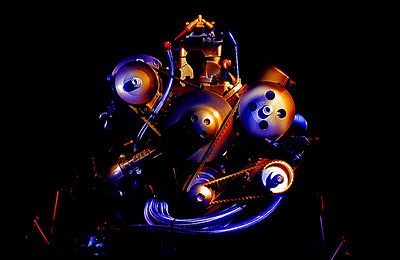
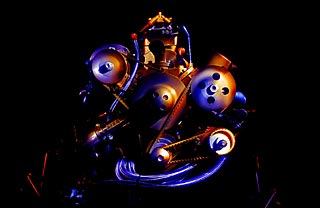
 Image #2 A LITTLE BIGGER … After doing several different small lightpaintings, try something a little bigger. Here is Jeff Gordon’s NASCAR engine. All the same basics from image #1 will apply. Make sure you have a dark environment to shoot in. Secure the camera with a tripod. Set the Self Timer based on how long it might take you to press the shutter and be ready to lightpaint. Pre Focus on the subject and then turn off the auto focus so your lens won’t be auto focus searching in the dark. Use a Low ISO. Choose a WB … I chose Shade (or 10,000K) to add some extra golden warmth to the engine. Turn on Long Exposure Noise Reduction mode in the camera. Decide how long you will need to lightpaint …in this case, 30 seconds. Now choose the aperture …in this case I am in a completely dark room, I want a large depth of field so I can have all the parts of the engine in focus ….so I chose f11. I take a shot and take a look, …yes, perfectly dark. The only thing that will be illuminated is what I choose to REVEAL from the darkness with lightpainting. I used a small MAG LIGHT for this image. I placed a blue gel over the front of the Mag Light to illuminate certain parts of the engine with a blue color while other parts of the engine used no gel at all and allowed the warm WB to warm-up those engine parts. I also wore dark clothing and I am actually standing in the picture next to the engine during the 30 second exposure. As long as I don’t illuminate myself I will not be visible in the picture. This closeness to my subject allows me to lightpaint many details of the engine. I have wrapped a small piece of black tape around the end of the Mag Light that extends about 1 inch beyond the front element to act as a “SNOOT” so the front element of the Mag Light is not visible in the picture. If you don’t make a small snoot you will probably see light streaks in the picture of the Mag Light itself. I also keep the Mag Light in constant motion while I lightpaint. If I hold the Mag Light still there will usually be an overexposed area or “hot spot” in the picture. A swirling motion while painting your subject helps to produce a smooth “painterly” effect with no hot spots. I made 25 frames of Jeff’s engine and examined each image on the LED screen in order to make corrections and improve with each attempt. Several were good but this one was the best combination of Blues and Golds, Lights and Darks with smooth transitions and modeling of light around the engine parts. Image #2 A LITTLE BIGGER … After doing several different small lightpaintings, try something a little bigger. Here is Jeff Gordon’s NASCAR engine. All the same basics from image #1 will apply. Make sure you have a dark environment to shoot in. Secure the camera with a tripod. Set the Self Timer based on how long it might take you to press the shutter and be ready to lightpaint. Pre Focus on the subject and then turn off the auto focus so your lens won’t be auto focus searching in the dark. Use a Low ISO. Choose a WB … I chose Shade (or 10,000K) to add some extra golden warmth to the engine. Turn on Long Exposure Noise Reduction mode in the camera. Decide how long you will need to lightpaint …in this case, 30 seconds. Now choose the aperture …in this case I am in a completely dark room, I want a large depth of field so I can have all the parts of the engine in focus ….so I chose f11. I take a shot and take a look, …yes, perfectly dark. The only thing that will be illuminated is what I choose to REVEAL from the darkness with lightpainting. I used a small MAG LIGHT for this image. I placed a blue gel over the front of the Mag Light to illuminate certain parts of the engine with a blue color while other parts of the engine used no gel at all and allowed the warm WB to warm-up those engine parts. I also wore dark clothing and I am actually standing in the picture next to the engine during the 30 second exposure. As long as I don’t illuminate myself I will not be visible in the picture. This closeness to my subject allows me to lightpaint many details of the engine. I have wrapped a small piece of black tape around the end of the Mag Light that extends about 1 inch beyond the front element to act as a “SNOOT” so the front element of the Mag Light is not visible in the picture. If you don’t make a small snoot you will probably see light streaks in the picture of the Mag Light itself. I also keep the Mag Light in constant motion while I lightpaint. If I hold the Mag Light still there will usually be an overexposed area or “hot spot” in the picture. A swirling motion while painting your subject helps to produce a smooth “painterly” effect with no hot spots. I made 25 frames of Jeff’s engine and examined each image on the LED screen in order to make corrections and improve with each attempt. Several were good but this one was the best combination of Blues and Golds, Lights and Darks with smooth transitions and modeling of light around the engine parts. |
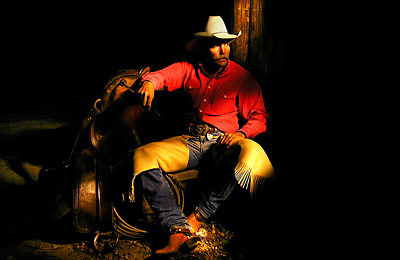
 Image #3 BIGGER YET … Image #3 BIGGER YET … After becoming efficient at that size of subject, now move on to something bigger yet, a real live person. By now the basics are becoming second nature to you ……….Darkness, Tripod, Self Timer, Pre Focus, Turn Off Auto Focus, Low ISO, Choose a WB, Turn on Long Exposure Noise Reduction, Choose a Shutter Speed (how long will it take you to lightpaint the subject), Choose the Aperture (depending on whether you want any of your subject visible with ambient light or a completely dark background) …in this image I wanted a perfectly dark background. This was my choice …I wanted the cowboy to be Revealed only with lightpainting from a black background so as to convey a very dramatic and oil painting quality. Remember to keep the light in constant motion, both on your subject and a swirling motion of the flash light itself to prevent any hot spots. I used a medium sized Mag Light for this image, but there are many flashlights on the market to choose from. Recently I find myself using the INOVA brand. INOVA makes several sizes of LED flashlights. I like the INOVA X03 and X5 for the “Life Size” full body portrait lightpaintings. Remember to make a snoot so you can work close to the subject and not see the front element of the flashlight.
|
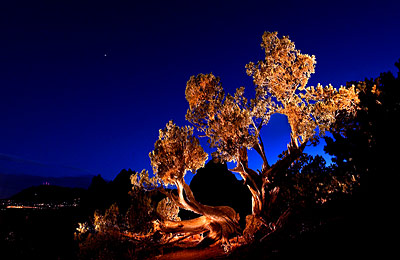
 Image #4 B I G G E R … So far I have been revealing subjects from a dark environment and dark background, but that is now going to change. This time I want to see my background …the sky … about 45 minutes after sunset. All the same basics apply …with the exception of complete darkness. In this image I only made sure I had darkness on my subject but not my background …. can you say SILHOUETTE? ….. sure you can! I exposed for the sky and allowed my subject to be in silhouette. OK, you know the drill …. Tripod, Self Timer …(for this image 30 seconds would be required for me to press the shutter and walk over to the Juniper Tree before the shutter opened and I could begin lightpainting), Pre Focus, Turn Off Auto Focus, Low ISO, Choose WB (in this image a cool WB of 3600K or Fluorescent will help really blue the sky), Turn on Long Exposure Noise Reduction, Choose Shutter Speed (how long to paint …30 seconds for this image), Choose the Aperture …in this case determine your aperture by exposing for the background (sky) …and you can do that by Take a Shot – Take a Look …(this image was f11). The bigger subject required a bigger light. I Revealed the tree using a 2 Million Candle VECTOR SPORT SPOTLIGHT. There are several brands so don’t worry if you can’t find a Vector Sport Spotlight. The important requirement is 2 MILLION CANDLES. Anything less is not enough …….. anything more seems to be too big to hand hold and difficult swirl around for a soft lighting effect. This exposure of the sky (ISO200, 30 seconds Shutter Speed and f11) also revealed a few stars in the night sky. I do not make a snoot for a light this big. I use a 20 degree Grid and simply place the grid over the front element of my spot light. I also lightpainted the tree from both sides off camera and even while laying down behind the tree. This way the light would not be seen in the picture. It’s fun and good exercise. Image #4 B I G G E R … So far I have been revealing subjects from a dark environment and dark background, but that is now going to change. This time I want to see my background …the sky … about 45 minutes after sunset. All the same basics apply …with the exception of complete darkness. In this image I only made sure I had darkness on my subject but not my background …. can you say SILHOUETTE? ….. sure you can! I exposed for the sky and allowed my subject to be in silhouette. OK, you know the drill …. Tripod, Self Timer …(for this image 30 seconds would be required for me to press the shutter and walk over to the Juniper Tree before the shutter opened and I could begin lightpainting), Pre Focus, Turn Off Auto Focus, Low ISO, Choose WB (in this image a cool WB of 3600K or Fluorescent will help really blue the sky), Turn on Long Exposure Noise Reduction, Choose Shutter Speed (how long to paint …30 seconds for this image), Choose the Aperture …in this case determine your aperture by exposing for the background (sky) …and you can do that by Take a Shot – Take a Look …(this image was f11). The bigger subject required a bigger light. I Revealed the tree using a 2 Million Candle VECTOR SPORT SPOTLIGHT. There are several brands so don’t worry if you can’t find a Vector Sport Spotlight. The important requirement is 2 MILLION CANDLES. Anything less is not enough …….. anything more seems to be too big to hand hold and difficult swirl around for a soft lighting effect. This exposure of the sky (ISO200, 30 seconds Shutter Speed and f11) also revealed a few stars in the night sky. I do not make a snoot for a light this big. I use a 20 degree Grid and simply place the grid over the front element of my spot light. I also lightpainted the tree from both sides off camera and even while laying down behind the tree. This way the light would not be seen in the picture. It’s fun and good exercise.
|
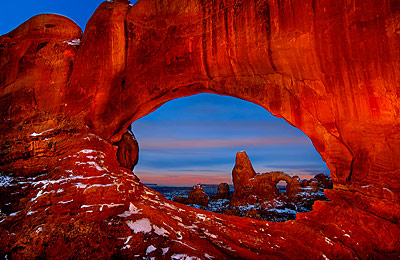
 Image #5 NOW GET CREATIVE … All the same basics apply throughout all these lightpaintings. For this image I used two of the Vector Sport Spotlights each with 2 Million Candles. I exposed for the pre dawn sky which left the subjects (North Window and Turret Arch) in Silhouette. I aimed both lights at Turret Arch. I did not aim my lights at the North Window Arch but directly through the window itself. The spill from the two spotlights was enough to reveal the famous North Window Arch from silhouette against the sky. The combination of the two Vector Sport Spotlights was just enough to reveal the Turret Arch over a 1/4 mile away. Now That’s Power! Nikon D2X, ISO100, 1 Minute Shutter Speed, f5.6, WB 6000K, Nikon 17-55mm Lens, Gitzo Tripod, Slik Super Ball Head, Kirk L Bracket, Nikon MC-20 Electronic Shutter Release, Lexar 4G Flash Card. This is the only image that worked that morning. It took longer than expected to climb into a location to shoot through the North Window Arch (remember, it was before sunrise and very dark, plus there was some ice and snow on the cliffs). I had pre set my exposure for the sky while I was walking from the truck to the location by “taking a shot and taking a look” while on the move along the trail. As soon as my feet landed on the final cliff I instantly extended the tripod legs, focused / turned auto focus off, pulled out my two spot lights and pressed the MC-20 button and blasted the Turret Arch through the North Window Arch. By the time I was prepared for my second shot the sky had already gained too much light. It had lost the deep blue look and the streaky clouds behind Turret Arch had vanished. Image #5 NOW GET CREATIVE … All the same basics apply throughout all these lightpaintings. For this image I used two of the Vector Sport Spotlights each with 2 Million Candles. I exposed for the pre dawn sky which left the subjects (North Window and Turret Arch) in Silhouette. I aimed both lights at Turret Arch. I did not aim my lights at the North Window Arch but directly through the window itself. The spill from the two spotlights was enough to reveal the famous North Window Arch from silhouette against the sky. The combination of the two Vector Sport Spotlights was just enough to reveal the Turret Arch over a 1/4 mile away. Now That’s Power! Nikon D2X, ISO100, 1 Minute Shutter Speed, f5.6, WB 6000K, Nikon 17-55mm Lens, Gitzo Tripod, Slik Super Ball Head, Kirk L Bracket, Nikon MC-20 Electronic Shutter Release, Lexar 4G Flash Card. This is the only image that worked that morning. It took longer than expected to climb into a location to shoot through the North Window Arch (remember, it was before sunrise and very dark, plus there was some ice and snow on the cliffs). I had pre set my exposure for the sky while I was walking from the truck to the location by “taking a shot and taking a look” while on the move along the trail. As soon as my feet landed on the final cliff I instantly extended the tripod legs, focused / turned auto focus off, pulled out my two spot lights and pressed the MC-20 button and blasted the Turret Arch through the North Window Arch. By the time I was prepared for my second shot the sky had already gained too much light. It had lost the deep blue look and the streaky clouds behind Turret Arch had vanished. |
Some common mistakes of first time lightpainters are: Forgetting to turn off the auto focus. Standing next to the camera to lightpaint (get yourself off to the sides of the subject while lightpainting for a more dramatic lighting effect.) Forgetting to turn on the Long Exposure Noise Reduction. Being rushed to lightpaint (if you need more than 30 seconds of exposure time buy an electric shutter release like a Nikon MC-20). And my personal favorite …not having any power left in your flashlight when you are finished for the night and you can’t find your way back to your vehicle in pitch darkness. Keep a spare Mag Light in your pocket or use a head lamp.
Well,…..I hope you have enjoyed this session and are ready to make some lightpaintings of your own. It’s fun and produces an interesting and stylish image. Remember, start small and work your way up to bigger and more complex subjects.
See you next time here at Workshop at the Ranch ……………….Adios. Dave
![]() Hi and welcome to this edition of Workshop at the Ranch. Last month I posted an article about a workshop that I had taught in Arches, Utah. I included an image of the famous Balanced Rock that I lightpainted, and eventually conducted a lightpainting class for the workshop at that location. Many of you emailed me through my website and asked to learn more about lightpainting. Past issues of WATR (January 2003 and December 2004) have addressed this technique, but for those who are new to the WATR and for those that enjoy lightpainting, here is another tutorial on LIGHTPAINTING…..
Hi and welcome to this edition of Workshop at the Ranch. Last month I posted an article about a workshop that I had taught in Arches, Utah. I included an image of the famous Balanced Rock that I lightpainted, and eventually conducted a lightpainting class for the workshop at that location. Many of you emailed me through my website and asked to learn more about lightpainting. Past issues of WATR (January 2003 and December 2004) have addressed this technique, but for those who are new to the WATR and for those that enjoy lightpainting, here is another tutorial on LIGHTPAINTING….. 

