2019 January WATR… Images and Backstories

Hi and welcome to the January 2019 edition of my Instructional BLOG – Workshop at the Ranch. Every Monday, Wednesday and Friday on my Instagram @daveblackphoto I post a photo and backstory of how the image was made. Here are some examples of IG posts that hit the mark with photographers wanting to learn something new. Thanks for FOLLOWING me on IG: @daveblackphoto
NOTE: Checkout my: 2019 Workshops Calendar to see when and where I will be teaching a workshop or seminar that you might be interested in: https://daveblackphotography.com/upcoming-workshops/
![]()
2019 Workshops Calendar:
May 29, 2019 … Photoshop World Pre-Conference SPORTS ACTION SHOOTING Workshop ( venue TBD ) Orlando, FL. www.photoshopworld.com
May 30-31, 2019 … Photoshop World Conference in Orlando, FL. www.photoshopworld.com
June 19-20, 2019 … UPPA University Professional Photographers Association Workshop in Grand Valley State Univ. MI. http://www.upaa.org/content/2019-symposium
June 20-23, 2019 … Summit LIGHTING Workshop in Denver, CO. www.photographyatthesummit.com
July 10-15, 2019 … Summit SPORTS Denver Workshop in Denver, CO. www.photographyatthesummit.com
August 20, 2019 … Photoshop World Pre-Conference LIGHTPAINTING Workshop in Las Vegas, NV. www.photoshopworld.com
August 21-23, 2019 … Photoshop World Conference in Las Vegas, NV. www.photoshopworld.com
September 14-19, 2019 … Summit ADVENTURE Workshop in Jackson Hole, WY. www.photographyatthesummit.com
September 22-27, 2019 … Summit NATURE Workshop in Jackson Hole, WY. www.photographyatthesummit.com
November 7-10, 2019 … Summit SPORTS California Workshop in LA – Thousand Oaks, CA. www.photographyatthesummit.com![]()
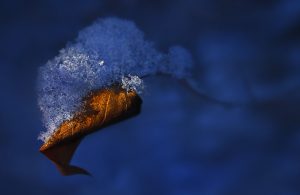
Image 1 “Last Lilac” … #NikonZ7, ISO2000, 1/500 at f5, NIKKOR Z 24-70mm lens, WB 4000K, Pinpoint AF, … Lightpainting.
I woke-up at 5:30AM, way early before the sunrise of which there wouldn’t be one … it was snowing.
The world always feels so “still” when I go out looking for a picture as a fluffy Colorado snow continues to fall and softly accumulate light cotton candy.
No tripod, just me walking around searching for a “turn-of-the-season” subject. Seemed simple enough, but the storm that moved through during the night removed all the leaves with a gust … except a Lilac bush where there was one lone leaf still hanging on.
I set my #NikonZ7 mirrorless camera to a cool Blue WB 4000K so as to make the frigid morning feel even colder for the lonely little leaf.
I then set the Z7 Auto Focus on something new … “Pinpoint AF”
Pinpoint AF is perfect for Macro work and for imagery where the subject has a small select detail point of interest within the frame, especially when a shallow depth-of-field is being used.
The single “Pinpoint” AF point is much smaller the a Single AF point and makes focusing much easier on a single snow flake that has caught a glimmer of light from my small LED penlight (with half CTO warming gel) while Lightpainting.
As the snow continued to gently settle onto the final leaf of Autumn there was a slight whisper of a breeze causing the leaf to move, but the Pinpoint AF did a great job of staying focused, especially in the low light predawn overcast.
I “worked” the subject/scene for nearly 45 minutes. Picture after picture, adding Light here and there as the subject bobbed around in the breeze defying winter’s arrival.
Difficult work to be sure, but I was content within my quiet mental mindset.
Could there be a better morning, I thought … maybe tomorrow, but that’s the beauty of being a photographer. As for this morning I am satisfied and savored the short time we had together … just me and the “Last Lilac” @nikonusa@nikonambassadors #nikonnofilter#nikonambassador #nikonz7
![]()
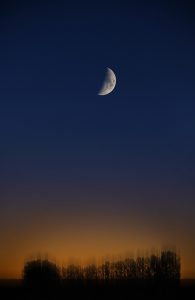
 Image 2 “Autumn Moon” … #NikonZ7, (Pre-Sunrise image: ISO500, 1/100 at f5.3, NIKKOR 80-400mm [at200mm] WB 8000K) … #NikonZ7, (Moon image: ISO1000, 1/1250 at f5.6, NIKKOR 80-400mm f4.5-5.6 [at 400mm] WB 5000K) … 2 separate images combined with the Z7 in-camera Image Overlay process.
The NEW Nikon Z7 camera offers plenty of new mirrorless technology and improved file quality, but here’s a couple of useful and fun ways to make multiple exposures that I really like.
I’m especially enjoying the Z7 in-camera Multiple Exposure mode where the first image of a Double Exposure is displayed in the EVF (Electronic View Finder) as a augmented reality where you see the first image, AND at the same time you see the next image that is about to be made. This makes it easy to compose the Double Exposure perfectly … WAY COOL !
This image of the Autumn Moon and the Pre-Sunrise image made the following morning were combined in-camera to make one image in “Image Overlay” (found in the Retouch menu.)
The in-camera Image Overlay process allows you select any image on the card and combine it with another image on the same card to make one combined image: a.k.a double exposure. AND, the exposure of each individual image can be increased or decreased prior to the overlay process so that the final image is exposed just the way you want it.
I photographed the moon at 1/1000 at 9:00PM on Tuesday and then I photographed the 6:20AM Pre-Sunrise on Wednesday morning at 1/100, and purposely “panned” vertically while making the image to create some sharp trees yet have some blurred motion … (just for something different)
I then brought the two separate images into “Image Overlay” … adjusted the exposures of each image to combine into one correct exposure … press “OK” and Voila’ … a Double Exposure made from 2 separate images shot on separate days … Brilliant!! #mirrorlessreinvented.
@nikonusa @nikonambassadors#nikonnofilter #nikonambassador![]()
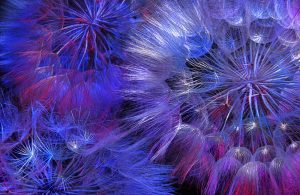
 Image 3 “Dandelion Color” … Nikon D850, ISO400, 3 minute exposure at f22, NIKKOR 24-70mm f2.8 (at 50mm with a 36mm Lens Extension Tube) WB 5000K.
Here’s how I approach making many of my Macro Lightpaintings:
BASE EXPOSURE: My base starting exposure for Lightpainting is: ISO500, 30 seconds at f8 for most of my small and human size Lightpaintings. That being said, previous experience told me that Macro work is so detailed that 3 minutes would give me time to “think” and be “precise” when applying the light.
STEP 1. The Prep: This image of Dandelions is made in my home, my D850 is on a tripod and my 24-70mm lens has a 38mm extension tube which allows me to make Macro imagery. I pre-focused the lens before turning OFF the room lights … it is VERY dark.
STEP 2. My Lightpainting Gear: I use a Stylus LED penlight because for many of my Lightpaintings because it has its own Snoot … see link to Dave’s Gear page: https://daveblackphotography.com/daves-gear/ … I will use 3 penlights: white, red and blue LEDs to Lightpaint the Dandelion.
STEP 3. OFF-Camera Lightpainting: As with all my Lightpaintings I will position myself with my “Light Source” (the penlight) about 90 degrees OFF-Camera. I carefully aim the penlight at the area of the subject that I want to illuminate, it is 2-3 inches away from the fluffy white ball called the capitulum/cypsela/calyx tissue.
STEP 4. Apply Lightpainting: I tend to keep the penlight moving in a circular or brushing motion to “feather” the transition edge between light & shadow or between color to color. This “feathering” is what gives Lightpainting its “painterly” appearance rather than a hard edge flashed look.
NOTE: Adjusting exposure is determined by: how close or far … and length of time the penlight is in relation to the subject … BEST SOLUTION is Trial & Error.
STEP 5. Get Creative: I will add light from a variety of Off-Camera angles, alternating the 3 penlights to blend and create. I examine the LCD after each picture so as to determine if more light or less light is needed. @nikonusa#nikonambassador
Well, I hope that you enjoyed these Images and Backstories of how they were made. I encourage all photographers to break out of the usual genre they are accustomed to and “Experiment” with various techniques and lighting styles. … you never know what you might connect with and develop into a new passion.
Come by my Instagram @daveblackphoto each week to learn something new about photography. I’ll see you next time here on Workshop at the Ranch.
Adios. Dave


