2016 October WATR … SHORT CUTS with Nikon SB-5000 Set-Up in TTL and Manual Power Modes.
 Welcome to this edition of Workshop at the Ranch (WATR.) This article contains ALL MY Notebook SHORT CUTS for the Nikon SB-5000 Setup & Pairing, and an AWESOME D5 & D500 Custom Settings short cut to the Group Flash Options menu and a super SHORT CUT to adjusting TTL flash power … all these Short Cuts in one article.
![]()
As I mentioned in July’s WATR article … first READ your Nikon MANUAL, it is well written … THEN read my “Notebook” Short Cuts … and THEN come see me teach on HSS action lighting at the Nikon School Theater during Photo Plus EXPO 2016 … Jacob Javits Center in New York City Oct. 21-23, 2016.
OK … Here are all my Notebook short cuts in one article … hope you all find them helpful.
SETTING UP the WR-R10 (buy the WR-10 A …product #27106 … it’s a 3 piece kit containing everything you need and more)
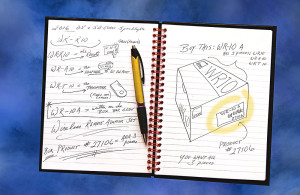 Image #1 My Notebook … To trigger the SB-5000 using Wireless Radio Control you’ll will need to buy the WR-10 A: product #27106. Inside the box, which says WR10 on the cover of the box, but try asking for WR-10 A and the product #27106 …this WR10 box contains 3 items:
- WR-R10 … the Wireless Remote: this connects directly to the side port of the camera and is basically all that is needed to trigger the SB-5000 Speedlight, but I do not like it connected to the side of the camera, so I connect my WR-R10 to the WR-A10.
- WR-A10 … the Wireless Remote Adaptor: with the WR-R10 connected to the WR-A10) this unit connects to the 10 pin port on the front of the camera, which I like because it’s up front on the camera and out of the way.
- WR-T10 … this is the Wireless Remote Transmitter that remotely triggers the camera. It is not needed for the operation of triggering the SB-5000 Speedlight, but you now own it because all 3 pieces come in the same WR-10 A box product #27106.
![]()
 Image #2 Autumn Riders … Nikon D5, ISO200, 1/6 at f20, NEW Nikon 24-70mm VR lens, WB 6250K, WR-R10, 2 Nikon SB-5000 Speedlights with Radio Control, XQD Card.
The Nikon SB-5000 Speedlight with Radio Control allows the photographer to accomplish lighting on location easier than ever. In this image I used 2 SB-5000 Speedlights and zoomed them to 200mm in order to concentrate light on each of my athletes riding through the fall colors.
The SB-5000 performed perfectly at located 100 feet from my D5 and even when placed behind a large tree trunk. Communication between the D5 (or D500) and the SB-5000 Speedlight remained consistent. Using a slow shutter speed of 1/6 of a second and rear curtain sync is one of my favorite shooting-flash combinations for Pan-Action.
SETTING UP the Nikon SB-5000 Speedlight and Pairing it to the D5 and D500 camera.
![]()
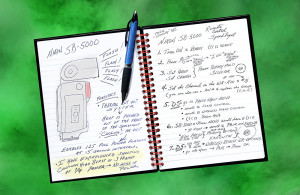 Image #3 My Notebook … As mentioned, the Manual is well written for setting up the SB-5000 and “Pairing” it with the D5 and D500 cameras.
If the Manual still baffles you regarding setting up your SB-5000 and “Pairing” it to your D5 and D500, these pages from my Notebook might help as a “Quick Guide” to get you up and running.
NOTE: I start by turning the Stand-by Mode “OFF” … it just keeps going to stand-by (asleep) while I’m trying to read the directions.
- Turn the SB-5000 Speedlight “ON” to Remote
- Press the Wireless Setting Button and select REMOTE/RADIO
- Select your Group (use Multi Selector Wheel…there are 6 groups available: A-F)
Select your Channel (use Multi Selector Wheel…there are 3 channels available 5, 10, and 15)
- Set the Channel on the WR-R10 to match the Channel on the SB-5000
- Grab your D5 or D500 and GO to:
PHOTO SHOOT MENU
Scroll to FLASH CONTROL
Scroll to WIRELESS FLASH CONTROL
Highlight: RADIO AWL
- Grab your SB-5000 and Press MENU
Get into the MENU and scroll to PAIR and EXECUTE
Now Press the Pairing button on the WR-W10 and Press the Speedlight Multi Selector Wheel “OK” button at the same time … (red lights blink and then the Green light on the top of the WR-R10 becomes GREEN” and the SB-5000 display reads “Pairing Complete”
- Go to the D5 (or D500) SETUP MENU and scroll to Wireless Remote (WR) Option … Go into that Menu to Pair and Press the camera’s “OK” button … camera and Speedlight are now “Paired”
BIG NOTE: The NEW SB-5000 Speedlight’s Thermal Cut Out System enables you to shoot as many as 125 FULL POWER continuous frames/flashes at 5 second intervals.
BIGGER NOTE: Occasionally with my D5 and D500 I have made bursts of 3 frames while shooting in Continuous High fps with the SB-5000 at 1/4 Power. I see very little decrease in illumination of my subject throughout each of the 3 consecutive frames.
BIGGEST NOTE: Hard for me to 100% recommend this, but I don’t see any approval (or disapproval) written in the User’s Manual regarding pushing the Speedlight to the max by making 3 consecutive “flash” frames. I do this only occasionally, but I will say that it is working fine for me.
![]()
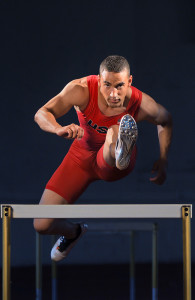 Image #4 Decathlete … Nikon D500, ISO4000, 1/2000 at f6.3, Nikon 80-400mm G VR lens, WB 3030K, and 6 SB-5000 Speedlights with Radio Control (each with the Nikon Orange Warming Filter), XQD Card.
NOTE: The NEW Nikon SB-5000 Speedlight features 6 Groups, making precise power control of each Speedlight directly from the D5 and D500 cameras convenient (see Image #5: My Notebook for Short Cut to Group Flash Options MENU)
The D500 and its 20.9 mega pixel file looks fantastic! … and the high ISO4000 that I used for this image is super clean. Add in the Cropped Sensor with my 80-400mm G VR zoom lens, plus Nikon’s revolutionary AF system (same as the D5) and shooting fast Action SPORTS with “long glass” is now easier than ever.
High Speed Sync with the SB-5000 allowed me to use a very fast shutter speed of 1/2000 of a second to stop the action of this Decathlon Hurdles record holder.
NOTE: for High Speed Sync set your camera to 1/250 s (Auto FP) … it’s in the CUSTOM SETTINGS MENU: e. Bracketing/Flash … e1. Flash Sync Speed. With camera set to 1/250 s (Auto FP) the Speedlight is ready for High Speed Sync shooting.
SETTING UP the D5 and D500 Short Cut to Group Flash Options MENU (Short Cut to adjusting the MANUAL flash power up or down):
![]()
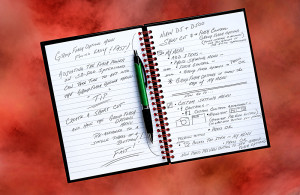 Image #5 My Notebook … This “Quick Guide” is one of my favorites and comes from great friend and Nikon Technical Master Mind, Lindsay Silverman: SHORT CUT to Menu that adjusts the flash power up and down!
Sometimes when I’m shooting I want to quickly adjust the power output of the Speedlights, but it takes too long for me to get into the Group Flash Options MENU to increase or decrease the power output of the Speedlight.
Here is a “Quick Guide” to re-assign a camera function button to instantly access the Group Flash Options Menu (Short Cut to adjusting the flash power up or down)
GO to:
- MY MENU
- ADD Items
- Scroll to Flash Control
- Scroll to Group Flash Options … PRESS OK and Group Flash Options appears at the top of MY MENU.
Now Go To:
- CUSTOM SETTINGS MENU
- f Controls
- f1 Custom Control Assignment … Highlight a function button: I chose PV (it’s the PreView button on the front of the camera, but you can choose the button you want) … PRESS OK
- Scroll to Access Top Item in MY MENU … Press OK
- Now simply PRESS the PreView button on the front of the camera and the Group Flash Options Menu will instantly appear, and you can now make adjustments to the power output of each Speedlight, or make changes to groups, etc. etc.
This “re-assigning” a function button (for me it’s the PreView button) makes adjusting power output of each Speedlight FAST and SIMPLE … no more scrolling through the long lists of menus to adjust the flash power.
![]()
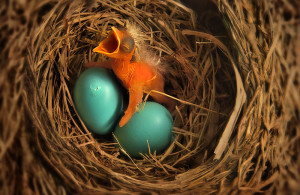 Image #6 Hello World … Nikon D5, ISO2000, 1/500 at f22, Nikon 28-300mm lens, WB 6250K, and 1 SB-5000 Speedlight with Radio Control, XQD Card.
Adjusting my single SB-5000 at a power output of 1/8 was easy via the re-assigned PreView button that now instantly takes me to the Group Flash Options MENU.
To illuminate the interior of the nest I simply bounced light off the white underside of the roof overhang above my backdoor to illuminate this new born Robin and sibling eggs as if I were in a studio.
Taking “light” with you everywhere gives inspires the creativity and freedom to make images that capture the attention of the viewer. The Nikon SB-5000 Speedlight Wireless Remote Control system makes beautiful studio lighting possible … start thinking where you might be able to use your Speedlights and “Light Up Your World.
SETTING UP a simple one step access to adjusting the TTL power output up or down … perfect for the Wedding and Event photographer.
![]()
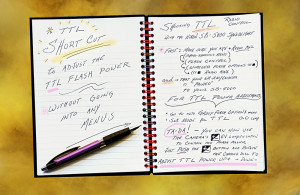 Image #7 My NOTEBOOK … This “Brilliant” SHORT CUT is not my own finding, but was told to me by fellow Nikon Ambassador Cliff Mautner (wedding photographer.) … a “Cliff Note” so to speak.
Thanks to Cliff’s short cut I used TTL on a recent commercial shoot with Jet Skiing … and it WORKED PERFECTLY !
My NOTEBOOK gives you Cliff’s TTL set-up in my layman’s breakdown of how to Adjust TTL Flash Power with the touch of a finger and a Roll of the camera’s Main Command Dial.
First: Make sure that your SB-5000 is Paired to your D5 or D500 camera.
Now: For instant TTL Flash Control:
- Go into Group Flash Options menu
- Set Mode for TTL …. 0.0 compensation is my TTL power setting
- Now simply press the cameras EV-+ Compensation button and at the same time rotate the Main Command dial with your thumb either + or – direction and TA-DA !! … your TTL Power Output increases or decreases as you rotate the Main Command Dial.
I can easily and instantly increase my Flash Power in 1/3 stop increments from 0.0 all the way to +5.0 …or … I can decrease the Flash Power all the way down to -5.0. and anywhere in between. All while continuing to look through the camera at my subject. …INCREADABLE!
![]()
 Image #8 Jet Ski Sundown … Nikon D5, ISO2500, 1/2000 at f8, Nikon 200-500mm G VR lens (at 500mm), WB 7140K, and 4 SB-5000 Speedlights with Radio Control in TTL mode, XQD Card.
My grateful thanks to fellow Nikon Ambassador Cliff Mautner for passing this simple SHORT CUT to adjusting TTL flash power. Just “press the EV button and rotate the Main Command Dial + or – … I never had to access the Group Flash Options menu, but simply pressed the EV button and turned the Main Command Dial on the camera to increase the flash power output … for this image I increased flash power to +5.0 for Maximum power to reach 85 feet to my Jet Skier.
Like everyone, I am still learning a great deal about the features of the Nikon SB-5000 Speedlight with Radio Control. This shoot involved a World Champion Jet Skier cutting turns at 55 mph while I used 4 SB-5000 Speedlights from a distance of 85 feet to my subject.
Because of my fast moving-erratic location of my subject I felt TTL would work with keeping the light from my 4 Speedlights consistent no matter where he was in the water in relation to my Speedlights.
This simple SHORT CUT to adjusting the power output of the SB-5000 Speedlight is so important for photographers shooting event coverage, weddings and receptions, and any moving subject where distance from Speedlight to subject changes.
THANKS again Cliff for passing this SHORT CUT tip along to me.
![]()
See you all at Photo Plus EXPO in the Nikon School Theater on October 21, 22, and 23, 2016 …and FOLLOW me on Instagram @daveblackphoto for photo tips and information about Workshops that I am teaching.
See you next month here on WATR. ….Adios. Dave


