2015 June WATR… Q&A and Behind the Scenes Video Debut
 Your Questions and My Answers keep on rolling in, along with the debut of my Behind the Scenes video by friend and photographer/filmmaker Keith Ladzinski is posted in Question #1 …so, come have a look.
![]()
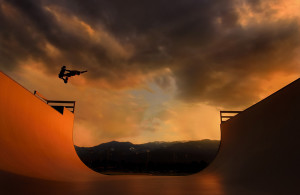
 Image #1 Sky Fall … Nikon D750, 1/2000 at f9, Nikon 28-300mm lens, WB 10,000K, SanDisk Extreme Pro Flash Card.
Q… Hey Dave, I really enjoyed seeing your Behind the Scenes video at the Summit Lighting Workshop in Denver last week. When will you post the video on your website? Great job teaching, everyone learned a lot.
Thanks. John
A… Perfect timing John, here it is:
I very much wanted to give my WATR readers a Behind the Scenes video of me working that was artistically beautiful, and would convey my passion for photography and my use of light.
I also felt strongly that to perfectly capture a vision of who I am, and how I approach to my craft would require bringing in a close friend who knows me well. And so this 3 minute Behind the Scenes video was made by Keith Ladzinski and 3 Strings Productions http://www.3stringspro.com/
3 Strings Productions is a full production media house and creative agency in Boulder, Colorado founded by Keith Ladzinski and Andy Mann. While Keith and I have known each other for many years, Andy was a new acquaintance …brilliant in his vision and expertise, and an absolute pleasure to work with.
The athlete in my Behind the Scenes video is X Games Skate Boarding Champion Jono Schwan www.jonosk8s.com Instagram: @jono_schwan
Jono is a remarkable athlete and amazing young man. I cannot remember any athlete during my career …Olympic, Professional, or otherwise, who worked harder for me on a photoshoot than Jono. If it is mathematically possible to give more than 100%, Jono set the mark well beyond it.
I hope that all of you enjoy this short BTS video. I’m very proud of the work that Keith, Andy and 3 Strings did for me.
Please sit back and enjoy: Dave Black – Behind the Scenes
![]()
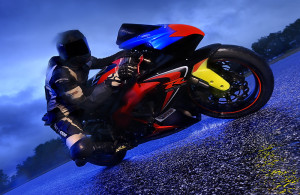
 Image #2 Knight Colors … Nikon D800, ISO1000, 3200 at f9 Nikon 14-24mm lens, WB 3030, Elinchrom Ranger RX Speed AS 1100ws power pack with Standard “S” Head and Sport Reflector, Full CTO Warming Gel, PocketWizard Flex TT5 Transmitter and ST4 Receiver in HyperSync mode, SanDisk 32G Extreme Pro Flash Card.
Q…Hi Dave,
Huge fan! Viewed your class on KelbyOne where you photographed sports action using of SB flashes, Quadra’s and Rangers. I shoot a D810 and have TT5s and Quadra S and A heads. I’ve researched endlessly online for the proper setup of the camera, pack, and PocketWizard, but just can’t seem to get the right combination. I still get the black banding on the images over 250 shutter speed.
Any help you could send my way would be greatly appreciated.
Thanks. Chris
A…Hi Chris.
Thanks for your question regarding my KelbyOne www.kelbyone.com video class 3 Ways to Light Up Sports Action.
While the PocketWizard FLEX TT5 system with HyperSync is a revolutionary advancement in the sports industry it can be a bit daunting on the technology side.
Lesson 13 in the video class speaks about the FLEX TT5 HyperSync system and the PocketWizard Utility Software. I didn’t address any “specifics” as to downloading the PocketWizard utility software because it continually changes with upgrades. What was current the day we made the video was changed only a few weeks later…and continues to change with each new camera and strobe system produced.
First, please make sure that your Nikon D810 camera is set to 1/250 AUTO FP. You can find this setting in the CUSTOM SETTINGS MENU …e. Bracketing and Flash … Flash Sync Speed. If you haven’t done this, it is likely the reason you are still seeing the “Black Banding” on the edge of the picture.
If your Nikon D810 is set to 1/250 Auto FP then we can move on to the PocketWizard Utility.
As mentioned on the video, you must use the PocketWizard Utility Software to calibrate your own FLEX TT5 to your own specific lighting system. There will be drop boxes and categories to match your FLEX TT5 to your Speedlights or Strobe lighting system. And this information seems to change (update) all the time. Perhaps the PocketWizard website can more specifically show you the most current system of options. http://www.pocketwizard.com/inspirations/tutorials/nikon_intro/?gclid=COLMlfmGv8UCFQcOaQodHJUAEg
The “black banding” indicates that the FLEX TT5 is not in “sync” with your camera and lighting system. If you are using the ST4 as the receiver on your Ranger or other power packs, that too needs to be calibrated using the PocketWizard Utility.
There are a lot of drop boxes and choices…match up your specific gear as best you can with the menus and make test shots. Everyone I have talked to, some of the best in the business regarding lighting, find that results vary quite a bit. Some lighting systems allow only 1/800 sec. sync capability, while other systems allow 1/4000 sync …some have slight black banding and others have no banding.
Keep in mind that when a new camera debuts, ex: the Nikon D810, it can take months for PocketWizard to develop and upgrade their Utility system to allow the new camera, or lighting system for that matter, to “sync” as a dedicated HyperSync system.
Not sure if all this helps you Chris…hope so. Adios. Dave
![]()
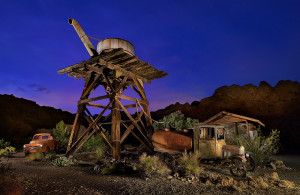
 Image #3 Sky Cast …Nikon D750, ISO250, 1/2500 at f6.3, Nikon 16-35mm G VR Zoom lens, WB 3030K, 4 Nikon SB-910 Speedlights each with a Warming Gel, RadioPopper Transmitter and Receiver system, Nikon SU-800 Commander, High Speed Sync, SanDisk 32G Flash Card.
Q… Hello
I am from Finland and I have look at your photos. Those are very good. And the colors are beatyfull. Do you use lightroom and photoshop?
I have photo-hoppyes. And I have one guestion. could you help me,give some good tips, what colors in photos and what situation I have to do in photos?
Jarmo/ Finland
A…Hi Jarmo. Glad to hear that you are enjoying my images on my website and portfolio pages. Sounds like you are asking what I’m doing in “post” to get my images so colorful and sharp.
Part of the reason my images look the way that they do is because I use off-camera lighting. I use Speedlights, and Strobes, and Lightpainting to make many of my images. Light and how a photographer uses it can make an image come alive with brilliance, color, contrast, and saturation.
This is not to say that Photoshop and Lightroom do not help photographers create beautiful images. These “powerful tools” are part of today’s image making equation. I just don’t care to spend a lot of time in post, I’d rather be out photographing more pictures. …and my photojournalism background holds strong in me and so I’m not skilled in much post work.
I’ve never used Lightroom (don’t know how) and I seldom use any Photoshop. I prefer to make adjustments using the in-camera settings prior to pressing the shutter. You can find these adjustments in the Nikon in-camera Picture Control menu.
Picture Control is found in the Photo Shooting Menu of many Nikon cameras.
Here are my settings for Picture Control:
I typically start by using the “Standard” setting in Picture Control. Within Standard is a collection of adjustment option slide bars. I can adjust several settings in-camera much the way I chose a particular film back before the digital revolution.
Each Adjustment slider defaults to “0” … this is the baseline. Slide the point to the Left decreases the adjustment. Slide the point to the Right increases the adjustment.
Here are my typical Picture Control “Standard” settings.
Sharpening: I decrease Sharpening -3 bars (see below: Regarding Sharpening)
Clarity: I increase Clarity +2 bars if the image has few shadow areas. If the image is dominated by dark shadow areas (ex: my Lightpaintings) then I decrease Clarity -3 bars.
Contrast: I increase the Contrast +1 bar if the image has few shadow areas. If the image is dominated by dark shadow areas (ex: my Lightpaintings) then I decrease Contrast -3 bars.
Brightness: Remains at the Default setting of “0”
Saturation: I increase Saturation +1 bar.
Hue: Remains at the Default setting of “0”
These in-camera Picture Control settings take care of 97% of adjustments for my images. It is much like selecting a particular film to give me more or less enhancements. If my image exposure needs any adjustment I do that to the RAW file in “post” using Nikon Capture NX2.
Regarding Sharpening: Although I decrease Sharpening by -3 bars in Picture Control I will usually add some Sharpening (Unsharpen Mask) in post using a layer in Photoshop. I apply Sharpening only to specific areas of the image …ex: Footfall jersey and number, logo on the helmet … possibly the athlete’s eyes.
Hope this information is helpful to you. If Photoshop and Lightroom are something that you want to learn more about and improve your skills, my suggestion is to visit KelbyOne www.kelbyone.com . They’re online classes are the best for learning post work.
I hope this information his helpful. Dave
![]()
 Image #4 Nelson Sundown … Nikon D800, ISO800, 30 seconds exposure time at f10, Nikon 24-70mm lens, WB 3030K, Max Million II rechargeable 2 million Candle Power spot light by: Brinkmann, Manfrotto Tripod with 410 Geared Head, SanDisk 32G Extreme Pro Flash card.
Q…Hi Dave, I’m taking your class in Las Vegas and I was looking at what lens to bring you suggested 24-70 if I don’t have that one what other would you suggest? I have 28-300 5.6 ~ 70-200 2.8 ~ 17-35 2.8 ~ 135 2D ~ 85 & 50 1.4 ~ 105 2.8 would any of these work for this class? If not I guess I have to get another lens hahaha. Let me know. Thanks and looking forward to your class! 😀 Lynn
A…Hi Lynn. Glad to hear that you will be joining our Lightpainting Workshop at PSW 2015 www.photoshopworld.com Your 28-300mm will work fine and also bring your 17-35mm. Bring both of these lenses for the Lightpainting Workshop.
This image was made during my first visit to Nelson. Upon arrival in the little ghost town-former movie set I felt I had died and gone to “Lightpainting Heaven” There is so much to photograph there and for my class to Lightpaint.
Looking forward to meeting you and the rest of my class at Photoshop World in Las Vegas August 10-13, 2015. See you there. Dave
![]()
Well, that wraps up another WATR full of great questions. Join me right here again next month when I showcase my Photoshop World class topics and teaching information, and in the meantime FOLLOW me on Instagram @daveblackphoto. Adios. Dave


