 Hi and welcome to this edition of Workshop at the Ranch. This will be the final tutorial in an 8 month long series on Lightpainting. If you haven’t read the first 7 monthly articles beginning in February 2011 let me encourage you to do so. There you will find many more Lightpaintings with step-by-step basic explanations and camera data of how I approach this creative lighting technique with a variety of subjects.
Hi and welcome to this edition of Workshop at the Ranch. This will be the final tutorial in an 8 month long series on Lightpainting. If you haven’t read the first 7 monthly articles beginning in February 2011 let me encourage you to do so. There you will find many more Lightpaintings with step-by-step basic explanations and camera data of how I approach this creative lighting technique with a variety of subjects.
Over the past 9 years of writing my monthly Workshop at the Ranch articles I have taught on a number of subjects, but the most popular articles are those involving lighting. Sometimes I teach about large strobe use, other times I have catered to Speedlights, and now this most recent series featured Lightpainting. All my articles about lighting stem from the concept that “Light is the Greatest Influence.” The way in which light falls on a subject within the scene can have a powerful influence on the audience. Light, and shadow, can stimulate our senses and become a catalyst that transforms a simple picture into an image full of emotion.
The second concept that I emphasize is this, “If you want a picture to look interesting, only light part of it.” I have found that it is more dynamic and more efficient to include some of the available ambient light and use my strobes, or Speedlights, or Lightpainting, to creatively highlight my subject. Simply said, I am only “lighting” part of the picture while the ambient does the rest. This sparing use of light tends to create a stylized look that instantly connects the audience with the subject.
Lightpainting Large Scale Landscapes is the perfect combination of these two concepts. By making use of the available ambient light, however faint or strong it might be, and then appling Lightpainting to the main subject can truly create a unique landscape image on an a large location.
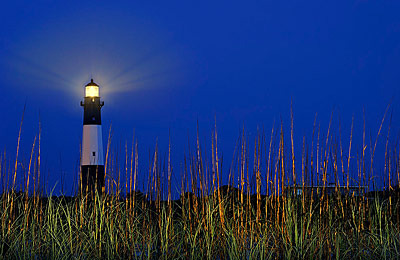 Image #1 Tybee Light … This Lightpainting of the lighthouse on Tybee Island near Savannah, Georgia was made earlier this spring. It was completely dark upon arriving on location. The air was heavy with a slightly overcast sky and what felt like 120% humidity. I manually exposed for the lighthouse beacon because I could not control its output of light. The sky was jet black for the first Blank Image (test shot) and so I waited for about 10 minutes for the available ambient light of the sky to become a more “twilight” looking value. With the beacon and the sky (my available ambient light) looking pleasing to me, my next image would include some Lightpaining on the tall grass growing on the sand dunes. I used my Brinkmann Max Million II from about 60 feet off camera to the right and at a 90degree angle to the grass. The light rays stretching out from the lighthouse beacon are a bonus thanks to a small area of humidity condensation on my 70-200mm G VRII zoom lens. Most of the lighting work is done by including the ambient light, while only a small portion of off camera light is provided by my Lightpainting of the tall grass. Nikon D3s, ISO1000, 8 seconds at f10, Nikon 70-200mm G VRII zoom lens, WB 4000K, Gitzo Carbon Fiber Tripod wit SLIK Super Ball Head, Brinkmann Max Million II, SanDisk 32G Extreme Pro Flash Card. The faint warm glow on the left side of the lighthouse main structure is ambient light from the parking lot lights. Image #1 Tybee Light … This Lightpainting of the lighthouse on Tybee Island near Savannah, Georgia was made earlier this spring. It was completely dark upon arriving on location. The air was heavy with a slightly overcast sky and what felt like 120% humidity. I manually exposed for the lighthouse beacon because I could not control its output of light. The sky was jet black for the first Blank Image (test shot) and so I waited for about 10 minutes for the available ambient light of the sky to become a more “twilight” looking value. With the beacon and the sky (my available ambient light) looking pleasing to me, my next image would include some Lightpaining on the tall grass growing on the sand dunes. I used my Brinkmann Max Million II from about 60 feet off camera to the right and at a 90degree angle to the grass. The light rays stretching out from the lighthouse beacon are a bonus thanks to a small area of humidity condensation on my 70-200mm G VRII zoom lens. Most of the lighting work is done by including the ambient light, while only a small portion of off camera light is provided by my Lightpainting of the tall grass. Nikon D3s, ISO1000, 8 seconds at f10, Nikon 70-200mm G VRII zoom lens, WB 4000K, Gitzo Carbon Fiber Tripod wit SLIK Super Ball Head, Brinkmann Max Million II, SanDisk 32G Extreme Pro Flash Card. The faint warm glow on the left side of the lighthouse main structure is ambient light from the parking lot lights.
|
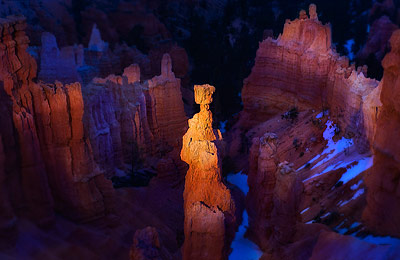 Image #2 Thor’s Hammer … I have Lightpainted Thor’s Hammer in Bryce Canyon several times over the years, but this image was done using the Soft Focus technique during the 1 minute exposure time. I composed the scene and manually focused on the iconic out cropping called Thor’s Hammer. I have set my exposure to underexpose the available ambient light by –2 stops. I applied 20 seconds of warm light from the Brinkmann Max Million II to Thor’s Hammer and allowed the cool 4500K WB to blue anywhere the ambient light was visible. Once the light application on Thor’s Hammer was complete I manually Soft Focused the lens to infinity. My hope was to have a significant separation between the focused Thor’s Hammer and a very out of focus canyon. This did not happen for the simple reason that I used an aperture setting of f13 for this picture. With 70mm at f13 the depth of field was too broad. Although I Soft Focused to infinity the canyon was not nearly soft enough. A note to self, use f5.6 or at most f8 when making a Soft Focus Lightpainting. I would have made another attempt, but the dim available ambient light had diminished to complete darkness before I could make another image. Keep in mind that I applied the Lightpainting from the upper rim of the canyon about 200 feet off camera to the left. The camera is positioned on a lower area down the canyon. These evenings tend to be short only allowing only 1 or 2 image attempts before the ambient is gone. Large Scale Landscape Lightpaintings tend to eat up the “exposure clock” when making use of the ambient light because twilight fades so quickly. Nikon D3s, ISO2000, 1 minute at f13, Nikon 24-70mm lens, WB4500K, Gitzo Carbon Fiber Tripod and Ball Hear with Kirk “L” Bracket, Nikon MC-36 Digital Cable Release, Brinkmann Max Million II with 20degree grid held over the front, SanDisk 16G Extreme Pro Flash Card. Image #2 Thor’s Hammer … I have Lightpainted Thor’s Hammer in Bryce Canyon several times over the years, but this image was done using the Soft Focus technique during the 1 minute exposure time. I composed the scene and manually focused on the iconic out cropping called Thor’s Hammer. I have set my exposure to underexpose the available ambient light by –2 stops. I applied 20 seconds of warm light from the Brinkmann Max Million II to Thor’s Hammer and allowed the cool 4500K WB to blue anywhere the ambient light was visible. Once the light application on Thor’s Hammer was complete I manually Soft Focused the lens to infinity. My hope was to have a significant separation between the focused Thor’s Hammer and a very out of focus canyon. This did not happen for the simple reason that I used an aperture setting of f13 for this picture. With 70mm at f13 the depth of field was too broad. Although I Soft Focused to infinity the canyon was not nearly soft enough. A note to self, use f5.6 or at most f8 when making a Soft Focus Lightpainting. I would have made another attempt, but the dim available ambient light had diminished to complete darkness before I could make another image. Keep in mind that I applied the Lightpainting from the upper rim of the canyon about 200 feet off camera to the left. The camera is positioned on a lower area down the canyon. These evenings tend to be short only allowing only 1 or 2 image attempts before the ambient is gone. Large Scale Landscape Lightpaintings tend to eat up the “exposure clock” when making use of the ambient light because twilight fades so quickly. Nikon D3s, ISO2000, 1 minute at f13, Nikon 24-70mm lens, WB4500K, Gitzo Carbon Fiber Tripod and Ball Hear with Kirk “L” Bracket, Nikon MC-36 Digital Cable Release, Brinkmann Max Million II with 20degree grid held over the front, SanDisk 16G Extreme Pro Flash Card. |
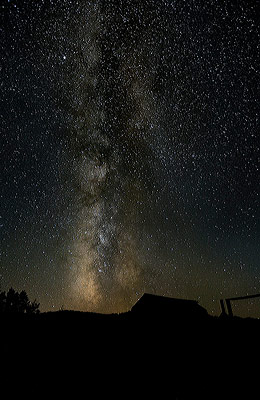
Image 3A Stardust Barn (silhouette) … It was an amazingly clear night for this Lightpainting of my favorite barn near Jackson Hole, Wyoming. The Milky Way was located directly over the town of Jackson Hole, which added to the horizon glow and seemingly more illumination to the already brilliant cosmos. I have done several Large Scale Landscape Lightpaintings with star fields, and so my memory helped me determine the exposure of ISO2500, 30 seconds at f4. In this image I am just determining the available ambient light, a.k.a. the Milky Way. This exposure leaves the barn in silhouette and ready to be revealed with Lightpainting.
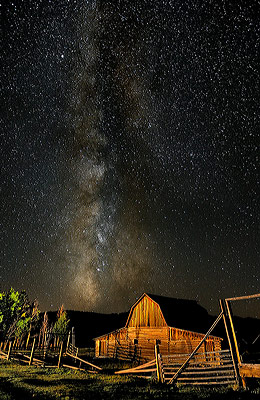
Image 3B Stardust Barn (revealed) … I set my self-timer at 20 seconds. This gave me ample time to press the shutter, trot 120 feet off camera to the left, and begin to “feather” in some light from the Brinkmann when the 30second exposure began. At this high ISO setting of 2500 it doesn’t take much light from the Brinkmann to illuminate the barn, trees, coral and ground. In fact, it is so easy to “cook” (over expose) the subject that I covered the front of the Brinkmann with a white cloth while flickering the Brinkmann’s trigger. I also used a 20degree grid to keep excess light from spilling into the scene. Nikon D3s, ISO2500, 30 seconds at f4, Nikon 14-24mm lens, WB 4000K, Gitzo Carbon Fiber Tripod and Ball Head with Kirk “L” Bracket, Brinkmann Max Million II with 20degree grid and white cloth place over the front, SanDisk 32G Extreme Pro Flash Card.
|
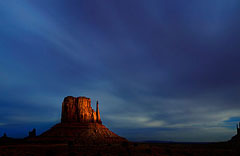
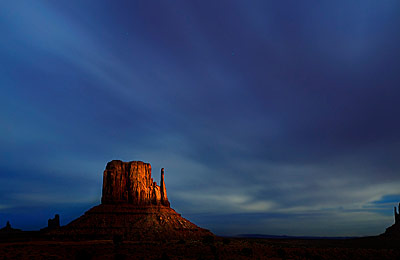 Image #4 West Mitten After Midnight … This is the largest Lightpainting I have done so far. The face of Monument Valley’s West Mitten is about 1,000 feet high while its base is more than 1,500 feet wide. This image was made as part of a collection of Lightpaintings showcasing iconic locations in the National Parks of the Southwest. With most of my Lightpaintings I make use of a basic lighting triangle configuration. The 3 points of the lighting triangle configuration are the camera, the light source, and the subject. My assistant for this project was a friend and very talented photographer, Dan Heidenreich. Dan was located with the camera while I am Lightpainting off camera to the right just over a mile away. Dan and the camera are over a mile away from the West Mitten. I’d say the distance from myself with Brinkmann’s in hand to the West Mitten was about 1.5 mile, but you better call in Mr. Pythagoras for an exact calculation. This is a very large triangle to be sure. Dan and I communicated via walkie-talkie. After requesting Dan to press the shutter, thus beginning the 20minute exposure time, I applied Lightpainting using 2 hand held Brinkmann Max Million II spotlights for the entire exposure. I had hoped to illuminate the face of the West Mitten, the base, and portions of the dessert floor, but a 40mph sandstorm greatly diminished the effectiveness of the light and so I concentrated only on the face of the Mitten. The moon broke the horizon about 15 minutes after I finished the 20 minutes of Lightpainting. It was the pre moonrise ambient light that added illumination to the cloud cover over Monument Valley. Needless to say, there was only time for 1 picture. If I had started any earlier, there wouldn’t have been any ambient light to illuminate the clouds. If I started any later the moonlight would have spilled over the horizon and overexposed the entire scene rendering the Brinkmann’s useless. As they say, timing is everything. Nikon D2, ISO400, 20minutes at f8, Nikon 24-70mm lens, WB4000K, heavy Bogan (Manfrotto) Tripod and ball head with Kirk “L” Bracket, Nikon MC-36 Digital Cable Release, 2 Brinkmann Max Million II. Image #4 West Mitten After Midnight … This is the largest Lightpainting I have done so far. The face of Monument Valley’s West Mitten is about 1,000 feet high while its base is more than 1,500 feet wide. This image was made as part of a collection of Lightpaintings showcasing iconic locations in the National Parks of the Southwest. With most of my Lightpaintings I make use of a basic lighting triangle configuration. The 3 points of the lighting triangle configuration are the camera, the light source, and the subject. My assistant for this project was a friend and very talented photographer, Dan Heidenreich. Dan was located with the camera while I am Lightpainting off camera to the right just over a mile away. Dan and the camera are over a mile away from the West Mitten. I’d say the distance from myself with Brinkmann’s in hand to the West Mitten was about 1.5 mile, but you better call in Mr. Pythagoras for an exact calculation. This is a very large triangle to be sure. Dan and I communicated via walkie-talkie. After requesting Dan to press the shutter, thus beginning the 20minute exposure time, I applied Lightpainting using 2 hand held Brinkmann Max Million II spotlights for the entire exposure. I had hoped to illuminate the face of the West Mitten, the base, and portions of the dessert floor, but a 40mph sandstorm greatly diminished the effectiveness of the light and so I concentrated only on the face of the Mitten. The moon broke the horizon about 15 minutes after I finished the 20 minutes of Lightpainting. It was the pre moonrise ambient light that added illumination to the cloud cover over Monument Valley. Needless to say, there was only time for 1 picture. If I had started any earlier, there wouldn’t have been any ambient light to illuminate the clouds. If I started any later the moonlight would have spilled over the horizon and overexposed the entire scene rendering the Brinkmann’s useless. As they say, timing is everything. Nikon D2, ISO400, 20minutes at f8, Nikon 24-70mm lens, WB4000K, heavy Bogan (Manfrotto) Tripod and ball head with Kirk “L” Bracket, Nikon MC-36 Digital Cable Release, 2 Brinkmann Max Million II. |
Well, we have finally come to the conclusion of our Lightpainting tutorials. There are 8 articles total beginning in February. The series covers all the basics and up to some very complex imagery. I hope you have enjoyed it and learned something new.
I have received many emails over these past several months encouraging me to do a Lightpainting book in both a soft back field manual and an ebook. I hear you all load and clear, and appreciate all your wonderful comments and suggestions. This extended WATR series is a good start but it’s only the beginning. I plan on including many more examples of Lightpainting with detailed explanations, personal commentary, camera data, and gear.
I hope you all have enjoyed this series. Thanks for reading Workshop at the Ranch and I’ll see you next month with a new article.
Adios. Dave
Here are links to the light sources I use to Lightpaint with:
Stylus penlight by Streamlight: www.streamlight.com
Inova Bolt 2L LED Flashlight: www.inovalight.com
Brinkmann Max Million II: www.brinkmann.net/products
![]() Hi and welcome to this edition of Workshop at the Ranch. This will be the final tutorial in an 8 month long series on Lightpainting. If you haven’t read the first 7 monthly articles beginning in February 2011 let me encourage you to do so. There you will find many more Lightpaintings with step-by-step basic explanations and camera data of how I approach this creative lighting technique with a variety of subjects.
Hi and welcome to this edition of Workshop at the Ranch. This will be the final tutorial in an 8 month long series on Lightpainting. If you haven’t read the first 7 monthly articles beginning in February 2011 let me encourage you to do so. There you will find many more Lightpaintings with step-by-step basic explanations and camera data of how I approach this creative lighting technique with a variety of subjects. 


