 Hi and welcome to this edition of Workshop at the Ranch. First let me apologize for this slightly late edition. Sometimes phone lines need repairs and sometimes these repairs take a few days and sometimes even after the repairs are completed the internet still doesn’t work and additional repairs are needed. Well, let’s move on. I was teaching at Rich Clarkson’s Photography at the Summit ( www.richclarkson.com ) in Jackson Hole, Wyoming recently. It is my favorite place to be in the fall. At the conclusion of the evening presentations I do what I have done for several years now, go out into night and make a Lightpainting before joining the workshops participants at the Silver Dollar. As you can see this months Workshop at the Ranch is all about Lightpainting outdoor landscapes. Not just any scene mind you, but scenes that include the vast western night sky over Jackson Hole, and the Teton Mountain Range.
Hi and welcome to this edition of Workshop at the Ranch. First let me apologize for this slightly late edition. Sometimes phone lines need repairs and sometimes these repairs take a few days and sometimes even after the repairs are completed the internet still doesn’t work and additional repairs are needed. Well, let’s move on. I was teaching at Rich Clarkson’s Photography at the Summit ( www.richclarkson.com ) in Jackson Hole, Wyoming recently. It is my favorite place to be in the fall. At the conclusion of the evening presentations I do what I have done for several years now, go out into night and make a Lightpainting before joining the workshops participants at the Silver Dollar. As you can see this months Workshop at the Ranch is all about Lightpainting outdoor landscapes. Not just any scene mind you, but scenes that include the vast western night sky over Jackson Hole, and the Teton Mountain Range.
Technology and the Nikon D3, D700 and D300 cameras have once again made imagery possible that blows ones mind. The nearly noiseless clarity of the Nikon D3 and D700 at super high ISO settings opens up new possibilities with “stellar” results. And when I say stellar, I do mean stellar!
|
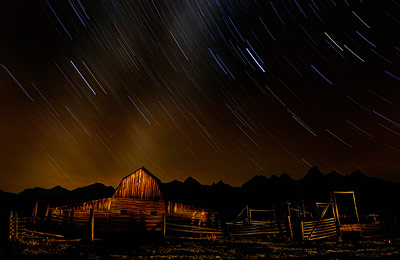 Image #1 Cosmic Barn … Jackson Hole, Wyoming provides great scenery by day and crisp clear skies at night. I decided to combine the best of both worlds by setting my exposure for the night sky over the Teton Mountain Range and revealing the landscape with Lightpainting. As with Lightpaintings I activate the Long Exposure Noise Reduction mode, place the camera on a sturdy tripod, set the camera on BULB and attached a Nikon MC-36 Remote Cord which serves two purposes; 1. the MC-36 allows me to make an exposure time longer than the camera standard of 30 seconds, (in this case 30 minutes), and 2. I can set the MC-36 self timer to begin the exposure after any amount of time I choose (in this case 1 minute.) Manual focus is best because an auto focus setting will cause the lens to search in the dark for something to focus on and cause the image to be out of focus. One could also auto focus on the subject and then switch off the auto focus using the Focus Mode Selector switch on the front of the camera. One year ago I made some long exposures of stars at 10 and 15 minutes with good results, but felt the star trails weren’t long enough. An exposure time of 30 minutes would be required to have longer sweeping and more graceful star trails in the night sky. I should also say that it is the clarity of the atmosphere over the Tetons in north western Wyoming that make this image a real success as so many stars are visible. The same exposure of the night sky in a humid climate or location near a large town or city most likely would not produce the same clearly defined star trails. The Rocky Mountain time zone states usually have low humidity and clear atmosphere which lends itself well to making star trail imagery with long exposure times. The Tetons are silhouetted against the glowing sky that is illuminated by Driggs, Idaho on the backside of the mountains. The two slightly diagonal shafts of light that extend from left horizon line of the Tetons to the center top of the frame is the Milky Way Galaxy. The long exposure time allowed the stars to sweep gracefully through the sky in a variety of colors (white, red, yellow and blue.) Nikon D700, ISO320, 30 minute exposure time at f8, Nikon 24-70mm lens, WB 5560K, Gitzo Carbon Fiber Tripod with Gitzo Ball Head and Kirk “L” Bracket, Nikon MC-36 Remote Cord, 1 Brinkmann Q Beam (2 million candle battery powered spotlight,) Lexar 8G Flash Card. About 7 minutes of Lightpainting was required during the 30 minute exposure. I used a 20 degree grid over the front of the Brinkmann to better narrow the beam of light and control the spill of light from over lighting areas of the scene. I was approximately 50 yards to the right of the barn while Lightpainting (note: I set the self timer mode on the MC-36 Remote Cord at 1 minute so I can easily leave the camera location and walk to my Lightpainting position about 75 yards off camera before the MC-36 triggers the shutter.) Image #1 Cosmic Barn … Jackson Hole, Wyoming provides great scenery by day and crisp clear skies at night. I decided to combine the best of both worlds by setting my exposure for the night sky over the Teton Mountain Range and revealing the landscape with Lightpainting. As with Lightpaintings I activate the Long Exposure Noise Reduction mode, place the camera on a sturdy tripod, set the camera on BULB and attached a Nikon MC-36 Remote Cord which serves two purposes; 1. the MC-36 allows me to make an exposure time longer than the camera standard of 30 seconds, (in this case 30 minutes), and 2. I can set the MC-36 self timer to begin the exposure after any amount of time I choose (in this case 1 minute.) Manual focus is best because an auto focus setting will cause the lens to search in the dark for something to focus on and cause the image to be out of focus. One could also auto focus on the subject and then switch off the auto focus using the Focus Mode Selector switch on the front of the camera. One year ago I made some long exposures of stars at 10 and 15 minutes with good results, but felt the star trails weren’t long enough. An exposure time of 30 minutes would be required to have longer sweeping and more graceful star trails in the night sky. I should also say that it is the clarity of the atmosphere over the Tetons in north western Wyoming that make this image a real success as so many stars are visible. The same exposure of the night sky in a humid climate or location near a large town or city most likely would not produce the same clearly defined star trails. The Rocky Mountain time zone states usually have low humidity and clear atmosphere which lends itself well to making star trail imagery with long exposure times. The Tetons are silhouetted against the glowing sky that is illuminated by Driggs, Idaho on the backside of the mountains. The two slightly diagonal shafts of light that extend from left horizon line of the Tetons to the center top of the frame is the Milky Way Galaxy. The long exposure time allowed the stars to sweep gracefully through the sky in a variety of colors (white, red, yellow and blue.) Nikon D700, ISO320, 30 minute exposure time at f8, Nikon 24-70mm lens, WB 5560K, Gitzo Carbon Fiber Tripod with Gitzo Ball Head and Kirk “L” Bracket, Nikon MC-36 Remote Cord, 1 Brinkmann Q Beam (2 million candle battery powered spotlight,) Lexar 8G Flash Card. About 7 minutes of Lightpainting was required during the 30 minute exposure. I used a 20 degree grid over the front of the Brinkmann to better narrow the beam of light and control the spill of light from over lighting areas of the scene. I was approximately 50 yards to the right of the barn while Lightpainting (note: I set the self timer mode on the MC-36 Remote Cord at 1 minute so I can easily leave the camera location and walk to my Lightpainting position about 75 yards off camera before the MC-36 triggers the shutter.)
|
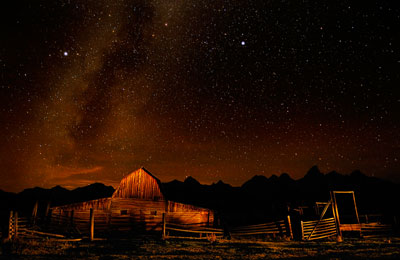 Image #2 Barn Cosmos … Same barn off of Antelope Flats Road near Jackson Hole, Wyoming, but photographed with very different settings and very different results. With the success of the Cosmic Barn star trail image I went to the opposite end of thinking and decided to freeze the star field and Milky Way, and again reveal my subject with Lightpainting. WOW! … Unbelievable results! Instead of 30 minutes I set my exposure time for 30 seconds. My ISO went from 320 to 3200, and my aperture went from f8 to f4. The Tetons are still silhouetted against the night glow from the town of Driggs, Idaho. The Milky Way and stars are frozen in the sky, and my Lightpainting time went from 7 minutes of actual Lightpainting to about 15 seconds of actively applying light to various parts of the barn, fence and coral. The difference is amazing as hundreds of stars, clusters of stars, and planets are clearly visible. The most difficult part of making this image was the application of Lightpainting. The extremely high ISO and f4 aperture required me to use sparing amounts of light from the Brinkmann so as to not over expose the barn and coral. Nikon D700, ISO3200, 30 seconds at f4, Nikon 24-70, WB 5560K, Gitzo Carbon Fiber Tripod with Gitzo Ball Head and Kirk “L” Bracket, Nikon MC-36 Remote Cord (I still used this even though the camera can make a 30 second exposure without the additional MC-36 Remote Cord), 1 Brinkmann Q Beam, 20 degree grid, Lexar 8G Flash Card. Image #2 Barn Cosmos … Same barn off of Antelope Flats Road near Jackson Hole, Wyoming, but photographed with very different settings and very different results. With the success of the Cosmic Barn star trail image I went to the opposite end of thinking and decided to freeze the star field and Milky Way, and again reveal my subject with Lightpainting. WOW! … Unbelievable results! Instead of 30 minutes I set my exposure time for 30 seconds. My ISO went from 320 to 3200, and my aperture went from f8 to f4. The Tetons are still silhouetted against the night glow from the town of Driggs, Idaho. The Milky Way and stars are frozen in the sky, and my Lightpainting time went from 7 minutes of actual Lightpainting to about 15 seconds of actively applying light to various parts of the barn, fence and coral. The difference is amazing as hundreds of stars, clusters of stars, and planets are clearly visible. The most difficult part of making this image was the application of Lightpainting. The extremely high ISO and f4 aperture required me to use sparing amounts of light from the Brinkmann so as to not over expose the barn and coral. Nikon D700, ISO3200, 30 seconds at f4, Nikon 24-70, WB 5560K, Gitzo Carbon Fiber Tripod with Gitzo Ball Head and Kirk “L” Bracket, Nikon MC-36 Remote Cord (I still used this even though the camera can make a 30 second exposure without the additional MC-36 Remote Cord), 1 Brinkmann Q Beam, 20 degree grid, Lexar 8G Flash Card.
|
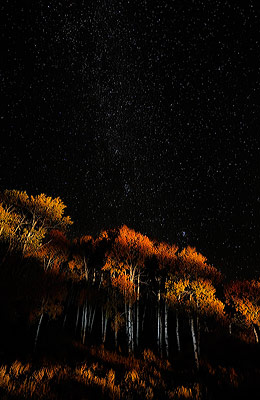 Image #3 Transfiguration Trees … I was so impressed by the cosmic heavens imagery that the following night would bring more of the same. This time my subject would be an Aspen grove near the Church of the Transfiguration that is within the boundaries of Teton National Park. I applied the same basic formula, ISO3200, 30 seconds exposure time at f4. As with the barn and coral I would need to be very sparing with my application of Lightpainting so as not to over expose the trees. I have always liked the way shafts of sunlight strike the landscape, so I created shafts of light on these trees. Nikon D3, ISO3200, 30 seconds at f4, Nikon 14-24mm lens, WB 4550K, Gitzo Carbon Fiber Tripod with Gitzo Ball Head and Kirk “L” Bracket, Nikon MC-36 Remote Cord, 1 Brinkmann Q Beam, 20 degree grid, INOVA XO3 LED Flashlight, Lexar 8G Flash Card. The leaves on the trees and tall prairie grass were Lightpainted with the quick horizontal shafts of light from the warm lamp of the Brinkmann Q Beam, while the Aspen tree trunks were lightpainted with a cooler colored light from my INOVA XO3 LED Flashlight. Seemed like a good idea and I liked the results. Image #3 Transfiguration Trees … I was so impressed by the cosmic heavens imagery that the following night would bring more of the same. This time my subject would be an Aspen grove near the Church of the Transfiguration that is within the boundaries of Teton National Park. I applied the same basic formula, ISO3200, 30 seconds exposure time at f4. As with the barn and coral I would need to be very sparing with my application of Lightpainting so as not to over expose the trees. I have always liked the way shafts of sunlight strike the landscape, so I created shafts of light on these trees. Nikon D3, ISO3200, 30 seconds at f4, Nikon 14-24mm lens, WB 4550K, Gitzo Carbon Fiber Tripod with Gitzo Ball Head and Kirk “L” Bracket, Nikon MC-36 Remote Cord, 1 Brinkmann Q Beam, 20 degree grid, INOVA XO3 LED Flashlight, Lexar 8G Flash Card. The leaves on the trees and tall prairie grass were Lightpainted with the quick horizontal shafts of light from the warm lamp of the Brinkmann Q Beam, while the Aspen tree trunks were lightpainted with a cooler colored light from my INOVA XO3 LED Flashlight. Seemed like a good idea and I liked the results.
|
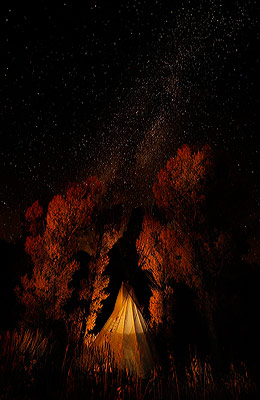 Image #4 Tee Pee Night Sky … I knew of a Tee Pee that was located about 7 miles outside Jackson Hole just past the entrance road to Moose Junction and Teton National Park. Well, here I go again. By now you should know the drill … Nikon D3, ISO3200, 30 seconds at f4, Nikon 14-24mm lens, WB 10,000K, Gitzo Carbon Fiber Tripod with Gitzo Ball Head and Kirk “L” Bracket, Nikon MC-36 Remote Cord, 1 Brinkmann Q Beam, 1 LED Head Lamp, Lexar 8G Flash Card. I set my exposure for the Milky Way and placed a spare LED head lamp inside the Tee Pee and made a test shot. The Tee Pee was now illuminated from the inside and matched the exposure of the heavens. With my test shot complete I proceeded with the entire making of the Lightpainting. While the 30 second exposure was being executed a 1 second burst of light from the Brinkmann Q Beam directly behind the Tee Pee was made and then from 65 feet the front of the Tee Pee I sparingly Lightpainted the trees with a 20 degree grid placed in front of the Brinkmann Q Beam and for about 10 seconds. More than 10 seconds of Lightpainting tended to over expose the surrounding trees so I would “feather” the light by flicking the trigger on the Brinkmann to help diminish the intensity of the light. Image #4 Tee Pee Night Sky … I knew of a Tee Pee that was located about 7 miles outside Jackson Hole just past the entrance road to Moose Junction and Teton National Park. Well, here I go again. By now you should know the drill … Nikon D3, ISO3200, 30 seconds at f4, Nikon 14-24mm lens, WB 10,000K, Gitzo Carbon Fiber Tripod with Gitzo Ball Head and Kirk “L” Bracket, Nikon MC-36 Remote Cord, 1 Brinkmann Q Beam, 1 LED Head Lamp, Lexar 8G Flash Card. I set my exposure for the Milky Way and placed a spare LED head lamp inside the Tee Pee and made a test shot. The Tee Pee was now illuminated from the inside and matched the exposure of the heavens. With my test shot complete I proceeded with the entire making of the Lightpainting. While the 30 second exposure was being executed a 1 second burst of light from the Brinkmann Q Beam directly behind the Tee Pee was made and then from 65 feet the front of the Tee Pee I sparingly Lightpainted the trees with a 20 degree grid placed in front of the Brinkmann Q Beam and for about 10 seconds. More than 10 seconds of Lightpainting tended to over expose the surrounding trees so I would “feather” the light by flicking the trigger on the Brinkmann to help diminish the intensity of the light.
|
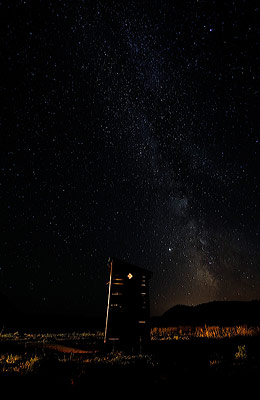 Image #5 Outer Limits … This outhouse on the flats east of the Tetons is a subject I Lightpainted 7 years ago. I decided to return to this scene with my new formula for Lightpainting under the stars. By facing south the glow from Jackson Hole silhouetted the hill side and outhouse. By this final night of Lightpainting I was well aware of were the Milky Way would be at 11:00 pm …… well, what do you know, directly over Jackson Hole itself, imagine that. The only thing left to do was reveal my subject, the outhouse, with a little Lightpainting. Nikon D3, ISO3200, 30 seconds at f4, Nikon 14-24mm lens, WB 3030K, Gitzo Carbon Fiber Tripod with Gitzo Ball Head and Kirk “L” Bracket, MC-36 Remote Cord, 1 Brinkmann Q Beam, 1 IVOVA OX3 LED Flashlight, Lexar 8G Flash Card. A 2 seconds burst of light from the INVOVA XO3 LED Flashlight inside the outhouse gave illumination through the cracks, the diamond shaped air window and out the door, while the Brinkmann Q Beam with 20 degree grid was used very sparingly, (feathered), for about 10 seconds to illuminate the grass and sage brush. I was about 50 feet away from the outhouse while Lightpainting the grass and sage. I used a cooler WB setting of 3030K to give a deep space coolness to the scene. If I had used a warmer WB setting of 7000K or even 10,000K the glow from Jackson Hole would be a warm red glow and the stars would be more yellow/orange. Either WB choice works, it’s all up to you and how you want the picture to look. Image #5 Outer Limits … This outhouse on the flats east of the Tetons is a subject I Lightpainted 7 years ago. I decided to return to this scene with my new formula for Lightpainting under the stars. By facing south the glow from Jackson Hole silhouetted the hill side and outhouse. By this final night of Lightpainting I was well aware of were the Milky Way would be at 11:00 pm …… well, what do you know, directly over Jackson Hole itself, imagine that. The only thing left to do was reveal my subject, the outhouse, with a little Lightpainting. Nikon D3, ISO3200, 30 seconds at f4, Nikon 14-24mm lens, WB 3030K, Gitzo Carbon Fiber Tripod with Gitzo Ball Head and Kirk “L” Bracket, MC-36 Remote Cord, 1 Brinkmann Q Beam, 1 IVOVA OX3 LED Flashlight, Lexar 8G Flash Card. A 2 seconds burst of light from the INVOVA XO3 LED Flashlight inside the outhouse gave illumination through the cracks, the diamond shaped air window and out the door, while the Brinkmann Q Beam with 20 degree grid was used very sparingly, (feathered), for about 10 seconds to illuminate the grass and sage brush. I was about 50 feet away from the outhouse while Lightpainting the grass and sage. I used a cooler WB setting of 3030K to give a deep space coolness to the scene. If I had used a warmer WB setting of 7000K or even 10,000K the glow from Jackson Hole would be a warm red glow and the stars would be more yellow/orange. Either WB choice works, it’s all up to you and how you want the picture to look. |
Well, I hope you have enjoyed this night time adventure. My hope is that some of you will apply these steps and make some “stellar” imagery of your own. Keep in mind that different areas of the country or the world have different atmospheric conditions that may increase of diminish the success of photographing stars. This article should help you get started.
NOTE: Equipment I use; The Brinkmann Q Beam can be found in most WalMarts for about $40 they are battery powered and rechargeable, while the INOVA Flashlights can be found online at www.inovalight.com The 20 degree grid I use is a common tool for the studio photographer. I use the grids that are made for the Elinchom Strobe Light reflectors. Sometimes I use a 20 degree but they make grids ranging from 10-40 degrees www.bogenimaging.com I purchase all my camera equipment at Robert’s in Indianapolis, Indiana www.robertsimaging.com or call 800-726-5544
Enjoy Lightpainting under the stars ……………… Adios. Dave
![]() Hi and welcome to this edition of Workshop at the Ranch. First let me apologize for this slightly late edition. Sometimes phone lines need repairs and sometimes these repairs take a few days and sometimes even after the repairs are completed the internet still doesn’t work and additional repairs are needed. Well, let’s move on. I was teaching at Rich Clarkson’s Photography at the Summit ( www.richclarkson.com ) in Jackson Hole, Wyoming recently. It is my favorite place to be in the fall. At the conclusion of the evening presentations I do what I have done for several years now, go out into night and make a Lightpainting before joining the workshops participants at the Silver Dollar. As you can see this months Workshop at the Ranch is all about Lightpainting outdoor landscapes. Not just any scene mind you, but scenes that include the vast western night sky over Jackson Hole, and the Teton Mountain Range.
Hi and welcome to this edition of Workshop at the Ranch. First let me apologize for this slightly late edition. Sometimes phone lines need repairs and sometimes these repairs take a few days and sometimes even after the repairs are completed the internet still doesn’t work and additional repairs are needed. Well, let’s move on. I was teaching at Rich Clarkson’s Photography at the Summit ( www.richclarkson.com ) in Jackson Hole, Wyoming recently. It is my favorite place to be in the fall. At the conclusion of the evening presentations I do what I have done for several years now, go out into night and make a Lightpainting before joining the workshops participants at the Silver Dollar. As you can see this months Workshop at the Ranch is all about Lightpainting outdoor landscapes. Not just any scene mind you, but scenes that include the vast western night sky over Jackson Hole, and the Teton Mountain Range. 


