 Hi, and welcome to this edition of Workshop at the Ranch. Are you like me? .. sometimes you just want to have some fun and let all the business work wait until tomorrow. Nine holes of golf sounded like fun but the rain/snow had already begun here in the mountains and I’m not a committed golfer who accepts the challenge of dodging lightning and enduring cold temperatures on the course. So, I did the next best thing ………. I Lightpainted some golf clubs. I’m always trying to learn something new and improve my Lightpainting skills. This project would offer a great indoor escape from the office.
Hi, and welcome to this edition of Workshop at the Ranch. Are you like me? .. sometimes you just want to have some fun and let all the business work wait until tomorrow. Nine holes of golf sounded like fun but the rain/snow had already begun here in the mountains and I’m not a committed golfer who accepts the challenge of dodging lightning and enduring cold temperatures on the course. So, I did the next best thing ………. I Lightpainted some golf clubs. I’m always trying to learn something new and improve my Lightpainting skills. This project would offer a great indoor escape from the office.
|
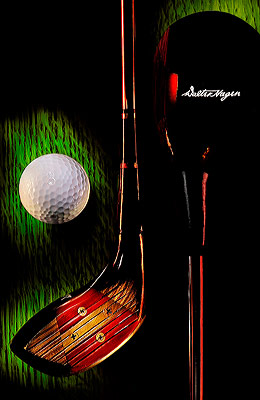 Image #1 The Set Up ….. I took the oak leaf section from our dinning room table and set it on the floor. I placed two 4 foot step ladders at either end of the oak leaf and used Bogen Super Clamps to secure and to suspend the clubs about 2 inches above the oak surface. Then I used a 2 inch section of cardboard tubing ( you know, a Christmas wrapping paper tube ) and place it on the oak surface and then placed the golf ball on the section of tubing. With my subjects (2 clubs and a golf ball) positioned 2 inches above the oak surface I felt I could Lightpaint the oak wood green and not paint the clubs or ball with any green color. The ladders, which are supporting the golf clubs had a duel purpose besides holding the clamped clubs. I laid my old skies from ladder to ladder directly over the top of the golf clubs, ball and the oak leaf that is on the floor. I placed my Nikon D200 on the skies so the view was looking straight down at the scene. I pulled the blinds, shut off the lights and made a 2 minute test shot with no Lightpainting. Perfect, a completely black image. Now the fun can begin. Nikon D200, ISO100, 2 minutes exposure at f10, Nikon 17-55mm Lens set on Manual Focus, WB 7600K, Stylus Streamlight (#2338161 … about the size of a ball point pen), Green Gel, 2 Bogen Super Clamps, Lexar 4G Flash Card. The green gel was placed over the Streamlight so I could Lightpaint the oak wood with green light. I Lightpainted under each club head and the ball for about 10 seconds each. Then I would take off the green gel and Lightpaint the 2 clubs and the ball with the standard daylight balanced Steamlight. The ball is white and only required 3 seconds while the clubs and shafts required about 30 seconds each. The remainder of time was used to position myself to Lightpaint from several different angles. These are my fathers old Walter Hagen signature golf clubs, therefore, the signature of Walter Hagen is prominently displayed on the club head and easily illuminated with Lightpainting. Image #1 The Set Up ….. I took the oak leaf section from our dinning room table and set it on the floor. I placed two 4 foot step ladders at either end of the oak leaf and used Bogen Super Clamps to secure and to suspend the clubs about 2 inches above the oak surface. Then I used a 2 inch section of cardboard tubing ( you know, a Christmas wrapping paper tube ) and place it on the oak surface and then placed the golf ball on the section of tubing. With my subjects (2 clubs and a golf ball) positioned 2 inches above the oak surface I felt I could Lightpaint the oak wood green and not paint the clubs or ball with any green color. The ladders, which are supporting the golf clubs had a duel purpose besides holding the clamped clubs. I laid my old skies from ladder to ladder directly over the top of the golf clubs, ball and the oak leaf that is on the floor. I placed my Nikon D200 on the skies so the view was looking straight down at the scene. I pulled the blinds, shut off the lights and made a 2 minute test shot with no Lightpainting. Perfect, a completely black image. Now the fun can begin. Nikon D200, ISO100, 2 minutes exposure at f10, Nikon 17-55mm Lens set on Manual Focus, WB 7600K, Stylus Streamlight (#2338161 … about the size of a ball point pen), Green Gel, 2 Bogen Super Clamps, Lexar 4G Flash Card. The green gel was placed over the Streamlight so I could Lightpaint the oak wood with green light. I Lightpainted under each club head and the ball for about 10 seconds each. Then I would take off the green gel and Lightpaint the 2 clubs and the ball with the standard daylight balanced Steamlight. The ball is white and only required 3 seconds while the clubs and shafts required about 30 seconds each. The remainder of time was used to position myself to Lightpaint from several different angles. These are my fathers old Walter Hagen signature golf clubs, therefore, the signature of Walter Hagen is prominently displayed on the club head and easily illuminated with Lightpainting.
|
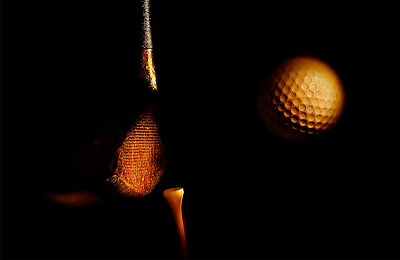 Image #2 Hickory Hit ….. What looks like a strobed shot of a golf ball being hit is actually another Lightpainting. Same set up as image #1 … oak leaf, ladders, club clamped in place, camera resting on my skies positioned directly above … YES, the camera is still positioned directly above. The golf ball is now resting on a 5 inch tall card board tube that is on the oak surface that is on the floor. When viewed from above the tube is not visible and it appears as though the ball is in the air. The club and tee are Super Clamped horizontal and are now 5 inches above the oak surface, same height as the ball. In other words, the entire scene is on it’s side …….Why? … because it was the best way to create the illusion of the ball being in flight. Crazy? …. wait, it gets better ………. Nikon D200, ISO100, 2 Minute Exposure at f10, Nikon 17-55mm Lens set on Manual Focus, Bogen Super Clamps, WB 10,000K, Streamlight with an Amber Gel, Lexar 4G Flash Card. The ball and tee are white and only needed 3 seconds of Lightpainting. The club face and wrapped shaft are a dark wood and require about 5-10 seconds. The 2 minute exposure gives me plenty of time to position myself to Lightpaint from a few angles and highlight only the areas I want. This image is OK but needs something more…… Image #2 Hickory Hit ….. What looks like a strobed shot of a golf ball being hit is actually another Lightpainting. Same set up as image #1 … oak leaf, ladders, club clamped in place, camera resting on my skies positioned directly above … YES, the camera is still positioned directly above. The golf ball is now resting on a 5 inch tall card board tube that is on the oak surface that is on the floor. When viewed from above the tube is not visible and it appears as though the ball is in the air. The club and tee are Super Clamped horizontal and are now 5 inches above the oak surface, same height as the ball. In other words, the entire scene is on it’s side …….Why? … because it was the best way to create the illusion of the ball being in flight. Crazy? …. wait, it gets better ………. Nikon D200, ISO100, 2 Minute Exposure at f10, Nikon 17-55mm Lens set on Manual Focus, Bogen Super Clamps, WB 10,000K, Streamlight with an Amber Gel, Lexar 4G Flash Card. The ball and tee are white and only needed 3 seconds of Lightpainting. The club face and wrapped shaft are a dark wood and require about 5-10 seconds. The 2 minute exposure gives me plenty of time to position myself to Lightpaint from a few angles and highlight only the areas I want. This image is OK but needs something more…… |
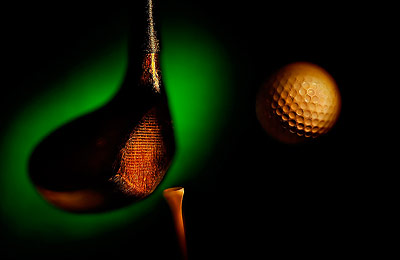 Image #3 Hickory Hit Again ….. Image #3 Hickory Hit Again ….. Background is everything! Remember that my club, ball and tee are positioned 5 inches above the oak leaf sitting on the floor. If no Lightpainting hits the oak it will be black. With this in mind I placed my green tee shirt on the oak leaf and Lightpainted a section of the tee shirt under the club using the Streamlight and a green gel. Now my picture has a little depth and the club head is defined. Once I had Lightpainted the ball, club face, shaft and tee I manually unfocused the lens and Lightpainted the green sweatshirt, the edges of the ball and the left side of the tee. The “pull focus” created a very dreamy softness to those areas Lightpainted out of focus while the areas Lightpainted in focus are perfectly sharp. Nikon D200, ISO100, 2 Minute Exposure at f10, Nikon 17-55mm Lens, WB 10,000K, Streamlight with gels ( the amber gel was used for the ball and tee … a green gel for the background, ) Bogen Super Clamps, Lexar 4G Flash Card. Now the wheels in my head are really turning. What if ……………….. |
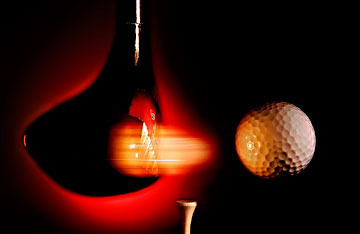
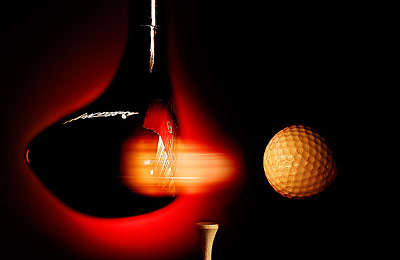 Image #4 Walter Hagen Drive ….. What if I used the same basic set up again, accept I replace the old hickory club with the Walter Hagen 4 Wood, the ball with a slightly more modern ball, and replaced my green tee shirt with a red tee shirt and lit it with a red gel. I used 2 Bogen Super Clamps to hold the club more secured at the grip so I could pull the club head back and release it to swing free ……. back and forth, back and forth for about 15 seconds while I Lightpainted the club face area with the Streamlight and no gel. Progress ! The red tee shirt when Lightpainted with a red gel produces a fireball glow behind the club head. The swinging club when Lightpainted for 15 seconds produces a motion fire trail ( thanks to the red and yellow club face … see Image #1. ) NikonD200, ISO100, 2 Minute Exposure at f10, Nikon 17-55mm Lens, WB 7600K, Streamlight and gel, Bogen Super Clamps, Lexar 4G Flash Card. Walter Hagen never hit so hard. I Lightpainted the ball, tee, club face and shaft in focus, then I pulled the focus when I Lightpainted the tee shirt behind the club to soften the red glow. Image #4 Walter Hagen Drive ….. What if I used the same basic set up again, accept I replace the old hickory club with the Walter Hagen 4 Wood, the ball with a slightly more modern ball, and replaced my green tee shirt with a red tee shirt and lit it with a red gel. I used 2 Bogen Super Clamps to hold the club more secured at the grip so I could pull the club head back and release it to swing free ……. back and forth, back and forth for about 15 seconds while I Lightpainted the club face area with the Streamlight and no gel. Progress ! The red tee shirt when Lightpainted with a red gel produces a fireball glow behind the club head. The swinging club when Lightpainted for 15 seconds produces a motion fire trail ( thanks to the red and yellow club face … see Image #1. ) NikonD200, ISO100, 2 Minute Exposure at f10, Nikon 17-55mm Lens, WB 7600K, Streamlight and gel, Bogen Super Clamps, Lexar 4G Flash Card. Walter Hagen never hit so hard. I Lightpainted the ball, tee, club face and shaft in focus, then I pulled the focus when I Lightpainted the tee shirt behind the club to soften the red glow.
|
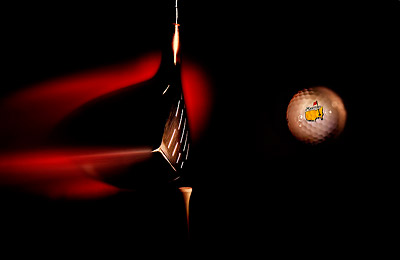 Image #5 Masters Drive ….. Same basic set up again, however, I switched the club and ball. This time a modern day Titanium Driver and a Masters golf ball from Augusta National were used. I Lightpainted the club face, shaft, front edge of the tee and Masters Logo on the ball in focus, then I pulled the focus and lightpainted the edges of the ball ( daylight ) and the red tee shirt (red gel ) behind the club head. With the focus pulled I then Lightpainted the oversized club head with red gelled Lightpainting while I slowly moved the club head away from the original position. The results is a fire streak of red that suggests the club is moving at top speed. Nikon D200, ISO100, 2 Minute Exposure at f10, Nikon 17-55mm Lens, WB 7600K, Streamlight, Bogen Super Clamps, Lexar 4G Flash Card. I loosened the Super Clamp in order to allow the club to pivot smoothly by hand rather than setting the club in a swinging motion as was done in image#4. This slow Lightpainted pivot (about 3 seconds) created an impression that the Titanium Driver is accelerating into the ball. Image #5 Masters Drive ….. Same basic set up again, however, I switched the club and ball. This time a modern day Titanium Driver and a Masters golf ball from Augusta National were used. I Lightpainted the club face, shaft, front edge of the tee and Masters Logo on the ball in focus, then I pulled the focus and lightpainted the edges of the ball ( daylight ) and the red tee shirt (red gel ) behind the club head. With the focus pulled I then Lightpainted the oversized club head with red gelled Lightpainting while I slowly moved the club head away from the original position. The results is a fire streak of red that suggests the club is moving at top speed. Nikon D200, ISO100, 2 Minute Exposure at f10, Nikon 17-55mm Lens, WB 7600K, Streamlight, Bogen Super Clamps, Lexar 4G Flash Card. I loosened the Super Clamp in order to allow the club to pivot smoothly by hand rather than setting the club in a swinging motion as was done in image#4. This slow Lightpainted pivot (about 3 seconds) created an impression that the Titanium Driver is accelerating into the ball. |
Keep in mind the same basic set up was used from start to finish ( oak leaf surface placed on the floor, objects clamped into positioned above the oak surface, two 4ft ladders, camera positioned above the scene using my skies laid across from ladder to ladder to support the camera facing down. I just switched objects and used pull focus and colored gels to create different looks. If you are new to Lightpainting I suggest you read some of the previous articles of Workshop at the Ranch (ex: May 2006 “Lightpainting From the Beginning”.) There you will find the necessary information to help you understand Lightpainting more completely.
Well, that wraps up another day of fun and learning. See you next time at Workshop at the Ranch. Adios, Dave
![]() Hi, and welcome to this edition of Workshop at the Ranch. Are you like me? .. sometimes you just want to have some fun and let all the business work wait until tomorrow. Nine holes of golf sounded like fun but the rain/snow had already begun here in the mountains and I’m not a committed golfer who accepts the challenge of dodging lightning and enduring cold temperatures on the course. So, I did the next best thing ………. I Lightpainted some golf clubs. I’m always trying to learn something new and improve my Lightpainting skills. This project would offer a great indoor escape from the office.
Hi, and welcome to this edition of Workshop at the Ranch. Are you like me? .. sometimes you just want to have some fun and let all the business work wait until tomorrow. Nine holes of golf sounded like fun but the rain/snow had already begun here in the mountains and I’m not a committed golfer who accepts the challenge of dodging lightning and enduring cold temperatures on the course. So, I did the next best thing ………. I Lightpainted some golf clubs. I’m always trying to learn something new and improve my Lightpainting skills. This project would offer a great indoor escape from the office. 


