
Workshop at the Ranch – March 2011 – Lightpainting Part 2, Macro Subjects
![]() Hi and welcome to this edition of Workshop at the Ranch. We are continuing this month with Part 2 of our Lightpainting series, and will be exploring the small world of Macro Lightpaintings. First let me answer the question, why Lightpaint? Why not use a studio strobe or flash? There is something about the way Lightpainting allows the photographer to feather and brush the light onto the subject that makes it distinctively different from a studio flashed image. By moving the light source continually (swirling and brushing) during the long exposure I can wrap light around my subject. I can create pockets of light and soft transitional edges in ways that other lighting systems cannot. The look is very stylized and unique, and produces a one of a kind image.
Hi and welcome to this edition of Workshop at the Ranch. We are continuing this month with Part 2 of our Lightpainting series, and will be exploring the small world of Macro Lightpaintings. First let me answer the question, why Lightpaint? Why not use a studio strobe or flash? There is something about the way Lightpainting allows the photographer to feather and brush the light onto the subject that makes it distinctively different from a studio flashed image. By moving the light source continually (swirling and brushing) during the long exposure I can wrap light around my subject. I can create pockets of light and soft transitional edges in ways that other lighting systems cannot. The look is very stylized and unique, and produces a one of a kind image.
Hi and welcome to this edition of Workshop at the Ranch. We are continuing this month with Part 2 of our Lightpainting series, and will be exploring the small world of Macro Lightpaintings. First let me answer the question, why Lightpaint? Why not use a studio strobe or flash? There is something about the way Lightpainting allows the photographer to feather and brush the light onto the subject that makes it distinctively different from a studio flashed image. By moving the light source continually (swirling and brushing) during the long exposure I can wrap light around my subject. I can create pockets of light and soft transitional edges in ways that other lighting systems cannot. The look is very stylized and unique, and produces a one of a kind image.
Let’s revisit a few Lightpainting Basics from last month’s article. Simply said, Lightpainting is the revealing of the subject from darkness with light. Lightpaintings in general, but not always, make use of long exposure times like 1 second, 10 seconds, 30 seconds, 2 minutes, or more. During the long exposure a light source (ex: penlight, flashlight, or spotlight) is used to illuminate the subject and various elements of the scene. I apply the light from off camera angles rather than a direct hit of light from the camera’s location. This helps to create some shadows and depth to the image. The main subject of the scene usually receives the most light while the supporting elements receive less light. These are general basics but not hard fast rules.
Long exposure Lightpaintings will require using a tripod or at least securing your camera so it is motionless during the long exposure time. Focus on your subject while the room lights are on. Then turn off the auto focus so the lens doesn’t search in the dark for the subject to focus on while you are Lightpainting. I use the camera’s self-timer to give myself 5 seconds or more after pressing the shutter before the exposure time begins. This prep time allows me to position my light source and gather my thoughts about Lightpainting the subject before the start of the exposure. I always activate the Long Exposure Noise Reduction mode in the camera’s custom settings (read your camera manual.) I make a homemade snoot for all my flashlights so the LED bulb isn’t seen in the picture and I can better control the spill of light. Apply the light from an off camera angle and not with the flashlight next to the camera or lens. Last month’s article also addressed how I determine what ISO, exposure time, and aperture settings I use. If you haven’t read the February Lightpainting Basics article, now would be a perfect time.
Is a completely dark environment required? No, but you need to make a “Blank Image” first. Basically, all you really need is a very underexposed image that allows enough time to Lightpaint the subject. For example, if the room you are working in allows you to make an exposure of ISO200, 30 seconds at f8 and the image that appears on the camera’s LCD screen looks so dark that I can’t see the subject, that is a blank image. The blank image should be dark enough so that when Lightpainting is added it makes a distinguishable difference. I always make a blank image without any applied light before I make the first Lightpainting. This is so I can see if there is any available ambient light, either helpful or unwanted, spilling into the scene. Sometimes I allow some ambient light to illuminate part of the scene by setting an exposure that produces an image where I can faintly see some of the subject. Then I will Lightpaint the subject or area of the scene I want the viewer to look at. All this being said I believe it is best for the photographer who is just learning to Lightpaint to begin with a dark environment and a dark blank image. It is easier to grasp the concept of Lightpainting when you are applying light onto the subject in a very dark room or outdoors at night.
With all the basics now fresh in our minds, let’s start small and Lightpaint some Macro Subjects.
|
|
| Does trial and error play a big role in the Lightpainting learning process? Yes. It might take you 20 attempts to get 1 Lightpainting you really like. The LCD screen on the back of the camera is going to help you determine how much light to apply and where to apply it. Keep making Lightpaintings and keep looking at the LCD screen to help guide your progress until you make a Lightpainting that has the “WOW” factor. |
|
|
| What does an Extension Tube do? Currently for my small scenes and macro work I am using extension tubes rather than a traditional macro lens. An extension tube increases the distance between the lens and camera sensor, which causes the lens to focus closer than its normal set minimum focusing distance. I am using the Kenko Extension Tubes and purchased them in a very handy 3 pack with 12mm, 24mm and 36mm extension tubes. The Kenko product enables all the electronic functions and information, like auto focus, exposure, and data to work between the camera and lens. This set up gives me a zoom macro capability for about $175 for the variety 3 pack of extension tubes. |
| Why not just add some softening or blurring in Photoshop to the image? It has been my experience that creating a softening or blurred effect in Photoshop can sometimes cause a kind of ghost-like edge to the subject. By adding some additional Lightpainting to only some parts of the image after un-focusing the lens, (to infinity if you want), a true dream like quality can be created. Keep in mind that when you use the soft focus technique you will need to refocus the lens on your subject after each Lightpainting is made. |
|
|
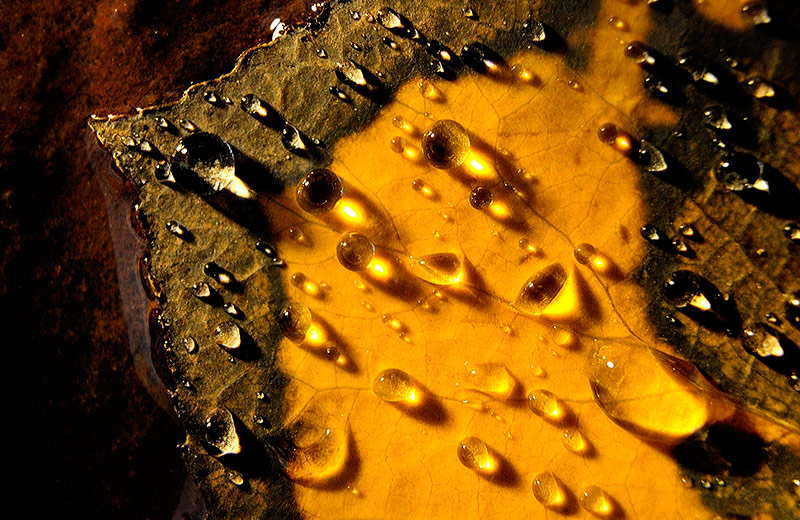 Image #4 Aspen Dew … This image, like the previous image #3, dispels the myth that Lightpaintings have to be made in a dark environment. It also deviates from the traditional long exposure times of most Lightpaintings. This macro image was captured outdoors about 9:00am during overcast conditions that were too bright to accomplish a long exposure time. It measures about 2 inches in width. I applied light from the upper left-hand corner with my Inova Bolt 2L LED flashlight. I used ISO1000, a shutter speed of 1/25 of a second at f22. The short exposure time doesn’t allow me to Lightpaint from a variety of angles, but I can recreate an early morning sunrise feeling with my Inova Bolt that is about 8 inches away from the leaf. I have made a flexible snoot for my Inova out of Gaffer Tape. The homemade snoot helps me to control the light and keep it more directional. Nikon D3s, ISO1000, 1/25 at f22, Nikon 28-300mm G VR II zoom lens (zoomed to 300mm) with a lens Kenko 20mm extension tube, SanDisk Extreme Pro 64G Flash Card. I was unsuccessful positioning my tripod and eventually went for the higher ISO so I could simply hand hold the camera in my right hand and apply the light with the Inova Bolt in my left hand. This kind of Lightpainting breaks some traditional thinking of what Lightpainting is, but it can be very useful for the nature photographer for adding a small amount of light to any small nature subject like a flower or leaf. Image #4 Aspen Dew … This image, like the previous image #3, dispels the myth that Lightpaintings have to be made in a dark environment. It also deviates from the traditional long exposure times of most Lightpaintings. This macro image was captured outdoors about 9:00am during overcast conditions that were too bright to accomplish a long exposure time. It measures about 2 inches in width. I applied light from the upper left-hand corner with my Inova Bolt 2L LED flashlight. I used ISO1000, a shutter speed of 1/25 of a second at f22. The short exposure time doesn’t allow me to Lightpaint from a variety of angles, but I can recreate an early morning sunrise feeling with my Inova Bolt that is about 8 inches away from the leaf. I have made a flexible snoot for my Inova out of Gaffer Tape. The homemade snoot helps me to control the light and keep it more directional. Nikon D3s, ISO1000, 1/25 at f22, Nikon 28-300mm G VR II zoom lens (zoomed to 300mm) with a lens Kenko 20mm extension tube, SanDisk Extreme Pro 64G Flash Card. I was unsuccessful positioning my tripod and eventually went for the higher ISO so I could simply hand hold the camera in my right hand and apply the light with the Inova Bolt in my left hand. This kind of Lightpainting breaks some traditional thinking of what Lightpainting is, but it can be very useful for the nature photographer for adding a small amount of light to any small nature subject like a flower or leaf. |


Well, I hope you have enjoyed this macro Lightpainting lesson. By now you should be ready to secure your camera to a tripod, grab your Stylus flashlight, turn out the room lights, and begin making your own Lightpaintings. If you haven’t read last month’s article Lightpainting Part 1: The Basics let me encourage you to do so. There you will find step-by-step basic explanations of how I approach Lightpainting. I hope you will join me next month here on Workshop at the Ranch when we expand our knowledge and learn how to Lightpaint the TableTop size subjects.
Adios. Dave
Here are links to the light sources I use to Lightpaint with:
Stylus penlight by Streamlight: www.streamlight.com
Inova Bolt 2L LED Flashlight: www.inovalight.com
Brinkmann Max Million II: www.brinkmann.net/products
See you next time here on Workshop at the Ranch. Adios. Dave
