
Workshop at the Ranch – June 2011 – Lightpainting Part 5, Outdoor Subjects
![]() Hi and welcome to this edition of Workshop at the Ranch. We are continuing this month with Part 5 of our Lightpainting series by learning how to Lightpaint Outdoor Subjects. I recommend that your Lightpainting basics be well established before taking on the challenge of Lightpainting these sometimes larger than life subjects. All the steps we have been learning in this series continue to apply to Lightpainting outdoor subjects. With outdoor subjects we will be making use of the available ambient light in the sky as our background while Lightpainting the subject and foreground. This concept can be a real challenge so I suggest starting small before attempting a large-scale landscape.
Hi and welcome to this edition of Workshop at the Ranch. We are continuing this month with Part 5 of our Lightpainting series by learning how to Lightpaint Outdoor Subjects. I recommend that your Lightpainting basics be well established before taking on the challenge of Lightpainting these sometimes larger than life subjects. All the steps we have been learning in this series continue to apply to Lightpainting outdoor subjects. With outdoor subjects we will be making use of the available ambient light in the sky as our background while Lightpainting the subject and foreground. This concept can be a real challenge so I suggest starting small before attempting a large-scale landscape.
Hi and welcome to this edition of Workshop at the Ranch. We are continuing this month with Part 5 of our Lightpainting series by learning how to Lightpaint Outdoor Subjects. I recommend that your Lightpainting basics be well established before taking on the challenge of Lightpainting these sometimes larger than life subjects. All the steps we have been learning in this series continue to apply to Lightpainting outdoor subjects. With outdoor subjects we will be making use of the available ambient light in the sky as our background while Lightpainting the subject and foreground. This concept can be a real challenge so I suggest starting small before attempting a large-scale landscape.
The return to basics is always a cornerstone for success, therefore, if you’ve just joined us for the first time here in Part 5 of our Lightpainting series I recommend reading through the February, March, April, and May WATR articles containing Parts 1, 2, 3, and 4. If you’ve Lightpainted before but your skills are a bit rusty then perhaps all you need is this short recap of the basics. Simply said, Lightpainting is the revealing of the subject from darkness with light. Lightpaintings in general, but not always, make use of long exposure times like 1 second, 10 seconds, 30 seconds, 2 minutes, or more. During the long exposure a light source (ex: penlight, flashlight, or spotlight) is used to illuminate the subject and various elements of the scene. I apply the light from off camera angles rather than a direct hit of light from the camera’s location. This helps to create some shadows and depth to the image. The main subject of the scene usually receives the most light while the supporting elements receive less light. These are general basics but not hard fast rules.
Long exposure Lightpaintings will require using a tripod or at least securing your camera so it is motionless during the long exposure time. Focus on your subject while the room lights are on. Then turn off the auto focus so the lens doesn’t search in the dark for the subject to focus on while you are Lightpainting. I use the camera’s self-timer to give myself 5 seconds or more after pressing the shutter before the exposure time begins. This prep time allows me to position my light source and gather my thoughts about Lightpainting the subject before the start of the exposure. I always activate the Long Exposure Noise Reduction mode in the camera’s custom settings (read your camera manual.) I make a homemade snoot for all my flashlights so the LED bulb isn’t seen in the picture and I can better control the spill of light. Apply the light from an off camera angle and not with the flashlight next to the camera or lens. Last month’s article also addressed how I determine what ISO, exposure time, and aperture settings I use. If you haven’t read the February Lightpainting Basics article, now would be a perfect time.
Is a completely dark environment required? No, but you need to make a “Blank Image” first. Basically, all you really need is a very underexposed image that allows enough time to Lightpaint the subject. For example, if the room you are working in allows you to make an exposure of ISO200, 30 seconds at f8 and the image that appears on the camera’s LCD screen looks so dark that I can’t see the subject, that is a blank image. The blank image should be dark enough so that when Lightpainting is added it makes a distinguishable difference. I always make a blank image without any applied light before I make the first Lightpainting. This is so I can see if there is any available ambient light, either helpful or unwanted, spilling into the scene. Sometimes I allow some ambient light to illuminate part of the scene by setting an exposure that produces an image where I can faintly see some of the subject. Then I will Lightpaint the subject or area of the scene I want the viewer to look at. All this being said I believe it is best for the photographer who is just learning to Lightpaint to begin with a dark environment and a dark blank image. It is easier to grasp the concept of Lightpainting when you are applying light onto the subject in a very dark room or outdoors at night.
With all the basics once again fresh in our minds, let’s begin Lightpainting some Outdoor Subjects.
I mentioned earlier in this article that I would be making use of the ambient light conditions in the sky behind my subject. Once I have composed the scene and focused on my subject, the first step is to make a Blank Image accept this image will not be blank, but will include the sky. This blank image has no Lightpainting applied to the subject, but places my subject in a silhouette against the sky. I usually make about 2-3 blank images to determine exactly how I want the sky exposed. Determining this blank image exposure can be tricky as the exposure of the sky can diminish rapidly as the sun continues to set. Why not use a program exposure mode? I have found it somewhat inconsistent to use a program mode like Aperture Priority with EV compensation when making my Lightpaintings. While the silhouette against the sky blank image might look perfect the auto exposure will change as I apply Lightpainting to the subject and so I suggest that you continue to determine your exposure manually. You can make manual exposure adjustments accordingly each time you return to the camera to examine the image. My next step is to reveal my subject and supporting characters from silhouette with lightpainting. I will need to achieve an exposure that includes the available ambient light in the sky, yet allows me a long enough exposure to apply the lightpainting sufficiently to reveal the subject from silhouette. That being said, these “Twilight” Lightpaintings usually begin after the sun has set below the horizon. Often times I will make my blank image 15-30 minutes after sunset. This allows me to achieve a long enough exposure time to reveal my subject from silhouette with Lightpainting.
Sound too difficult? Well, it does take some getting used to, but once you step outdoors and give it a try you’ll be making some very unique Lightpaintings before you know it. So, let’s take it outdoors.
|
|
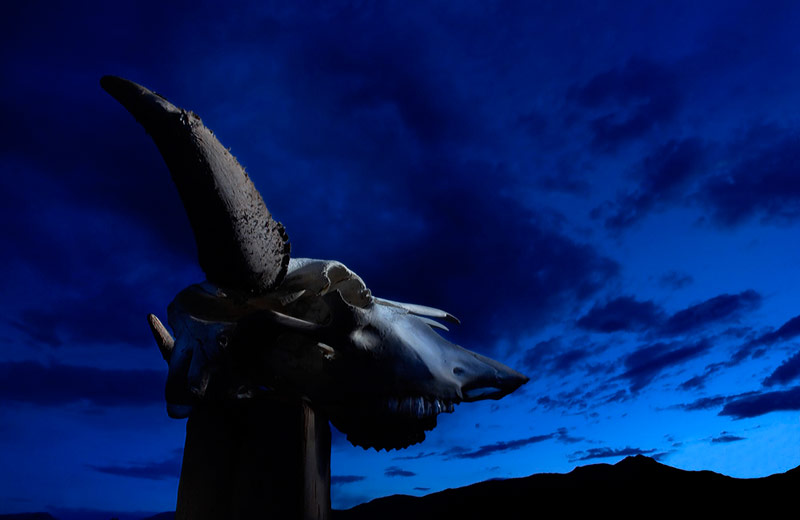
 Image #2 Twilight Skull (reveal) … With my camera set on a 5-second self-timer mode I pressed the shutter and stepped off camera to the right side just out of the frame. When the shutter opened I applied lightpainting for the 5 seconds of exposure time. The 5 seconds did not offer me much time to be detailed with my application of light, but it was just enough time to make it look as if the final ray of setting sun fell on Old Skully. The red burn in the sky lasted less than 1 minute, which gave me enough time to make 4 Lightpaintings with a fiery sky. Nikon D1, ISO200, 5 seconds at f16, Nikon 17-55mm lens, WB Shade, Mag-Light, Gitzo Tripod with SLIK Super Ball Head, SanDisk 64mb Flash Card. Image #2 Twilight Skull (reveal) … With my camera set on a 5-second self-timer mode I pressed the shutter and stepped off camera to the right side just out of the frame. When the shutter opened I applied lightpainting for the 5 seconds of exposure time. The 5 seconds did not offer me much time to be detailed with my application of light, but it was just enough time to make it look as if the final ray of setting sun fell on Old Skully. The red burn in the sky lasted less than 1 minute, which gave me enough time to make 4 Lightpaintings with a fiery sky. Nikon D1, ISO200, 5 seconds at f16, Nikon 17-55mm lens, WB Shade, Mag-Light, Gitzo Tripod with SLIK Super Ball Head, SanDisk 64mb Flash Card. |
|
|
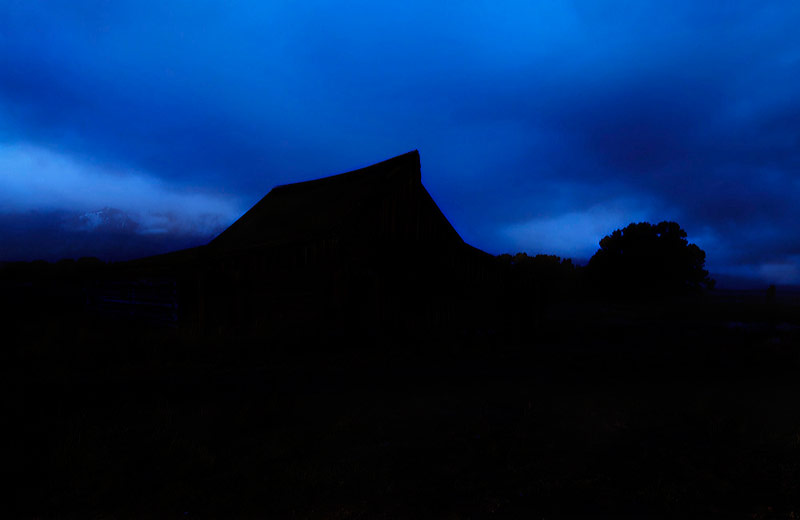 Image #4 Mormon Row Barn (silhouette) … The Molton Barn on Mormon Row outside Jackson Hole, Wyoming is a favorite subject of mine. All the Lightpainting basics are the same with this much larger subject. I have chosen a camera angle that places the gable of the barn into the sky above the horizon. The sun has set below the horizon for about 30 minutes leaving the sky illuminated and the gable of the barn in silhouette. With my subject in silhouette I waited for the sky to begin the “burn” but nothing came of it. The cloud cover had increased blocking the sun’s final rays from lighting up the sky. I shifted to plan “B” and changed the WB too incandescent for a super blue sky (today I will use a WB of 3030-4000K). This image is also one of my earlier outdoor Lightpaintings, which of course made use of earlier camera equipment. Nikon D100, ISO200, 30 seconds at f4, Nikon 17-55mm lens, WB Incandescent, Gitzo Tripod with SLIK Super Ball Head, Brinkmann Q Beam (today it is called a Brinkmann Max Million II) Image #4 Mormon Row Barn (silhouette) … The Molton Barn on Mormon Row outside Jackson Hole, Wyoming is a favorite subject of mine. All the Lightpainting basics are the same with this much larger subject. I have chosen a camera angle that places the gable of the barn into the sky above the horizon. The sun has set below the horizon for about 30 minutes leaving the sky illuminated and the gable of the barn in silhouette. With my subject in silhouette I waited for the sky to begin the “burn” but nothing came of it. The cloud cover had increased blocking the sun’s final rays from lighting up the sky. I shifted to plan “B” and changed the WB too incandescent for a super blue sky (today I will use a WB of 3030-4000K). This image is also one of my earlier outdoor Lightpaintings, which of course made use of earlier camera equipment. Nikon D100, ISO200, 30 seconds at f4, Nikon 17-55mm lens, WB Incandescent, Gitzo Tripod with SLIK Super Ball Head, Brinkmann Q Beam (today it is called a Brinkmann Max Million II) |
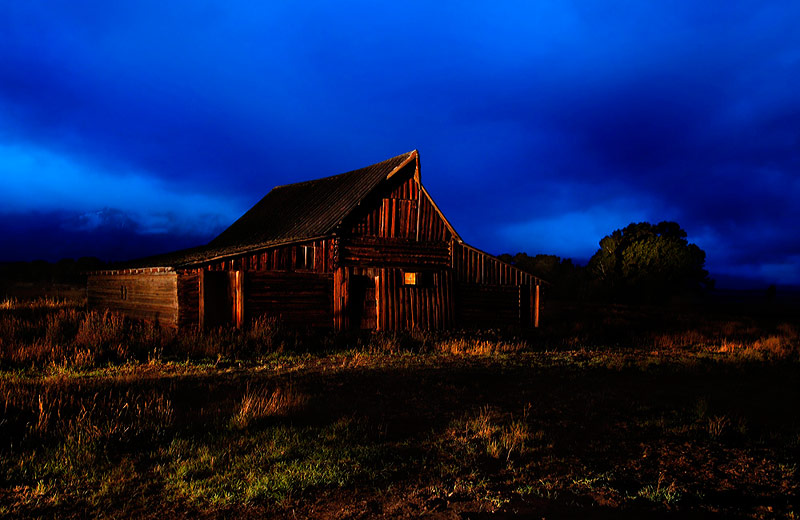 Image #5 Mormon Row Barn (reveal) … I revealed the barn from silhouette with the warm colored light produced by my Brinkmann 2 million-candle powered spotlight. Currently I use the Brinkmann Max Million II spotlight. Itis ideal for making large-scale landscape Lightpaintings because it is battery powered and rechargeable, and has an easy to hold handgrip with a trigger release. Rather than lightpaint all of the barn and foreground I applied light sparingly with shafts of warm illumination. These shafts of light help create an overall mood of the day’s first rays of sunlight even though it is nearly 8:00pm. Two key supporting characters are the lit window and the tree. I set my camera with a 20 second self-timer setting that gave me enough time to press the shutter and make my way behind the barn. I knew when the shutter would open because I simply counted down from 20 as I moved into position to illuminate the window and tree. This was accomplished by aiming the Brinkmann directly at the window through a crack on the backside of the barn for about 3 seconds, and then I turned and illuminated the tree for 5 seconds. I turned off the Brinkmann and took about 7 seconds to relocate myself off camera out of the left side of the frame, which left me with 15 seconds of exposure time to finish the image. From this location I applied shafts of lightpainting to the gable, the side of the barn, the front of the barn, and some shafts along the foreground. Nikon D100, ISO200, 30 seconds at f4, Nikon 17-55mm lens, WB Incandescent, Gitzo Tripod with SLIK Super Ball Head, Brinkmann Q Beam (a.k.a. the Brinkmann Max Million II). Image #5 Mormon Row Barn (reveal) … I revealed the barn from silhouette with the warm colored light produced by my Brinkmann 2 million-candle powered spotlight. Currently I use the Brinkmann Max Million II spotlight. Itis ideal for making large-scale landscape Lightpaintings because it is battery powered and rechargeable, and has an easy to hold handgrip with a trigger release. Rather than lightpaint all of the barn and foreground I applied light sparingly with shafts of warm illumination. These shafts of light help create an overall mood of the day’s first rays of sunlight even though it is nearly 8:00pm. Two key supporting characters are the lit window and the tree. I set my camera with a 20 second self-timer setting that gave me enough time to press the shutter and make my way behind the barn. I knew when the shutter would open because I simply counted down from 20 as I moved into position to illuminate the window and tree. This was accomplished by aiming the Brinkmann directly at the window through a crack on the backside of the barn for about 3 seconds, and then I turned and illuminated the tree for 5 seconds. I turned off the Brinkmann and took about 7 seconds to relocate myself off camera out of the left side of the frame, which left me with 15 seconds of exposure time to finish the image. From this location I applied shafts of lightpainting to the gable, the side of the barn, the front of the barn, and some shafts along the foreground. Nikon D100, ISO200, 30 seconds at f4, Nikon 17-55mm lens, WB Incandescent, Gitzo Tripod with SLIK Super Ball Head, Brinkmann Q Beam (a.k.a. the Brinkmann Max Million II). |
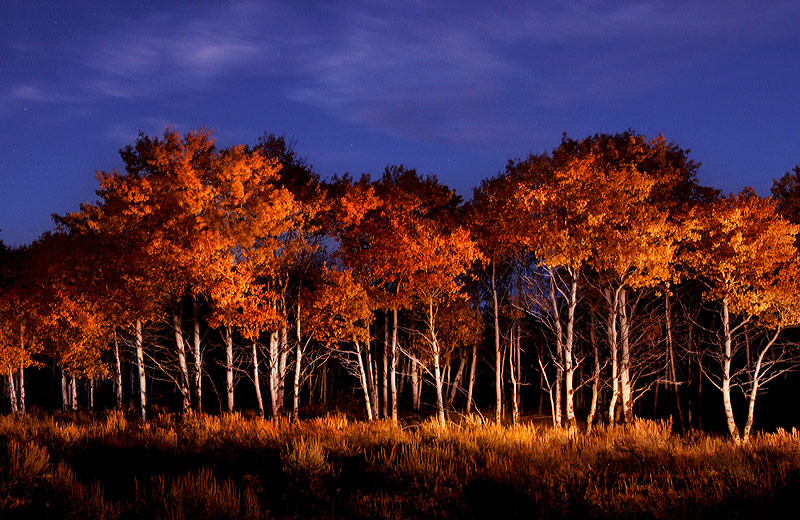 Image #6 Evening Aspen … One of my favorite outdoor Lightpaintings, Evening Aspen, was made north of Wilson, Wyoming. This Aspen grove seemed gigantic to me back in 2002 and certainly presented some challenges. I made 2 blank images in order to determine my sky exposure. This is a large scene that I felt would require 30 seconds to Lightpaint. I wanted a broad depth of field so I chose f11. Experience told me that ISO200 would be enough, but the first blank image was a bit dark so I made a second with ISO250. I tend to judge my exposures directly from the LCD monitor on the back of the camera. My off camera Lightpainting location is about 60 feet to the right side of the Aspen grove. To avoid applying too much light to any one tree I feathered the light by continually “flickering” the trigger on the Brinkmann. Keeping the application of light consistent across the entire Aspen grove was both critical and a challenge. The closest tree to me received only 1-2 seconds of lightpainting, the 3rd and 4th trees received 3-4 seconds of light, the center trees received 5-6 seconds of light, while the farthest group of trees received about 15 seconds of light. The theory was that the closest objects receive the least amount of time spent illuminating, and the farthest objects would receive the most amount of time spent illuminating. Remember that it’s not always how powerful your lightsource is, but how much time you spend illuminating your subject. By using a 30-degree honeycomb grid I was able to control the spill of light and thus be very accurate with my application of Lightpainting to each tree. By now you should recognize that the Aspen grove began as a silhouette against my manual exposure for the sky and was then revealed with Lightpainting. The same formula applies to many of my outdoor Lightpaintings, that being place your subject in silhouette against the sky and then reveal your subject with Lightpainting. Again, this is an older image from 2002 thus equipment from that year was used. Nikon D100, ISO250, 30 seconds at f11, Nikon 17-55mm lens, WB Cloudy (no Kelvin scale available on the D100 camera in 2002), Gitzo Tripod with SLIK Super Ball Head (today I use a Kirk “L” Bracket), Brinkmann Q Beam (now the Brinkmann Max Million II), and I placed a 30 degree honey comb grid over the front to help control the spill of light. Image #6 Evening Aspen … One of my favorite outdoor Lightpaintings, Evening Aspen, was made north of Wilson, Wyoming. This Aspen grove seemed gigantic to me back in 2002 and certainly presented some challenges. I made 2 blank images in order to determine my sky exposure. This is a large scene that I felt would require 30 seconds to Lightpaint. I wanted a broad depth of field so I chose f11. Experience told me that ISO200 would be enough, but the first blank image was a bit dark so I made a second with ISO250. I tend to judge my exposures directly from the LCD monitor on the back of the camera. My off camera Lightpainting location is about 60 feet to the right side of the Aspen grove. To avoid applying too much light to any one tree I feathered the light by continually “flickering” the trigger on the Brinkmann. Keeping the application of light consistent across the entire Aspen grove was both critical and a challenge. The closest tree to me received only 1-2 seconds of lightpainting, the 3rd and 4th trees received 3-4 seconds of light, the center trees received 5-6 seconds of light, while the farthest group of trees received about 15 seconds of light. The theory was that the closest objects receive the least amount of time spent illuminating, and the farthest objects would receive the most amount of time spent illuminating. Remember that it’s not always how powerful your lightsource is, but how much time you spend illuminating your subject. By using a 30-degree honeycomb grid I was able to control the spill of light and thus be very accurate with my application of Lightpainting to each tree. By now you should recognize that the Aspen grove began as a silhouette against my manual exposure for the sky and was then revealed with Lightpainting. The same formula applies to many of my outdoor Lightpaintings, that being place your subject in silhouette against the sky and then reveal your subject with Lightpainting. Again, this is an older image from 2002 thus equipment from that year was used. Nikon D100, ISO250, 30 seconds at f11, Nikon 17-55mm lens, WB Cloudy (no Kelvin scale available on the D100 camera in 2002), Gitzo Tripod with SLIK Super Ball Head (today I use a Kirk “L” Bracket), Brinkmann Q Beam (now the Brinkmann Max Million II), and I placed a 30 degree honey comb grid over the front to help control the spill of light. |

Well, I hope you have enjoyed this Outdoor Subject Lightpainting lesson. If you haven’t read the February, March, April, and May articles titled Lightpainting Part 1, Part 2, Part 3, and Part 4 let me encourage you to do so. There you will find step-by-step basic explanations of how I approach Lightpainting a variety of subjects.
I hope that you are discovering just how unique Lightpaintings can be, and that you are having some success making your own, but we’re just getting warmed up. Join me next month here on Workshop at the Ranch for Part 6 when we delve into some of my favorite Lightpainting Specialty Techniques.
Here are links to the light sources I use to Lightpaint with:
Stylus penlight by Streamlight: www.streamlight.com
Inova Bolt 2L LED Flashlight: www.inovalight.com
Brinkmann Max Million II: www.brinkmann.net/products
See you next time here on Workshop at the Ranch. Adios. Dave
