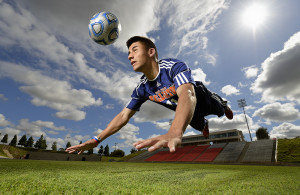
 Image #1… Soccer Header Image #1… Soccer Header
Zoom Feature on Speedlights
Question: …My questions for you are with regards to zooming the flash heads. When we did the soccer shoots at Sports Shooter Academy, I remember you zoomed the flash heads in to the max setting of 200mm. Do you zoom them in for everything that you shoot?
Thanks again for your time. I look forward to hearing from you. Joshua
Answer … Hi Joshua. Glad you enjoyed the Sports Shooter Academy workshop this year. Teaching High Speed Sync action classes was a great treat for me. First off, keep in mind that the Zoom feature on a Speedlight has no relation to your zoom lens or telephoto lens. The Zoom feature allows the photographer to adjust the “Spread of Light” coming from the Speedlight. With the Zoom set at 14mm the light from the Speedlight will spread very wide to 14mm. At 85mm the spread is more narrow…at 200mm the spread is very narrow. By Zooming the Speedlight to 200mm I am narrowing or concentrating the spread of light. This Zooming or concentrating the light tends to increase the intensity of the light illuminating my subject. In the case of our soccer player my flash was competing with the sunshine. Therefore, I needed my Speedlights to produce the maximum of illumination, so I zoomed the Speedlights to a maximum of 200mm.
All this being said, If I was making a portrait and had my Speedlights mounted in a FourSquare Softbox I would zoom out to a wider setting like 14mm or 24mm. This wider spread of light helps “bounce” the light around the inside of the box and creates a softer edge of light on the subject. Keep in mind that this wider spread and softbox would also decrease the amount of light illuminating my subject.
I needed the maximum amount of illumination from my 3 Speedlights to over power the sunshine and thus allow me to under expose my background by 1 and 2/3 stops. Keep in mind that we were shooting the soccer player at the High Speed Sync setting which allowed us to use a very fast shutter speed of 1/2000. When using the High Speed Sync mode setting on either Nikon or Canon Speedlights the illumination efficiency is slightly reduced with a very fast shutter speed like 1/2000. Therefore, I zoomed each of the Speedlights to 200mm to get the most concentrated light on my subject possible.
This image called Soccer Dive was captured with the NEW Nikon D800, ISO160, 1/2000 at f5.6, Nikon 14-24mm lens, WB 6250K, 3 Nikon Speedlights each at Full Power and each Zoomed to the maximum 200mm, and mounted into a FourSquare Softbox, SanDisk Extreme Pro 32G Flash Card. NOTE: the FourSquare Softbox is being held about 4 feet off the ground and about 8 feet from the subject. It takes a lot of flash power and the 200mm zoom to overpower the sunshine and use High Speed Sync at 1/2000.
Really a great question Joshua. Thanks for asking it. Adios. Dave
|
| Image: #2 Monument Valley Morning, and #3 Totem Pole After Midnight…Tips for Photographing in Monument Valley, UT.
Question: …Hi Dave. Long time. How have you been? As usual, I have been enjoying your monthly blogs. Was thinking about heading out to Monument Valley to shoot and was hoping you might have some advice for me. I’d like to do some shooting during the day as well as at night. Any tips on permits, locations, to do/not to do, etc? Hope your doing well. Thanks a lot D. Hammer
Answer: …Hope all is going well. You’ll love Monument Valley. Day time shooting is no problem. Just cruise around this most iconic park, hopefully in a more substantial vehicle than a sports car. Rough roads and drifting sand are the norm. Some form of high clearance or 4 WD vehicle is helpful, but a rental car will work for many of the rough roads. Mid day shooting is kind of harsh with regards to the sunlight. A polarizing filter is a great piece of gear from 10:00 am to 4:00 am. A heavy tripod is helpful, especially when the wind is blowing…and it can blow hard quite often. Early morning sunrise and late afternoon till sunset is spectacular. I believe the park is open from 6:00 am to 8:00 pm during the summer. I also believe there are special tours available that offer a pre sunrise and post-sunset opportunity.
My first visit to Monument Valley was for Lightpainting. This was a project where I was Lightpainting several of the National Parks across the Southwestern US. I had secured permission and hired a Native American guide so that I could be in the park all night long and photograph. The guide I worked with is no longer guiding, but google around and you’ll find Native American tours that have overnight access to the park.
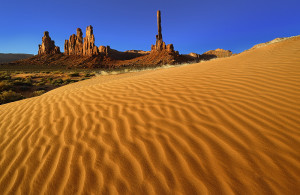 This image called Monument Valley Morning captures the Totem Pole monument and dunes at sunrise. Nikon D3, ISO400, 1/60 at f18, Nikon 14-24mm lens, WB 6500K, Gitzo Heavy Tripod and ball head. The Totem Pole is the iconic monument that was used for the opening scene in the 1975 movie, The Eiger Sanction staring Clint Eastwood. This image called Monument Valley Morning captures the Totem Pole monument and dunes at sunrise. Nikon D3, ISO400, 1/60 at f18, Nikon 14-24mm lens, WB 6500K, Gitzo Heavy Tripod and ball head. The Totem Pole is the iconic monument that was used for the opening scene in the 1975 movie, The Eiger Sanction staring Clint Eastwood.
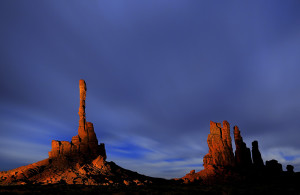
This image called Totem Pole after Midnight is a Lightpainting of the same Totem Pole monument. Nikon D3, ISO400, 3 minutes at f8, WB 4000K, Gitzo Heavy Tripod with Ball Head, 1 Brinkmann Max Million II handheld spot light with a 30 degree Honey Comb Grid placed over the front.
Have a good trip…safe travels. Adios, Dave |
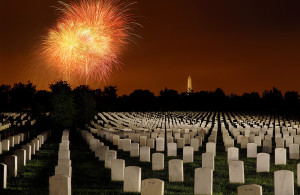 Image #4 … Heroes Tribute Image #4 … Heroes Tribute
Arlington National Cemetery Tribute
Question … Hello Mr.Black, I was at Photoshop World in DC. I went to your light painting class and I really enjoyed it. At the Art of Digital Photography class, you showed a video of your pictures from the Arlington shoot. I was wondering if I could possibly get a copy of that video to use for the 4th of July service at my Church. If I could that would be really great. Thanks and have a wonderful day. Walter
Answer … Hi Walter, I’m glad that you enjoyed my slide show presentation and tribute to our heroes in Arlington National Cemetery. The more than 30 images that comprised the slide show were made as part of a book project for the National Geographic and Arlington National Cemetery. I was part of a collection of select Geographic and military photographers, each with a photographic specialty, hired to photograph for the book, Where Valor Rests, Arlington National Cemetery. The book is a beautiful and historic tribute to the men and women who served this nation. My job was unlike any of the other photographers. I was asked to Lightpaint Arlington National Cemetery over a period of 3 consecutive nights, July 2, 3, and 4th, 2006.
I have received well over 100 requests for the slide show from attendees of Photoshop World. I do not make this show available to the public, but only present it on special occasions, which, I felt deeply that Photoshop World in Washington D.C. was such an occasion. The book, Where Valor Rests, Arlington National Cemetery, is available in bookstores and at Arlington National Cemetery. I believe that the National Geographic has made their own DVD that features images from all the photographers that are in the book, including my images from both the book and my slide show.
This image, Heroes Tribute is Section 68 of Arlington National Cemetery. It was made during the fireworks display over Washington D.C. July 4th, 2006. …Nikon D2x, ISO100, 25 seconds at f16, Nikon 17-55mm lens, WB 8000K, Gitzo Carbon Fiber Tripod and Ball Head with Kirk “L” Bracket, 2 Brinkmann Max Million II handheld spotlights.
|
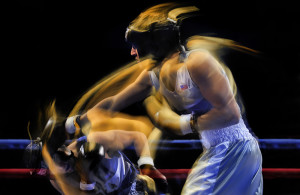 Image #5 … Knockout Light Image #5 … Knockout Light
Flash Action with Rear Curtain Sync
Question: …Hi Dave, First off can I say that I was introduced to your work at KelbyOne, and after that came to your website. The striking thing about your photography is that it really is unique, and in a class of its own. I have a question for you. I am trying to photograph sports, and would like a blurred image, to portray movement, but also the subject to be crisp clear in one part of the frame. For example, your image of Knockout Light (using sports strobes). Have you any tips on how to achieve images like this, using only one flash, or any general tips at all. It would be great to hear an expert opinion on this, as it is something I have had only limited success with, but seem to have hit a brick wall!! Thanks Brendan
Answer: … Blurred Action and Pan Action are accomplished by using a slower than normal shutter speed while shooting action movement photography. Normally we think of action photography as being best captured by fast shutter speeds like 1/1000, 1/2000, or faster. Shutter Speeds of 1/60, 1/30, 1/15, and slower as with this image at 1/5 of a second will cause the action or movement of your subject to blur. In the image Knockout Light I used sport strobes (large flash units with a very fast flash duration located high up in the catwalks system over the boxing ring) to illuminate the boxers. My exposure with a very slow shutter speed allowed some of the dim available ambient light of the old arena to also illuminate them. This image is a combined exposure of both ambient and flash. The camera was set to the “Rear Curtain Sync” flash mode, which causes the strobe or flash to fire just before the shutter closes. This way I let the available ambient light illuminate the movement of the boxers punch and then “FLASH” the punch is frozen by the strobe firing. If I were to set the camera on front curtain sync, which is a normal default setting, the frozen movement would be at the start of the punch, “FLASH”, followed by the blurred punch motion. Rear Curtain Sync is usually a good choice for capturing interesting flash action imagery.
This image called Knockout Light was captured with a Nikon D3x, ISO200, 1/5 second at f6.3, Nikon 24-70mm lens, WB 6500K, 4 Elinchrom 600 RX strobes, Pocket Wizard Multi MAX Transceivers.
|
 Hi and welcome to this edition of Workshop at the Ranch. This continuing Q&A Series is ongoing as many of you are submitting your photographic, lighting, technical, business, and simply thought provoking questions each month. Keep the Questions coming in via the Contact category on my website and I’ll reply with my best effort to answer quickly. And maybe yours will get written up in the next WATR article. Let’s see what Qs arrived into the email bag this month.


