 Hi and welcome to this edition of Workshop at the Ranch. We are continuing this month with Part 6 of our Lightpainting series by learning some Special Techniques that I have used. These techniques came about by simply experimenting during the Lightpainting process in an effort to create the picture I wanted. My advice is that you should always be open towards experimenting while making your Lightpaintings. Before incorporating any Special Techniques into your Lightpainting regimen, make sure that your basics are well established. All the fundamental steps we have been learning in this series continue to apply to the Lightpaintings featured in this article. If your not familiar with Lightpainting, or need a some review, I suggest you read the past 5 articles beginning with the February 2011 Workshop at the Ranch.
Hi and welcome to this edition of Workshop at the Ranch. We are continuing this month with Part 6 of our Lightpainting series by learning some Special Techniques that I have used. These techniques came about by simply experimenting during the Lightpainting process in an effort to create the picture I wanted. My advice is that you should always be open towards experimenting while making your Lightpaintings. Before incorporating any Special Techniques into your Lightpainting regimen, make sure that your basics are well established. All the fundamental steps we have been learning in this series continue to apply to the Lightpaintings featured in this article. If your not familiar with Lightpainting, or need a some review, I suggest you read the past 5 articles beginning with the February 2011 Workshop at the Ranch.
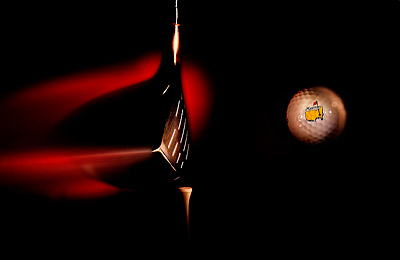 Image #1 Super Driver … Occasionally I will do some product shoots for companies. Often times I will incorporate Lightpainting into those photo shoots, and often times the client will choose the Lightpainting over images I made using more traditional lighting techniques. For this Super Driver image I stepped out of the traditional Lightpainting box of thought that your subject must remain completely still during the long exposure time. The scene is actually photographed from a camera position looking directly down onto the scene. A cardboard tube supports the golf ball. Thus, from the camera’s position looking down onto it the golf ball, it appears to be in mid-air. The tip of 3 inch golf tee is attached to another cardboard tube. Because I did not illuminate the bottom tip of the golf tee or the cardboard tube they are not visible. The driver grip is clamped to a table, which allows the driver head to swing back and forth about 6 inches thanks to the club’s flexible shaft. I’ve placed a red cloth about 2 feet behind (below) the driver head to be my background. And I have placed a red gel over the LED of one of my Stylus penlights. The other Stylus is the standard white LED. I pre-focus on the club face, which is also the plain of focus for the ball and tee. Once I begin the 2 minute exposure I use the white LED Stylus to Lightpaint the club face and shaft, tee, and golf ball in perfect focus. Then I turned off the Stylus and manually pushed the focus ring of the lens to infinity. This is the “soft focus” technique I mentioned earlier in this series. Now I can Lightpaint the red background which places the club head in a soft silhouette. Then, I pull the club head back about 3 inches and release it. The club begins to swing back and forth at which time I Lightpaint the sides and back of the club head using the red gelled Stylus. I applied the light only on the back swing and not when the club face was near the golf ball. I made certain not to add any additional light to the club face, shaft, tee or golf ball because I want those parts of the Lightpainting puzzle to be sharp and in focus without any movement or double exposure. The Driver now has the appearance of a fiery Super Driver just after impact with the golf ball. Nikon D200, ISO100, 2 minutes at f10, Nikon 17-55mm lens, WB 7600K, Stylus penlight by Steamlight, Manfroto Super Clamp. Image #1 Super Driver … Occasionally I will do some product shoots for companies. Often times I will incorporate Lightpainting into those photo shoots, and often times the client will choose the Lightpainting over images I made using more traditional lighting techniques. For this Super Driver image I stepped out of the traditional Lightpainting box of thought that your subject must remain completely still during the long exposure time. The scene is actually photographed from a camera position looking directly down onto the scene. A cardboard tube supports the golf ball. Thus, from the camera’s position looking down onto it the golf ball, it appears to be in mid-air. The tip of 3 inch golf tee is attached to another cardboard tube. Because I did not illuminate the bottom tip of the golf tee or the cardboard tube they are not visible. The driver grip is clamped to a table, which allows the driver head to swing back and forth about 6 inches thanks to the club’s flexible shaft. I’ve placed a red cloth about 2 feet behind (below) the driver head to be my background. And I have placed a red gel over the LED of one of my Stylus penlights. The other Stylus is the standard white LED. I pre-focus on the club face, which is also the plain of focus for the ball and tee. Once I begin the 2 minute exposure I use the white LED Stylus to Lightpaint the club face and shaft, tee, and golf ball in perfect focus. Then I turned off the Stylus and manually pushed the focus ring of the lens to infinity. This is the “soft focus” technique I mentioned earlier in this series. Now I can Lightpaint the red background which places the club head in a soft silhouette. Then, I pull the club head back about 3 inches and release it. The club begins to swing back and forth at which time I Lightpaint the sides and back of the club head using the red gelled Stylus. I applied the light only on the back swing and not when the club face was near the golf ball. I made certain not to add any additional light to the club face, shaft, tee or golf ball because I want those parts of the Lightpainting puzzle to be sharp and in focus without any movement or double exposure. The Driver now has the appearance of a fiery Super Driver just after impact with the golf ball. Nikon D200, ISO100, 2 minutes at f10, Nikon 17-55mm lens, WB 7600K, Stylus penlight by Steamlight, Manfroto Super Clamp.
|
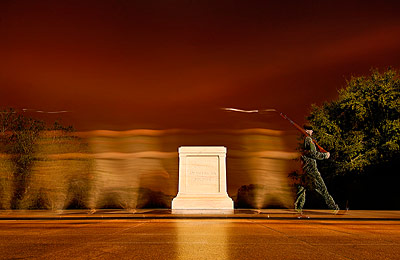 Image #2 Honor Guard … I like my Lightpaintings to have a pure painterly quality by using only mobile light sources. But some pictures require specialization. So far, I have only combined Lightpainting and Strobe (flash) on one project. This Lightpainting of the Honor Guard sentry at the Tomb of the Unknown Soldier at Arlington National Cemetery was made for the National Geographic book Where Valor Rests. It combines Lightpainting with a mobile light source (Brinkmann Max Million II) and 2 Nikon Speedlights. I made a careful study of my subject from Midnight – 1:00 AM on July 4th, 2006. I calculated that an 8 second exposure time would capture the sentry marching in front of the tomb while I Lightpainted him. Then I would have 2 Nikon SB-800 Speedlights (off camera in front of him) FLASH in order to freeze him in full stride. I turned off the Brinkmann just for a stride or 2 as he passed by the tomb. This allowed the tomb with its inscription “Here Rests In Honored Glory AN AMERICAN SOLDIER Known But To God” to be visible. Nikon D2x, ISO100, 8 seconds at f8, Nikon 17-55mm lens, WB 8000K, Ground Plate and Gitzo Ball Head with Kirk “L” Bracket, Brinkmann Max Million II (formerly called the Q Beam) with a 20 degree honey comb grid, 2 Nikon SB-800 Speedlights, Nikon SU-800 Commander. The book contains a photo essay of my Lightpaintings, along with the photo essays of several other photographers. This project is the most treasured of my career. Image #2 Honor Guard … I like my Lightpaintings to have a pure painterly quality by using only mobile light sources. But some pictures require specialization. So far, I have only combined Lightpainting and Strobe (flash) on one project. This Lightpainting of the Honor Guard sentry at the Tomb of the Unknown Soldier at Arlington National Cemetery was made for the National Geographic book Where Valor Rests. It combines Lightpainting with a mobile light source (Brinkmann Max Million II) and 2 Nikon Speedlights. I made a careful study of my subject from Midnight – 1:00 AM on July 4th, 2006. I calculated that an 8 second exposure time would capture the sentry marching in front of the tomb while I Lightpainted him. Then I would have 2 Nikon SB-800 Speedlights (off camera in front of him) FLASH in order to freeze him in full stride. I turned off the Brinkmann just for a stride or 2 as he passed by the tomb. This allowed the tomb with its inscription “Here Rests In Honored Glory AN AMERICAN SOLDIER Known But To God” to be visible. Nikon D2x, ISO100, 8 seconds at f8, Nikon 17-55mm lens, WB 8000K, Ground Plate and Gitzo Ball Head with Kirk “L” Bracket, Brinkmann Max Million II (formerly called the Q Beam) with a 20 degree honey comb grid, 2 Nikon SB-800 Speedlights, Nikon SU-800 Commander. The book contains a photo essay of my Lightpaintings, along with the photo essays of several other photographers. This project is the most treasured of my career. |
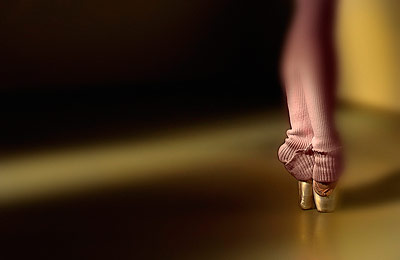 Image #3 On Toe … I have been experimenting with the “soft focus” technique over the past few years. I find it has a very pleasing quality that can greatly enhance an already unique image. While the soft focus technique is a bit more labor intensive due to the requirement of re-focusing after each Lightpainting attempt, it is well worth the effort. I used an aperture setting of f6.3, which provided a short depth of field. The first 6 seconds of the 1 minute exposure time was used to Lightpaint just the ankles, heels and toe shoes of the ballerina perfectly in focus. I am actually kneeling on the floor with my “snooted” Inova Bolt 2L about 18 inches from the ballerina’s toe shoes. I am not visible in the image because there is no light illuminating me. Once the ankles, heels, and toe shoes were complete, I turned off the Inova Bolt 2L and walked back to the camera so I could “soft focus” the remainder of the image by manually turning the focus ring of the lens about half way to infinity. With the exposure time still going I then stepped into the scene and finished adding some Lightpainting to the soft focus legs, floor, and wall. Make note that the sharp focus portion of the Lightpainting was accomplished during the first 6 seconds of the 1 minute exposure time when the subject is most likely to remain perfectly still. The soft focus portion is executed secondly. Nikon D2x, ISO100, 1 minute at f6.3, Nikon 17-55mm lens, WB 5500K, Gitzo Carbon Fiber Tripod and Ball Head with Kirk “L” Bracket, Inova Bolt 2L LED Flashlight. Image #3 On Toe … I have been experimenting with the “soft focus” technique over the past few years. I find it has a very pleasing quality that can greatly enhance an already unique image. While the soft focus technique is a bit more labor intensive due to the requirement of re-focusing after each Lightpainting attempt, it is well worth the effort. I used an aperture setting of f6.3, which provided a short depth of field. The first 6 seconds of the 1 minute exposure time was used to Lightpaint just the ankles, heels and toe shoes of the ballerina perfectly in focus. I am actually kneeling on the floor with my “snooted” Inova Bolt 2L about 18 inches from the ballerina’s toe shoes. I am not visible in the image because there is no light illuminating me. Once the ankles, heels, and toe shoes were complete, I turned off the Inova Bolt 2L and walked back to the camera so I could “soft focus” the remainder of the image by manually turning the focus ring of the lens about half way to infinity. With the exposure time still going I then stepped into the scene and finished adding some Lightpainting to the soft focus legs, floor, and wall. Make note that the sharp focus portion of the Lightpainting was accomplished during the first 6 seconds of the 1 minute exposure time when the subject is most likely to remain perfectly still. The soft focus portion is executed secondly. Nikon D2x, ISO100, 1 minute at f6.3, Nikon 17-55mm lens, WB 5500K, Gitzo Carbon Fiber Tripod and Ball Head with Kirk “L” Bracket, Inova Bolt 2L LED Flashlight.
|
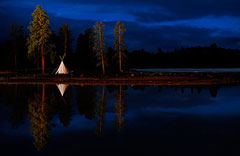
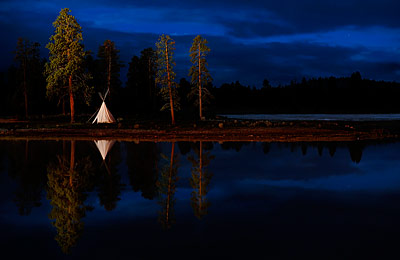 Image #4 TeePee Reflection … This image and lesson is more about problem solving rather than an actual technique. Capturing the perfect reflection of your subject by a lake sounds easy, but can be more difficult than it appears. Often times as soon as the morning sun breaks the horizon, the air begins to move and ruins the reflection. A solution is to Lightpaint your lakeside subject during the still of the night. This TeePee was located about 50 yards from the end of a small serene inlet to this lake in southern Utah. Unfortunately, I had forgotten to bring my wireless Pocket Wizard remote triggering gear with me on this trip. Guess I didn’t expect to find a TeePee by a lake…silly me. I first tried to walk off camera while the 20 second Self-Timer period before the exposure would begin, but the Lightpainting angle was too direct. Then I ran off camera, but still could not achieve an off camera Lightpainting angle. I wanted this picture so much that I eventually set-up the camera with its 20 second self-timer, pushed the shutter while sitting in my truck and then drove as fast as I could around the end of the inlet and Lightpainted out the truck window. I made 10 attempts before perfecting my timing to push the shutter, drive like Tony Stewart, and Lightpaint out the truck window. I’m not recommending this NASCAR-ish Technique to make a Lightpainting, but for me it was worth it. Nikon D3, ISO400, 30 seconds at f5.6, Nikon 70-200mm G VR lens, WB 5500K, Gitzo Carbon Fiber Tripod and Ball Head with Kirk “L” Bracket, Brinkmann Max Million II with 20 degree honey comb grid, and my 2007 Chevy Silverado Truck. (NOTE TO SELF: Bring all my gear next time.) Image #4 TeePee Reflection … This image and lesson is more about problem solving rather than an actual technique. Capturing the perfect reflection of your subject by a lake sounds easy, but can be more difficult than it appears. Often times as soon as the morning sun breaks the horizon, the air begins to move and ruins the reflection. A solution is to Lightpaint your lakeside subject during the still of the night. This TeePee was located about 50 yards from the end of a small serene inlet to this lake in southern Utah. Unfortunately, I had forgotten to bring my wireless Pocket Wizard remote triggering gear with me on this trip. Guess I didn’t expect to find a TeePee by a lake…silly me. I first tried to walk off camera while the 20 second Self-Timer period before the exposure would begin, but the Lightpainting angle was too direct. Then I ran off camera, but still could not achieve an off camera Lightpainting angle. I wanted this picture so much that I eventually set-up the camera with its 20 second self-timer, pushed the shutter while sitting in my truck and then drove as fast as I could around the end of the inlet and Lightpainted out the truck window. I made 10 attempts before perfecting my timing to push the shutter, drive like Tony Stewart, and Lightpaint out the truck window. I’m not recommending this NASCAR-ish Technique to make a Lightpainting, but for me it was worth it. Nikon D3, ISO400, 30 seconds at f5.6, Nikon 70-200mm G VR lens, WB 5500K, Gitzo Carbon Fiber Tripod and Ball Head with Kirk “L” Bracket, Brinkmann Max Million II with 20 degree honey comb grid, and my 2007 Chevy Silverado Truck. (NOTE TO SELF: Bring all my gear next time.) |
Well, I hope you have enjoyed this Lightpainting lesson regarding a few Specialty Techniques that I use. If you haven’t read the February, March, April, May, and June Workshop at the Ranch articles titled Lightpainting Part 1, Part 2, Part 3, Part 4, and Part 5, let me encourage you to do so. There you will find more Lightpaintings with step-by-step basic explanations of how I approach this creative lighting technique with a variety of subjects.
Join me next month here on Workshop at the Ranch for Part 7 of our Lightpainting series when we continue to Explore and Experiment with Lightpainting.
Adios. Dave
Here are links to the light sources I use to Lightpaint with:
Stylus penlight by Streamlight: www.streamlight.com
Inova Bolt 2L LED Flashlight: www.inovalight.com
Brinkmann Max Million II: www.brinkmann.net/products
![]() Hi and welcome to this edition of Workshop at the Ranch. We are continuing this month with Part 6 of our Lightpainting series by learning some Special Techniques that I have used. These techniques came about by simply experimenting during the Lightpainting process in an effort to create the picture I wanted. My advice is that you should always be open towards experimenting while making your Lightpaintings. Before incorporating any Special Techniques into your Lightpainting regimen, make sure that your basics are well established. All the fundamental steps we have been learning in this series continue to apply to the Lightpaintings featured in this article. If your not familiar with Lightpainting, or need a some review, I suggest you read the past 5 articles beginning with the February 2011 Workshop at the Ranch.
Hi and welcome to this edition of Workshop at the Ranch. We are continuing this month with Part 6 of our Lightpainting series by learning some Special Techniques that I have used. These techniques came about by simply experimenting during the Lightpainting process in an effort to create the picture I wanted. My advice is that you should always be open towards experimenting while making your Lightpaintings. Before incorporating any Special Techniques into your Lightpainting regimen, make sure that your basics are well established. All the fundamental steps we have been learning in this series continue to apply to the Lightpaintings featured in this article. If your not familiar with Lightpainting, or need a some review, I suggest you read the past 5 articles beginning with the February 2011 Workshop at the Ranch. 


