 Hi and welcome to this edition of Workshop at the Ranch. For those that have been following this entire series, welcome back. For those who are just joining in, let me suggest that you review that past several WATR articles and become familiar with the principles of Lightpainting before moving forward with this month’s article where we continue to Explore and Experiment with Lightpainting.
Hi and welcome to this edition of Workshop at the Ranch. For those that have been following this entire series, welcome back. For those who are just joining in, let me suggest that you review that past several WATR articles and become familiar with the principles of Lightpainting before moving forward with this month’s article where we continue to Explore and Experiment with Lightpainting.
If you have ever made your own Lightpaintings you already know that experimenting is a key ingredient. Exploring and experimenting with light and how to apply it to your subject is an important basic to making a successful Lightpainting. Buy now you have also discovered that the possibilities seem unlimited regarding the choice of light sources, snoots, colored gels, and application techniques. This is what makes Lightpainting so much fun. So, with Explore and Experiment as our Lightpainting topic this month, let’s have a look at some Lightpaintings and how they were made.
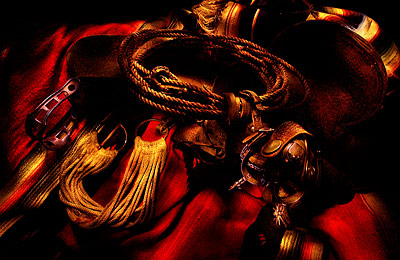 Image #1 Saddlery Light … This is my first Lightpainting. The technique, in-and of itself, was an Exploration into lighting by simply Experimenting with a variety of flashlights and exposures. This saddle and western tack placed on a red horse blanket was Lightpainted using a small Mag-Lite. I knew almost nothing about the technique. There were no classes or workshops on Lightpainting back in the day. I first heard of Lightpainting when I was part of a collection of photographers speaking to NPPA members in Denver. I had seen a few examples in a presentation by another photographer earlier in the day and immediately the interest was sparked in my mind. I returned home that evening and wasted no time putting together a manageable subject to Lightpaint. At about midnight I shut the door to my office, turned off the lights, and embarked on my Lightpainting journey. It was January 1999 and film was still the industry standard and so it seemed wise to have the final product on film. I would determine my exposure using one of Nikon’s earliest digital products, the Coolpix 950. I felt the digital image on the LCD screen would act as a kind of Polaroid to guide me. Unfortunately, the longest shutter time on the Coolpix 950 was 10 seconds so I learned to apply the light very fast. The Coolpix 950 had a 1.92 megapixel ccd which translated to a 5.6MB Tiff file size. The digital image that appeared on the 2 inch LCD screen helped me in determine how much light to apply to each part of the scene. I would press the shutter on my Nikon f5 film camera at the same time as the Coolpix 950, thus making a 10 second Lightpainting on film as well as digital. The surprise was that the digital image, even with its small file size, had a more artistic and almost painterly quality than the film image. Pure desire and passion to produce an artistic picture that was unlike any picture I had previously made urged me on to Explore and Experiment with this lighting technique. My college degrees in Commercial Graphics Design and Studio Drawing make Lightpainting the perfect marriage of Photography and Artistic Expression for me. Here is my first Lightpainting. It is the Coolpix 950 digital file. Nikon Coolpix 950, ISO400, 10 second exposure, F5.6, WB Cloudy, Gitzo Tripod with SLIK Super Ball Head, Mag-Lite, 8mg Flash Card. Image #1 Saddlery Light … This is my first Lightpainting. The technique, in-and of itself, was an Exploration into lighting by simply Experimenting with a variety of flashlights and exposures. This saddle and western tack placed on a red horse blanket was Lightpainted using a small Mag-Lite. I knew almost nothing about the technique. There were no classes or workshops on Lightpainting back in the day. I first heard of Lightpainting when I was part of a collection of photographers speaking to NPPA members in Denver. I had seen a few examples in a presentation by another photographer earlier in the day and immediately the interest was sparked in my mind. I returned home that evening and wasted no time putting together a manageable subject to Lightpaint. At about midnight I shut the door to my office, turned off the lights, and embarked on my Lightpainting journey. It was January 1999 and film was still the industry standard and so it seemed wise to have the final product on film. I would determine my exposure using one of Nikon’s earliest digital products, the Coolpix 950. I felt the digital image on the LCD screen would act as a kind of Polaroid to guide me. Unfortunately, the longest shutter time on the Coolpix 950 was 10 seconds so I learned to apply the light very fast. The Coolpix 950 had a 1.92 megapixel ccd which translated to a 5.6MB Tiff file size. The digital image that appeared on the 2 inch LCD screen helped me in determine how much light to apply to each part of the scene. I would press the shutter on my Nikon f5 film camera at the same time as the Coolpix 950, thus making a 10 second Lightpainting on film as well as digital. The surprise was that the digital image, even with its small file size, had a more artistic and almost painterly quality than the film image. Pure desire and passion to produce an artistic picture that was unlike any picture I had previously made urged me on to Explore and Experiment with this lighting technique. My college degrees in Commercial Graphics Design and Studio Drawing make Lightpainting the perfect marriage of Photography and Artistic Expression for me. Here is my first Lightpainting. It is the Coolpix 950 digital file. Nikon Coolpix 950, ISO400, 10 second exposure, F5.6, WB Cloudy, Gitzo Tripod with SLIK Super Ball Head, Mag-Lite, 8mg Flash Card.
“You will never know what is possible until your try.”
|
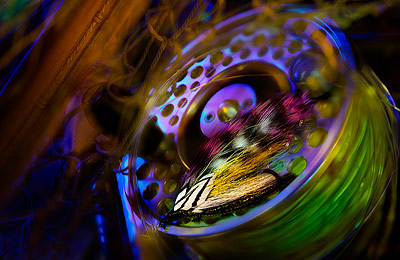 Image #2 Sur-Reel … Here is a very recent Lightpainting made in May 2011. It incorporates all the same basics of Lightpainting that I have been teaching from the beginning of this series, but includes some experimentation as well. I have been working on a collection of fishing reels, flies, and lures periodically over the last 6 months. Most are warm, nostalgic looking images of the by gone era of fishing, but not this one. This is one of Ovis’s latest technology reels and so I gave it a “High Tech” quality using an unusual colored light source, my Light Saber. Yes, you heard me right, my Light Saber. My daughter gave me a Limited Edition Star Wars Luke Skywalker Light Saber for Christmas a few years ago. Kind of off the grid for a cowboy like me, but it does receive a lot of attention from folks who come visit my office at the Ranch. At the flick of the switch it produces an indigo color of light that progresses up the saber while reproducing the electric sound effect from the Star Wars movies. The indigo bluish-purple color of light seemed well suited for the high tech look I needed for the modern reel. I simply lightpainted some portions of the scene with traditional warm light and then powered up the Light Saber for the indigo coloring on the new reel and held it about 2 feet away for about 5 seconds. This image also makes use of the “Soft Focus” technique that I have discussed in previous articles. I also used 2 lens extension tubes, which allowed me to use a wider angle of view lens, yet have an almost macro closeness. The NEW Nikon 28-300mm zoom lens allows me to focus at extremely close range and with extension tubes it is like having a 28-300mm macro zoom. Nikon D3s, ISO100, 1 minute 30 seconds exposure at f29, Nikon’s NEW 28-300mm G VRII zoom lens with 36mm and 12mm Kenko Extension Tubes (the front element of the lens was about 1 inch from the near edge of the reel), WB 8330K, Gitzo Carbon Fiber Tripod with Gitzo Ball Head and Kirk “L” Bracket, Stylus penlight by Steamlight and Star Wars Luke Skywalker Light Saber, SanDisk 36G Flash Card. Image #2 Sur-Reel … Here is a very recent Lightpainting made in May 2011. It incorporates all the same basics of Lightpainting that I have been teaching from the beginning of this series, but includes some experimentation as well. I have been working on a collection of fishing reels, flies, and lures periodically over the last 6 months. Most are warm, nostalgic looking images of the by gone era of fishing, but not this one. This is one of Ovis’s latest technology reels and so I gave it a “High Tech” quality using an unusual colored light source, my Light Saber. Yes, you heard me right, my Light Saber. My daughter gave me a Limited Edition Star Wars Luke Skywalker Light Saber for Christmas a few years ago. Kind of off the grid for a cowboy like me, but it does receive a lot of attention from folks who come visit my office at the Ranch. At the flick of the switch it produces an indigo color of light that progresses up the saber while reproducing the electric sound effect from the Star Wars movies. The indigo bluish-purple color of light seemed well suited for the high tech look I needed for the modern reel. I simply lightpainted some portions of the scene with traditional warm light and then powered up the Light Saber for the indigo coloring on the new reel and held it about 2 feet away for about 5 seconds. This image also makes use of the “Soft Focus” technique that I have discussed in previous articles. I also used 2 lens extension tubes, which allowed me to use a wider angle of view lens, yet have an almost macro closeness. The NEW Nikon 28-300mm zoom lens allows me to focus at extremely close range and with extension tubes it is like having a 28-300mm macro zoom. Nikon D3s, ISO100, 1 minute 30 seconds exposure at f29, Nikon’s NEW 28-300mm G VRII zoom lens with 36mm and 12mm Kenko Extension Tubes (the front element of the lens was about 1 inch from the near edge of the reel), WB 8330K, Gitzo Carbon Fiber Tripod with Gitzo Ball Head and Kirk “L” Bracket, Stylus penlight by Steamlight and Star Wars Luke Skywalker Light Saber, SanDisk 36G Flash Card.
“While I believe in mastering the basics, once they are achieved I break away from the boundaries that restrict my creativity.” |
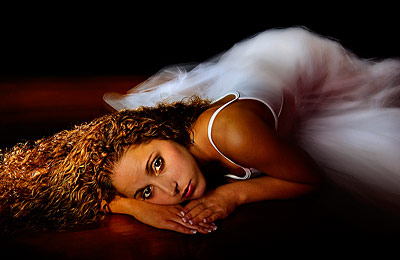 Image #3 LaReve’ … LaReve (the dream) was made about 1 year ago. Again, with this image I experimented with soft focus to create a dream like quality. Lightpainting a live subject has its own complexities. Usually the subject should remain still during the long exposure time. For this Lightpainting my subject remained still for the 30 seconds of exposure time. I Lightpainted her face, hair, hands, and shoulders in about 6 seconds and then “soft focused” the lens and Lightpainted the rest of her body. I wanted her white dress to have an almost dream like cascading water quality and the soft focus technique worked well. It’s like using a tilt shift lens with selective focusing capabilities. I love this effect which came about simply by experimenting. Nikon D3s, ISO500, 30 seconds at f16, Nikon 24-70mm (at 40mm), WB 8330K, Gitzo Carbon Fiber Tripod with Gitzo Ball Head and Kirk “L” Bracket, Inova Bolt 2L, SanDisk 16G Flash Card. Image #3 LaReve’ … LaReve (the dream) was made about 1 year ago. Again, with this image I experimented with soft focus to create a dream like quality. Lightpainting a live subject has its own complexities. Usually the subject should remain still during the long exposure time. For this Lightpainting my subject remained still for the 30 seconds of exposure time. I Lightpainted her face, hair, hands, and shoulders in about 6 seconds and then “soft focused” the lens and Lightpainted the rest of her body. I wanted her white dress to have an almost dream like cascading water quality and the soft focus technique worked well. It’s like using a tilt shift lens with selective focusing capabilities. I love this effect which came about simply by experimenting. Nikon D3s, ISO500, 30 seconds at f16, Nikon 24-70mm (at 40mm), WB 8330K, Gitzo Carbon Fiber Tripod with Gitzo Ball Head and Kirk “L” Bracket, Inova Bolt 2L, SanDisk 16G Flash Card.
“You have nothing to loose accept a little time in the dark.”
|
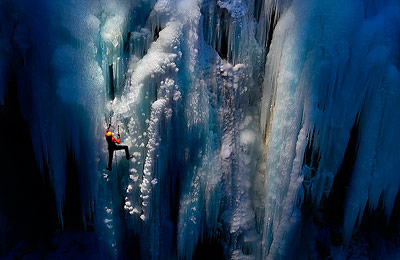 Image #4 Stairway to Heaven … This ice climbing image is part of a collection of Lightpaintings from Ouray, Colorado. One of the most difficult Lightpainting projects I have done and perhaps one of the most recognizable images. The entire idea of Lightpainting ice climbers was an exploration into Lightpainting with experimentation being the key element each night of image making. Working on the edge of the ice gorge can be difficult enough, but add in the element of working in total darkness and things can get a little sketchy for the athlete and for me. This is a rare image that breaks away from my Lightpainting tradition of manual exposure settings by making use of the Aperture Priority mode. The sun was already setting as I began setting up the camera. There was still an ambient twilight available in the ice gorge. With Aperture Priority mode and the EV set at –2.0 the available ambient exposure was 2 stops darker than a perfect exposure. This allowed the image to be faintly visible and remain faintly visible as the twilight continued to diminish without me adjusting the exposure manually. I was perched above my subject and ready to Lightpaint while the camera was on the other side of the ice gorge. I triggered the camera using a wireless Pocket Wizard Multi-Max transceiver system. As the available ambient Twilight continued to diminish I made several Lightpaintings of world class ice climber Chris Alstrin. This is a strong example of off camera lighting using Lightpainting. By setting up an underexposed scene and revealing my subject from that underexposure with Lightpainting I can create a dramatic and unique image. Nikon D200, ISO200, 13 seconds at f8 (by Aperture Priority mode), Nikon 17-55mm lens, WB 3000K, Gitzo Carbon Fiber Tripod with SLIK Super Ball Head, Pocket Wizard Multi Max Transceivers, Brinkmann Max Million II (formerly called the Q Beam). Image #4 Stairway to Heaven … This ice climbing image is part of a collection of Lightpaintings from Ouray, Colorado. One of the most difficult Lightpainting projects I have done and perhaps one of the most recognizable images. The entire idea of Lightpainting ice climbers was an exploration into Lightpainting with experimentation being the key element each night of image making. Working on the edge of the ice gorge can be difficult enough, but add in the element of working in total darkness and things can get a little sketchy for the athlete and for me. This is a rare image that breaks away from my Lightpainting tradition of manual exposure settings by making use of the Aperture Priority mode. The sun was already setting as I began setting up the camera. There was still an ambient twilight available in the ice gorge. With Aperture Priority mode and the EV set at –2.0 the available ambient exposure was 2 stops darker than a perfect exposure. This allowed the image to be faintly visible and remain faintly visible as the twilight continued to diminish without me adjusting the exposure manually. I was perched above my subject and ready to Lightpaint while the camera was on the other side of the ice gorge. I triggered the camera using a wireless Pocket Wizard Multi-Max transceiver system. As the available ambient Twilight continued to diminish I made several Lightpaintings of world class ice climber Chris Alstrin. This is a strong example of off camera lighting using Lightpainting. By setting up an underexposed scene and revealing my subject from that underexposure with Lightpainting I can create a dramatic and unique image. Nikon D200, ISO200, 13 seconds at f8 (by Aperture Priority mode), Nikon 17-55mm lens, WB 3000K, Gitzo Carbon Fiber Tripod with SLIK Super Ball Head, Pocket Wizard Multi Max Transceivers, Brinkmann Max Million II (formerly called the Q Beam).
“Light is the Greatest Influence.” |
| NOTE: Aperture Priority worked in this scenario of rapidly diminishing twilight and my inaccessibility to manually set the exposure, but remember that when you apply Lightpainting during a priority mode exposure the exposure can be effected and your results can vary drastically. Therefore, for the most consistent exposure results I strongly recommend a manual exposure for Lightpainting. |
Well, I hope you have enjoyed this Lightpainting lesson encouraging you to Explore and Experiment. If you haven’t read the February, March, April, May, June, and July Workshop at the Ranch articles titled Lightpainting Part 1, Part 2, Part 3, Part 4, Part 5, and Part 6, let me encourage you to do so. There you will find more Lightpaintings with step-by-step basic explanations of how I approach this creative lighting technique with a variety of subjects.
Join me next month here on Workshop at the Ranch for Part 8 of this series when we learn how to Lightpaint Large Scale Landscapes.
Adios. Dave
Here are links to the light sources I use to Lightpaint with:
Stylus penlight by Streamlight: www.streamlight.com
Inova Bolt 2L LED Flashlight: www.inovalight.com
Brinkmann Max Million II: www.brinkmann.net/products
![]() Hi and welcome to this edition of Workshop at the Ranch. For those that have been following this entire series, welcome back. For those who are just joining in, let me suggest that you review that past several WATR articles and become familiar with the principles of Lightpainting before moving forward with this month’s article where we continue to Explore and Experiment with Lightpainting.
Hi and welcome to this edition of Workshop at the Ranch. For those that have been following this entire series, welcome back. For those who are just joining in, let me suggest that you review that past several WATR articles and become familiar with the principles of Lightpainting before moving forward with this month’s article where we continue to Explore and Experiment with Lightpainting. 


