
Workshop at the Ranch – April 2012 – Question and Answer Series # 3

Hi and welcome to this edition of Workshop at the Ranch. Here we go again with more of your Questions and my Answers. So far this Q&A Series is doing well as many of you are submitting your photographic, lighting, technical, and simply great questions each month. Let’s see what Qs emailed in via my website contact page this month.
My goal is to answer your questions in the Workshop at the Ranch (WATR) articles over the next few months. I’m anticipating that I may get overwhelmed with hundreds of questions to choose from, so please go easy on me should I not send a “thank you” reply in a timely manor. I will do my best to give an in-depth answer along with an image to illustrate my point. Sports, Portraiture, Photojournalism, Landscapes, Weddings, any genre is fine. Technical, Lighting, Gear, your choice…this is going to be crazy good. No question is too basic or too complex. Whatever is on your mind.
This is going to be great learning and I am up for the challenge. To get the idea rolling, let’s begin with some questions that I received over the past few weeks.
|
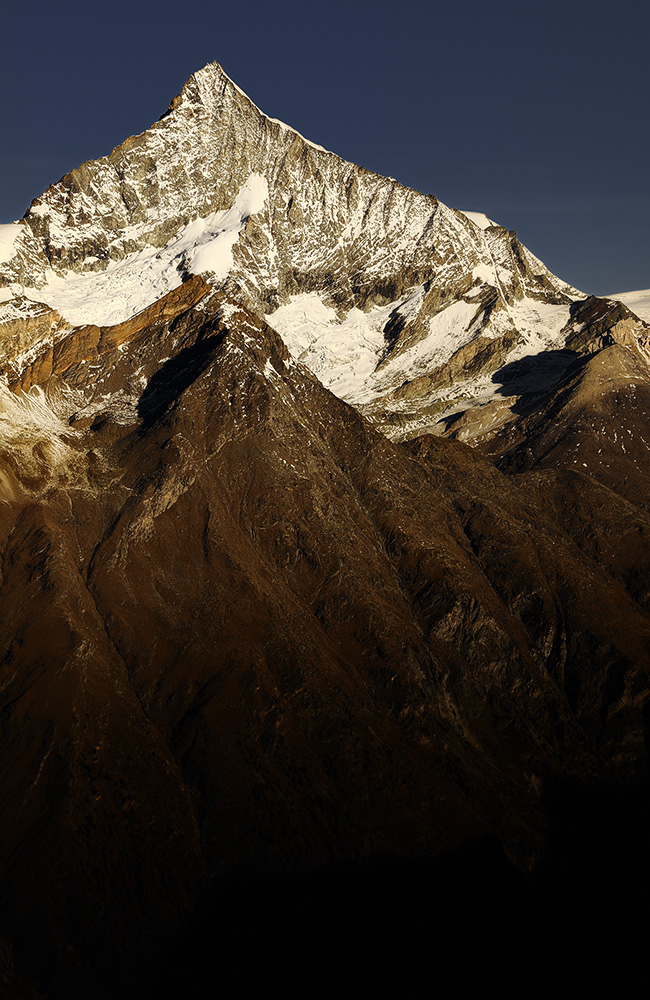
Image #1…How to determine the exposure? Question…hi dave i am from austria and have some questions. how do you fix your exposure? are you looking on the histogram or the blinking highlights, or the monitor witch you can adjust brighter or darker on your d3s or do you never adjust the monitor to the brightness of the environment, or is it still the experience and your profession ? i love your new site, nic Answer… Hi Niki. Thanks for such a good question. I use the Nikon cameras and lenses, and am currently using the NEW Nikon D4 and should have my NEW D800 soon as well. There are several ways to determine your exposure settings. Keep in mind that there is a Light Meter Scale inside the Nikon cameras. I use it to determine my Manual Exposure before I take the picture. The in-camera Light Meter does a fine job and allows me to determine a Manual Exposure quickly. I do not use the Histogram. I do use the Highlights setting. The “Flashing/Blinking Highlights” displayed on the camera’s LCD monitor instantly alert me to the fact that areas of the image are overexposed and contain zero information. A common term used to describe this overexposed/zero information is “blown out” or “washed out”. If I see Flashing Highlights on the camera’s LCD monitor then I know I must reduce my exposure. If I am shooting Manual Exposures (which I usually do) then I must do 1 of 3 things… lower the ISO (ex: ISO400 to ISO 200)…or increase my Shutter Speed (ex: 1/250 to 1/500)…or increase my aperture setting (ex: f5.6 to f8). These are just example corrections of course, and I could use a combination of them to reduce the exposure. Once I have made one of these adjustments or a combination of them, I can take another picture and see if the Flashing Highlights are gone. If I am shooting on a Priority mode like Aperture Priority then I can reduce my exposure by dialing the EV up or down (ex: EV-1.0 reduces the auto expose to automatically underexpose every image by -1.0). The Priority modes work very well and adjusting your auto exposure via the EV dial is a great way to either reduce or increase the auto exposure of your images. Auto ISO works well. If you own a current camera that has ultra clean high ISO capabilities, you can use Auto ISO. You can manually set your shutter and aperture at whatever you want and then simply let the ISO setting go up or down according to the light. I use this setting during late season football games when the play begins in bright sunlight and ends in the dark shadow of the stadium. By setting my shutter speed at 1/1250 and my aperture at f5.6, the auto ISO will adjust automatically to match the lighting conditions. It might start at ISO400 with my players in the sunshine and then increase to ISO2500 when players run into the dark shaded side of the football field. Bracketing also works well. By setting the Bracketing mode you can shoot 3 images: One image is over exposed by whatever you dial in…example +1.0. The next image is under exposed by, say, -1.0. And the third image is exposed with no compensation…0.0. I believe you can shoot in a Priority mode and use Bracketing as well. I think Jay Maisel uses this combination when shooting street photography. It works for him, and he is the BEST in the business. A hand held Light Meter is another solution. The hand held Light Meter is yet another choice for determining exposures. Minolta and Sekonic make good ones. Dialing down the brightness on the LCD monitor has no effect regarding the exposure of the image. That procedure is merely decreasing or increasing the visual brightness of the camera’s LCD monitor. Some photographers increase the brightness on their camera’s LCD monitor when working outdoors in bright sunlight so they can see the image better. You asked if my years of experience help me determine exposures. Yes. My 30+ years of experience certainly gives me an edge when determining my manual exposure settings, but here’s a wild idea from “photographer’s past”. If you want to shoot manual exposures there is an old photographer’s rule called the “Sunny 16 rule”. The Sunny 16 rule is this: …if I want to expose for a perfect direct sunlit exposure I simply set my manual exposure so that my ISO number is the same number as my shutter speed and that will always make my aperture f16. Example: ISO200, 1/200 = f16. …or, ISO500, 1/500 = f16. Knowing this formula or rule allows me to make a perfect expose of a directly sunlit subject, even if darker or brighter areas surround my subject. This picture of the Swiss Alps was made using the Sunny 16 rule. The lower half of the picture is very dark (no sun on it) while the sky is a deep blue (also kind of dark). My snow-capped mountain is in direct sunshine. If I used, aperture priority the snow would be “washed out” with Flashing Highlights blinking on the LED screen…solution, dial down the EV -1.7 or maybe more to get this perfect exposure of the snow capped mountain. Or, I can use the Sunny 16 rule…ISO500, 1/500, f16…and here it is perfectly exposed snow capped mountain. Keep in mind that if your subject is not in direct sunlight, or it is overcast skies etc, then the Sunny 16 rule will not work. Nikon D3s, ISO500, 1/500 at f16, Nikon 28-300mm zoom lens, WB 6700K, SanDisk 32G Extreme Pro Flash Card. Hopefully I have not confused you with this old rule of Sunny 16. |
 Image #2…How to Lightpaint the Model. Image #2…How to Lightpaint the Model.
Question…Hi Dave, Impressive body of work, especially light painting. I was wondering while you’re light painting how do you keep the subjects still (in this case, models). Do you take a snapshot of them first, then overlay it with another light painted version? Thanks for your reply in advance. Sami Answer….. Hi Sami. This is a very good question indeed. I do not make a separate image of the model and then Lightpaint the rest of the scene in a 2nd image. This would involve blending the 2 separate images in PhotoShop which, is not my style of Lightpainting. I enjoy Lightpainting the entire scene with the model simply holding still during the long exposure time. My style of Lightpainting is a very pure application of Lightpainting, but this doesn’t mean that others might want to combine multiple images or even use a Speedlight to illuminate the model and then Lightpainting the remainder of the scene. When Lightpainting the model I suggest choosing someone who is patient and can remain still for 30 seconds during exposure time or longer. It helps if you pose them in a comfortable position like sitting down, reclining, or leaning against something solid. A person’s balance is highly dependent on eyesight. It helps them keep their balance if their eyesight is focused on something in the room. That being said, I try to Lightpaint the model in an environment that has a tiny spot of light visible so the model will be able to focus their eyesight on something. An exit sign above the door, a crack of light in the curtains, the moon etc. When the model can focus their eyesight on something they will be able to remain motionless for the long exposure time. All these tips will help you achieve a successful Lightpainting. Here is one of the most difficult Lightpaintings I have done. Not only did my cowboy need to remain still, but also so did the horse. I used a Brinkmann Max Million II to Lightpaint with. I spent only 4 seconds to illuminate the cowboy, horse and side of the house. I then backed up about 20 feet and Lightpainted the tree and ground for 4 seconds while placing my slightly spread fingers over the front of the Brinkmann. I then walked inside the house and aimed the Brinkmann at the floor and illuminated the room for 3 seconds. This gave a nice warm glow in the window. This was a 30 second exposure time of which, only 11 seconds were actual Lightpainting. The rest of the time was spent walking through the scene. Nikon D2x, ISO200, 30 seconds at f8, Nikon 17-55mm lens, WB 6700K, Gitzo Carbon Fiber Tripod and Ball Head with Kirk “L” Bracket, Brinkmann Max Million II portable/rechargeable spotlight…and a few peppermint candies for the horse. Terrific question Sami. Glad you asked. Adios. Dave |
|
Image #3…My lens choices for Horse Racing. Question #3…Dear Mr. Dave Black: My name is William, first off I’m a big fan of your work and of your KelbyOne videos. I’m planning to apply to shoot for a horse racing event where I live, and I was wondering if I could get a few tips on photographing horse racing. Like a nice type of lens or any other tips that you might have on the subject. Thank you for taking the time to read my email. William…ps: I will be planing to read your articles on your web page. I’ve also just purchased your ebook and I have to say I’m liken it. Hope this answer and the ebook helps you on race day. Adios. Dave |
The website’s Search box seems to be a big hit with everyone. By just typing in a word like Speedlights, or an athletes name like Michael Phelps, or even a piece of equipment like Inova Bolt 2L a list of WATR articles and or image locations will appear. This should make it quick and easy for anyone to find information, images, and complete teachings that I have written about. So give the Search box a try and find something you have been looking for.
Well, 3 more Qs and 3 more As. Remember that the topics are your choice. Thanks for joining me, and I’ll see you next month when we continue our Q&A Series with more answers to your questions here on Workshop at the Ranch.
Adios. Dave
