
Workshop at the Ranch – April 2010 – Little Lights, BIG Arena – PART 1
![]() Hi and welcome to this edition of Workshop at the Ranch on steroids. There is a lot of information and data in this very extensive article. Don’t give up, but hold on to the end and I think you’ll be glad you did.
Hi and welcome to this edition of Workshop at the Ranch on steroids. There is a lot of information and data in this very extensive article. Don’t give up, but hold on to the end and I think you’ll be glad you did.
With March Madness (basketball) and the Frozen Four (ice hockey) near memories I wanted to share with all of you who come read these monthly tutorials something I learned this college indoor sports season. I can strobe light a sports arena with Nikon Speedlights. Yes, that’s correct. This season I left my sizable collection of arena sport strobes in the garage and traveled “light” so to speak.
Hi and welcome to this edition of Workshop at the Ranch on steroids. There is a lot of information and data in this very extensive article. Don’t give up, but hold on to the end and I think you’ll be glad you did. With March Madness (basketball) and the Frozen Four (ice hockey) near memories I wanted to share with all of you who come read these monthly tutorials something I learned this college indoor sports season. I can strobe light a sports arena with Nikon Speedlights. Yes, that’s correct. This season I left my sizable collection of arena sport strobes in the garage and traveled “light” so to speak.
With the improvements of the 35mm digital camera over the past few years photographers now enjoy ultra high ISO settings of ISO 3200, 6400 and even ISO 12,800. Well then, why use arena sport strobe lighting at all? Good question. With these high ISO settings many college arenas will yield a shutter speed of 1/500 or 1/1000 of a second at f2.8 or even f4.0. Why go through the hassle of lighting an arena? Well, more light translates to bigger aperture settings like f5.6, f8, or even f11, which gives the image a greater depth of field. Sports Illustrated loves depth of field where 2, 3, or 4 players are all in perfect focus. And for me, nothing looks more exciting and perfect than strobed sports action. Strobed sports images just look fantastic. It brings to mind historic sports imagery made by photographers like Neil Liefer, Walter Iooss, Heinz Kluetmeier, and others who “shoot on strobes.”
For those unfamiliar, the basic principal behind arena sport strobe lighting is to install sport strobes (large flash units) capable of flash duration’s that exceed 1/1100 of a second in the catwalks of the sports arena high above the competition floor. This 1/1100 is not a shutter speed, but is the duration or length of the “FLASH” it self. This is what stops the action. With the camera’s shutter sync speed held captive at a slow 1/250 of a second the available ambient arena light exposure needs to be at least 3 stops under (darker) than the strobed exposure. That takes a lot of light from big arena sport strobe systems. This 3 stop exposure difference would (in the film days before digital cameras) insure all the action to be stopped by the strobes 1/1100-1/4000 (depending on make and model of the strobe) fast flash duration. Today’s combination of the modern digital camera and sport strobe can sometimes leave a slight ghosting along the edges of some of the fastest action elements in the picture, example the rapidly moving puck and hockey stick during a slap-shot or the hands and basketball during an aggressive jam. The camera’s shutter sync speed for off camera flash has traditionally been 1/250 … until recently. Many of today’s cameras and dedicated flash units like the Nikon SB-900 Speedlight allow the photographer to use their flash from off camera locations at any shutter speed they choose. This is accomplished in many Nikon cameras (check your camera’s manual) by using the Auto FP setting in the Custom Functions menu located under Bracketing/Flash. With Auto FP selected I can use my Nikon Speedlights either on or off camera at any shutter speed I choose, like 1/500, 1/1000, 1/4000 or even up to 1/8000 of a second. I can now stop the action with a fast shutter sync speed and have a strobed flash look whether shooting indoors or outdoors.
So, with my mind set on strobe lighting indoor sports and my determination to eliminate all ghosting no matter how fast the sports action I decided to use my Nikon SB-900 Speedlights to cover some of my indoor college sports this past season. And it worked…perfectly!
|
|
|
|
|
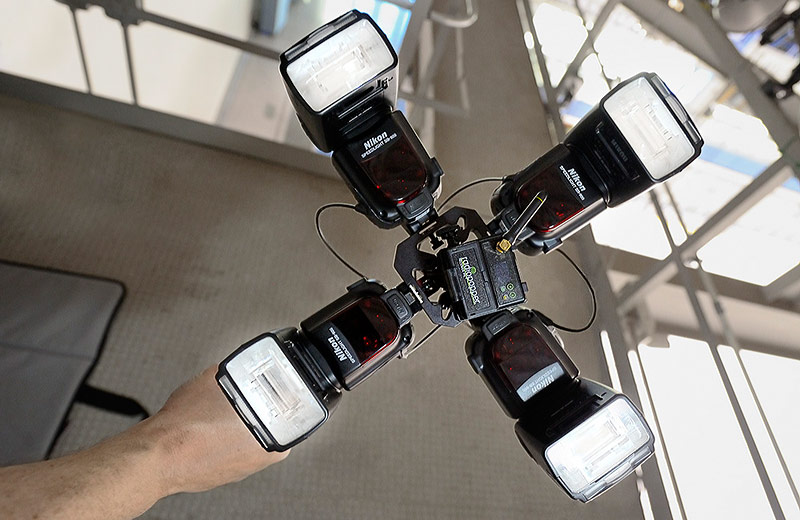 Image #3 Speedlight Bank … Here is an image of 1 Speedlight Bank as I call it. It contains 4 SB-900 Speedlights set to Manual with Full power output. I also zoomed each Speedlight to 200mm to help concentrate the light at the rink. The 4 Speedlights are mounted to a FourSquare Block and Hand Grip. There is a single Radio Popper PX Receiver connected to a Michael Bass Designs Fiber Optic Bundle. This allows 1 Radio Popper PX Receiver to service 4 Speedlights. That combo of PX Receiver and Bundle is mounted to the FourSquare Block. The 4 fiber optic cables are connected to the Speedlights sensor by simply taping them over the sensor with black gaffer’s tape. This blocks out any ambient light or sunshine (if I were shooting outdoors) from interfering with the signal. Image #3 Speedlight Bank … Here is an image of 1 Speedlight Bank as I call it. It contains 4 SB-900 Speedlights set to Manual with Full power output. I also zoomed each Speedlight to 200mm to help concentrate the light at the rink. The 4 Speedlights are mounted to a FourSquare Block and Hand Grip. There is a single Radio Popper PX Receiver connected to a Michael Bass Designs Fiber Optic Bundle. This allows 1 Radio Popper PX Receiver to service 4 Speedlights. That combo of PX Receiver and Bundle is mounted to the FourSquare Block. The 4 fiber optic cables are connected to the Speedlights sensor by simply taping them over the sensor with black gaffer’s tape. This blocks out any ambient light or sunshine (if I were shooting outdoors) from interfering with the signal. |
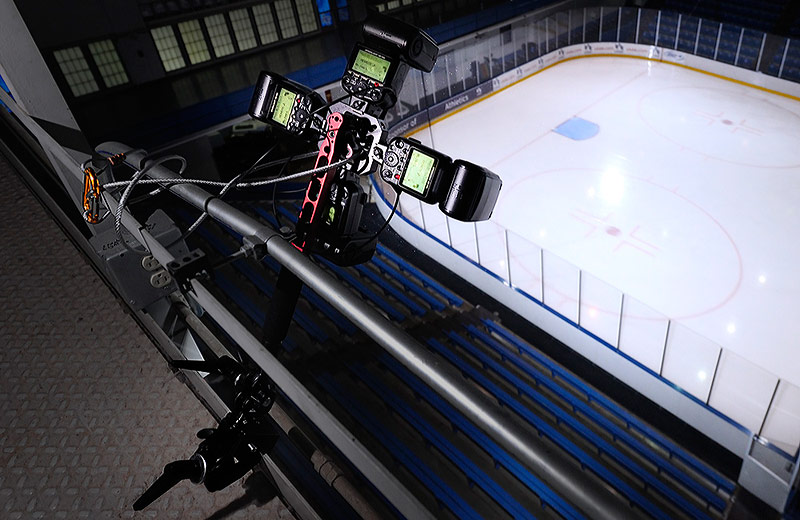 Image #4 Speedlight Bank Mounted to the Catwalk … I like to use the FourSquare Block with its accessory Hand Grip even though the Bank is not being handheld. It’s just a great mounting accessory. The Grip attaches to a Manfroto 5/8-3/8 Rapid Adapter which attaches to a Manfroto #155 RC Double Ball Tilt Head (I sometimes call it a Double Ball Joint as that is what it looks like.) The Double Ball Tilt Head attaches to the Manfroto Super Clamp which then attaches to the arena catwalk and is also secured with a safety cable. I will use two Banks of 4 Speedlights each to light from the blue line to the goal. [Q&A: Are 8 Speedlights always necessary? Depends on the size of the arena and distance from your lights to the court or ice rink. I used 8 because I have 8, but 6 Speedlights would have done the job sufficiently.] I’m going to position my two Banks in a cross light arrangement. This image shows “Bank A” and is exactly 115 feet from the goal. It is about even with the blue line nearest my goal. “Bank B” is located across the ice rink and is above the far corner, a distance of 95 feet from the goal. I would have liked it to be exactly 115 feet but an industrial size air conditioner was in the way. I will be shooting the game from rink side through the glass (no open hole at this ice rink) where the Zamboni enters the ice. That is the corner of the ice rink that is obscured by the Speedlight Bank in this image. This configuration forms a triangle with the 3 points being my photo location, Bank A and Bank B. I will not use TTL, but will set each Speedlight on Manual and at full power 1/1 via the Nikon SU-800 Commander on the hotshoe of my D3s camera. With SANYO Eneloop rechargeable AA batteries I have a Speedlight recycle time of 2.3 seconds. Interestingly this is about the same recycle time as larger traditional sport strobe systems like Elinchrom, White Lightning, and Dyna-Lite. At full charge the Eneloop’s lasted 7 hours (set-up, testing, dinner break, and game time) and still had power to spare at the game’s conclusion. Over 20 test shots were made during set-up, 430 shots were made during the game. Image #4 Speedlight Bank Mounted to the Catwalk … I like to use the FourSquare Block with its accessory Hand Grip even though the Bank is not being handheld. It’s just a great mounting accessory. The Grip attaches to a Manfroto 5/8-3/8 Rapid Adapter which attaches to a Manfroto #155 RC Double Ball Tilt Head (I sometimes call it a Double Ball Joint as that is what it looks like.) The Double Ball Tilt Head attaches to the Manfroto Super Clamp which then attaches to the arena catwalk and is also secured with a safety cable. I will use two Banks of 4 Speedlights each to light from the blue line to the goal. [Q&A: Are 8 Speedlights always necessary? Depends on the size of the arena and distance from your lights to the court or ice rink. I used 8 because I have 8, but 6 Speedlights would have done the job sufficiently.] I’m going to position my two Banks in a cross light arrangement. This image shows “Bank A” and is exactly 115 feet from the goal. It is about even with the blue line nearest my goal. “Bank B” is located across the ice rink and is above the far corner, a distance of 95 feet from the goal. I would have liked it to be exactly 115 feet but an industrial size air conditioner was in the way. I will be shooting the game from rink side through the glass (no open hole at this ice rink) where the Zamboni enters the ice. That is the corner of the ice rink that is obscured by the Speedlight Bank in this image. This configuration forms a triangle with the 3 points being my photo location, Bank A and Bank B. I will not use TTL, but will set each Speedlight on Manual and at full power 1/1 via the Nikon SU-800 Commander on the hotshoe of my D3s camera. With SANYO Eneloop rechargeable AA batteries I have a Speedlight recycle time of 2.3 seconds. Interestingly this is about the same recycle time as larger traditional sport strobe systems like Elinchrom, White Lightning, and Dyna-Lite. At full charge the Eneloop’s lasted 7 hours (set-up, testing, dinner break, and game time) and still had power to spare at the game’s conclusion. Over 20 test shots were made during set-up, 430 shots were made during the game. |
|
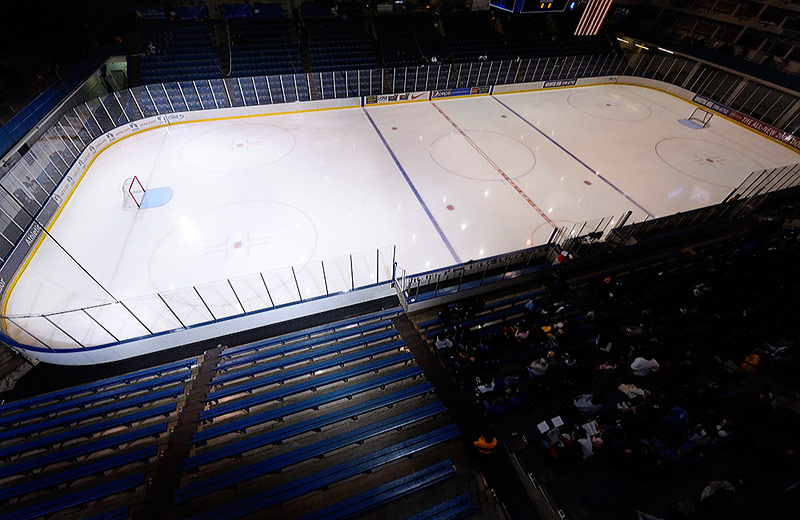 Image #5 Overview with Available Ambient Arena Light and Strobe Light Combined … This image shows my 1/3 end of the rink lit with perfect Daylight White Balanced (WB 5000K) strobe light from my two Speedlight Banks while the far 2/3 of the rink are lit by only by the available ambient arena light. You can see that I have purposely let the far 2/3 of the rink be slightly under exposed by 1 and 1/3 stop (1.3 stop). When I photograph my players on my end of the rink the arena will appear to be completely lit thanks to the ambient light at the far end. Keep in mind I did not need to achieve a 3 stop difference between the ambient exposure and the strobe exposure as would have been necessary with traditional sport strobe systems. This is my base exposure that I will shoot the entire game at: ISO5000, 1/1600 at f5.6, WB 5000K (Daylight). Image #5 Overview with Available Ambient Arena Light and Strobe Light Combined … This image shows my 1/3 end of the rink lit with perfect Daylight White Balanced (WB 5000K) strobe light from my two Speedlight Banks while the far 2/3 of the rink are lit by only by the available ambient arena light. You can see that I have purposely let the far 2/3 of the rink be slightly under exposed by 1 and 1/3 stop (1.3 stop). When I photograph my players on my end of the rink the arena will appear to be completely lit thanks to the ambient light at the far end. Keep in mind I did not need to achieve a 3 stop difference between the ambient exposure and the strobe exposure as would have been necessary with traditional sport strobe systems. This is my base exposure that I will shoot the entire game at: ISO5000, 1/1600 at f5.6, WB 5000K (Daylight). |
|
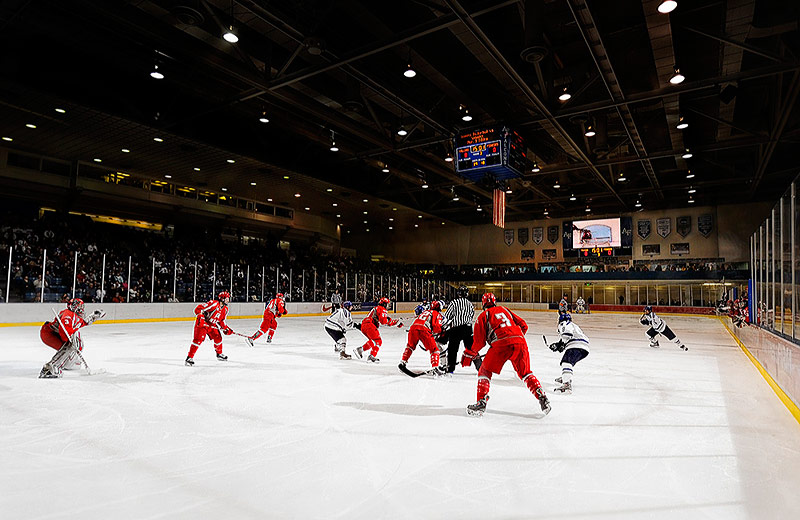 Image #6 Rinkside … I finally take my photo position rink side. I am about 100 feet from Bank A and about 135 feet from Bank B. This distance would be way out of range for the Nikon SU-800 Commander which is why all my Speedlights are being triggered wirelessly via the Radio Popper system. The Radio Popper PX Transmitter is attached to my SU-800 Commander using Velcro and is connected to my D3s hotshoe. The Radio Popper PX wireless system converts the Nikon infrared signal to a radio signal that can be transmitted over hundreds of feet. Then the Radio Popper PX Receiver on the Speedlights converts the radio signal back to infrared and triggers the Speedlights. I can now use Nikon’s Auto FP setting for a fast shutter sync speed. With my end of the rink strobe-lit and the far end of the rink lit only with the available ambient arena lights I have achieved a giant “fill Flash.” The combination of the strobe and ambient gives me a BIG arena strobe lit appearance even though I only lit 1/3 of the rink with equipment from a small roll-aboard case. …My back feels better already. Image #6 Rinkside … I finally take my photo position rink side. I am about 100 feet from Bank A and about 135 feet from Bank B. This distance would be way out of range for the Nikon SU-800 Commander which is why all my Speedlights are being triggered wirelessly via the Radio Popper system. The Radio Popper PX Transmitter is attached to my SU-800 Commander using Velcro and is connected to my D3s hotshoe. The Radio Popper PX wireless system converts the Nikon infrared signal to a radio signal that can be transmitted over hundreds of feet. Then the Radio Popper PX Receiver on the Speedlights converts the radio signal back to infrared and triggers the Speedlights. I can now use Nikon’s Auto FP setting for a fast shutter sync speed. With my end of the rink strobe-lit and the far end of the rink lit only with the available ambient arena lights I have achieved a giant “fill Flash.” The combination of the strobe and ambient gives me a BIG arena strobe lit appearance even though I only lit 1/3 of the rink with equipment from a small roll-aboard case. …My back feels better already. |
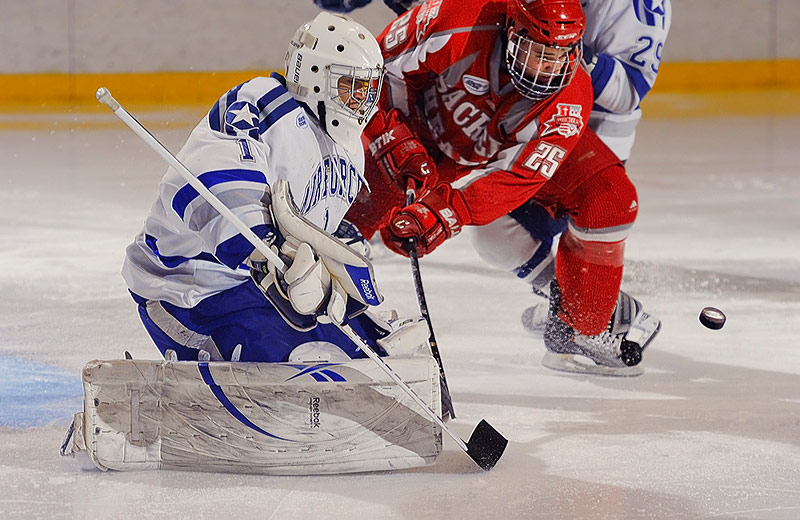 Image #7 The Puck Stops Here … The average NCAA collegiate ice hockey player sends the puck to speeds of up to 90 mph. This aggressive slap shot is frozen in mid air thanks to the Auto FP fast shutter sync speed of 1/1600 and my Speedlights. No ghosting at all, just like the old days of film cameras. I think David Klutho (Sports Illustrated) would be proud of me. I have watched the TV coverage of my “Speedlight” games during the 10:00 pm news and see when my Speedlights flash and they are barely noticeable to the eye and have no effect on the TV camera’s exposure on screen…perfect. Nikon D3s, ISO5000, 1/1600 at f5.6, Nikon 70-200mm G VR II Lens, WB 5000K, 8 Speedlights, 2 FourSquare Blocks each with Hand Grip … each Hand Grip is connected to a Manfroto 5/8-3/8 Rapid Adapter which is connected to Manfroto #155 Double Ball Head which is connected to a Manfroto Super Clamp which is clamped to the arena catwalk and secured with a safety cable, 1 Radio Popper PX Transmitter and 2 PX Receivers with Michael Bass Designs Fiber Optic Bundles on each Receiver. Nikon SU-800 Commander, Lexar 16G Flash Card. Image #7 The Puck Stops Here … The average NCAA collegiate ice hockey player sends the puck to speeds of up to 90 mph. This aggressive slap shot is frozen in mid air thanks to the Auto FP fast shutter sync speed of 1/1600 and my Speedlights. No ghosting at all, just like the old days of film cameras. I think David Klutho (Sports Illustrated) would be proud of me. I have watched the TV coverage of my “Speedlight” games during the 10:00 pm news and see when my Speedlights flash and they are barely noticeable to the eye and have no effect on the TV camera’s exposure on screen…perfect. Nikon D3s, ISO5000, 1/1600 at f5.6, Nikon 70-200mm G VR II Lens, WB 5000K, 8 Speedlights, 2 FourSquare Blocks each with Hand Grip … each Hand Grip is connected to a Manfroto 5/8-3/8 Rapid Adapter which is connected to Manfroto #155 Double Ball Head which is connected to a Manfroto Super Clamp which is clamped to the arena catwalk and secured with a safety cable, 1 Radio Popper PX Transmitter and 2 PX Receivers with Michael Bass Designs Fiber Optic Bundles on each Receiver. Nikon SU-800 Commander, Lexar 16G Flash Card. |
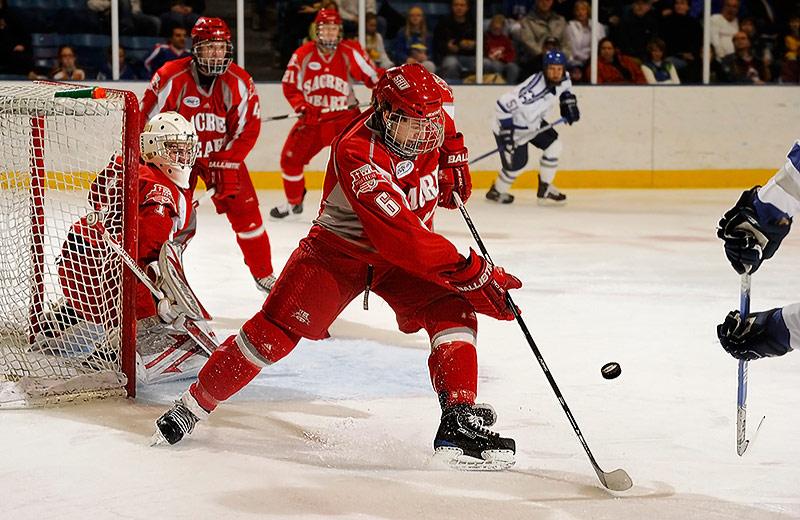 Image #8 Wrist Shot … Here is an aggressive wrist shot where the action of the swinging stick, flying puck, and spraying ice chips are stopped perfectly with no ghosting at all. The Speedlights in combination with the fast shutter sync speed make the difference and eliminate any ghosting. (Same camera and equipment data as previous image.) Image #8 Wrist Shot … Here is an aggressive wrist shot where the action of the swinging stick, flying puck, and spraying ice chips are stopped perfectly with no ghosting at all. The Speedlights in combination with the fast shutter sync speed make the difference and eliminate any ghosting. (Same camera and equipment data as previous image.) |
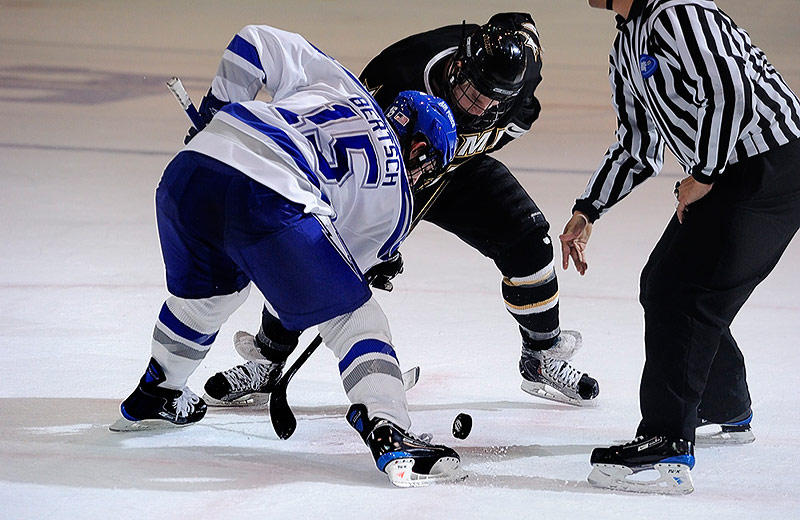 Image #9 Face Off … In this image you can see the blue line just behind the two players facing off. The slightly darker ice in the upper 1/3 of this picture is a result of the light from the Speedlights beginning to diminish past the blue line towards the far end of the rink. The 1 and 1/3 stop (1.3 stop) underexposed ambient exposure beyond the blue line to the far end of the rink gives the appearance that the entire rink is strobe lit even though it is not. (Same camera and equipment data as previous image.) Image #9 Face Off … In this image you can see the blue line just behind the two players facing off. The slightly darker ice in the upper 1/3 of this picture is a result of the light from the Speedlights beginning to diminish past the blue line towards the far end of the rink. The 1 and 1/3 stop (1.3 stop) underexposed ambient exposure beyond the blue line to the far end of the rink gives the appearance that the entire rink is strobe lit even though it is not. (Same camera and equipment data as previous image.) |
 Image #10 Hot Biscuit … I used 1 remote camera above the goal at my “lit” end of the rink. Here again all the fast action is perfectly stopped. With my former arena lighting system the incoming puck would have some slight ghosting around its edges, but now the “biscuit” is stopped cold. This Nikon D3s camera is being fired remotely and has its own Nikon SU-800 Commander with Radio Popper PX Transmitter. This allows me to adjust the output of light from the Speedlights independently from my hand held camera. Rather than have the light output equal from each of my two Banks of Speedlights I chose to keep Bank A (light coming from upper right-hand corner of the picture) at full power (1/1). I then set Bank B (light coming from the lower left-hand corner of the picture) at half power (1/2). This gave a slightly front-lit look from above, reduced some shadows, and was a real mind blower regarding light control. I learned that instead of installing additional sport strobe lights to create a different lighting look during the same game I can just use another SU-800 Commander to raise or lower the Speedlight power output independently of each camera I use. How cool is that. How cost efficient is that! Nikon D3s, ISO5000, 1/1600 at f5.6, Nikon 70-200mm G VR lens, WB 5000K, Manfroto Super Clamp with Mini-Magic Arm and Safety Cable, Pocket Wizard Multi MAX Transceivers to trigger the remote D3s, LPA Design Pre-Release Trigger to keep the remote camera from going asleep, 8 Nikon Speedlights, 2 FourSquares, Radio Popper PX system, the Fiber Optic Bundle, Lexar 16G Flash Card, etc, etc, as were used for the previous images. The only difference being the power output of Bank B being set via the remote camera’s Nikon SU-800 Commander is at 1/2 power instead of full power. Image #10 Hot Biscuit … I used 1 remote camera above the goal at my “lit” end of the rink. Here again all the fast action is perfectly stopped. With my former arena lighting system the incoming puck would have some slight ghosting around its edges, but now the “biscuit” is stopped cold. This Nikon D3s camera is being fired remotely and has its own Nikon SU-800 Commander with Radio Popper PX Transmitter. This allows me to adjust the output of light from the Speedlights independently from my hand held camera. Rather than have the light output equal from each of my two Banks of Speedlights I chose to keep Bank A (light coming from upper right-hand corner of the picture) at full power (1/1). I then set Bank B (light coming from the lower left-hand corner of the picture) at half power (1/2). This gave a slightly front-lit look from above, reduced some shadows, and was a real mind blower regarding light control. I learned that instead of installing additional sport strobe lights to create a different lighting look during the same game I can just use another SU-800 Commander to raise or lower the Speedlight power output independently of each camera I use. How cool is that. How cost efficient is that! Nikon D3s, ISO5000, 1/1600 at f5.6, Nikon 70-200mm G VR lens, WB 5000K, Manfroto Super Clamp with Mini-Magic Arm and Safety Cable, Pocket Wizard Multi MAX Transceivers to trigger the remote D3s, LPA Design Pre-Release Trigger to keep the remote camera from going asleep, 8 Nikon Speedlights, 2 FourSquares, Radio Popper PX system, the Fiber Optic Bundle, Lexar 16G Flash Card, etc, etc, as were used for the previous images. The only difference being the power output of Bank B being set via the remote camera’s Nikon SU-800 Commander is at 1/2 power instead of full power. |
|


Is it practical and cost efficient? …Yes, I believe it can be both when compared to a larger and more traditional sport strobe system. Keep in mind because I cannot combine the available ambient arena light with the strobe light using a traditional system I will need 6 sport strobes to illuminate an entire ice rink. With 6 sport strobes, 6 reflectors, 6 super clamps, 6 cables, 6 Pocket Wizards, 6 AC extension cords, larger and additional travel cases etc, etc, etc, the cost is about $8,500. If I were to cut cost and have only 2 Elinchrom strobes lighting my 1/3 of the rink then the far 2/3 of the rink will drop 3 stops underexposed leaving a jet-black emptiness behind the players. Why? … This is not a dedicated camera/flash system and the Auto FP setting will not function which also means I can only use 1/250 shutter sync speed. All the lighting equipment and accessories described in this article will cost about $4,500 – $5,500 depending on whether your size arena needs 6 Speedlights or 8 Speedlights. Keep in mind I lit an ice rink, a basketball court is smaller. This could be a very nice way to add super light quality and perfectly stopped action to your sports images both indoors and outdoors……… Hummm, outdoor strobed sports … I see another article in the making ….. but, that will need to be future Workshop at the Ranch.
See you next time. Adios. Dave
There is a lot of equipment mentioned in this article. I thought it might be helpful to mention where to acquire these items.
The FourSquare and all FourSquare accessories: www.lightwaredirect.com
The Lightwalker II roll-aboard case (soon to be available): www.lightwareinc.com or any camera store that carries the Lightware brand.
Radio Popper PX Transmitters and PX Receivers: www.radiopopper.com
Michael Bass Designs Fiber Optic Bundle: www.michaelbassdesigns.com
Manfroto (formally Bogen): #155 Double Ball Tilt Head and the 5/8-3/8 Rapid Adapters: available at Robert’s Imaging in Indianapolis 800-726-5544 www.robertsimaging.com
Thank you for hanging in there to the end. Hope you enjoyed the article and learned something new.
