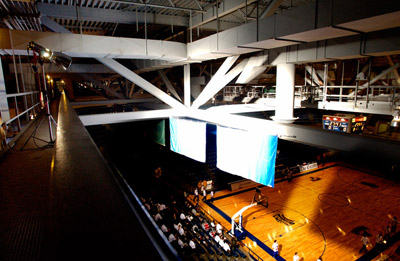
 This first image is in response to the high number of questions via email with regards to February’s Workshop at the Ranch. Many of you wanted to see how the shaft of light was created on the basketball court. First of all, clamping the strobe to the catwalk and using a safety cable is best, but to achieve the perfect angle for the light I received clearance from the athletic department to secure a light stand with strobe and reflector to shoot the game. I used the flags as ” GoBos”(short for go between) the strobe and the court. This images shows how the space between the flags allowed the light to hit the court in a shaft like angle. Hope this helps you understand the technique.
This first image is in response to the high number of questions via email with regards to February’s Workshop at the Ranch. Many of you wanted to see how the shaft of light was created on the basketball court. First of all, clamping the strobe to the catwalk and using a safety cable is best, but to achieve the perfect angle for the light I received clearance from the athletic department to secure a light stand with strobe and reflector to shoot the game. I used the flags as ” GoBos”(short for go between) the strobe and the court. This images shows how the space between the flags allowed the light to hit the court in a shaft like angle. Hope this helps you understand the technique.
Well, let’s talk about a third way of lighting a subject. The “on camera strobe” or “flash” is useful and economical. This style of lighting is commonly used when doing fast paced news, press conferences, or the “FLASH” in the face of the athlete getting out of his car………….or as we see too often, the athlete getting out of court. The main object is to add only enough light to “CLEAN UP” the subject while holding the desired background exposure. Sometimes my goal is to have a natural look to the picture and not a flashed look, but sometimes I like to create a dynamic look. I usually DIAL DOWN the output of light so as not to over light the subject. My only experience is with the Nikon speedlights but I believe the other manufacturers are similar.
What I will use…… These examples are from a few years of work,therefore, different generations of cameras and strobes were used. It is the principle of fill flash that is important…so…I currently use the NikonD1X and D100 camera and the speedlight is currently Nikon’s SB-80DX Usually, a wide lens(14mm or17-35mm) is used when I feel fill flash is appropriate.
|
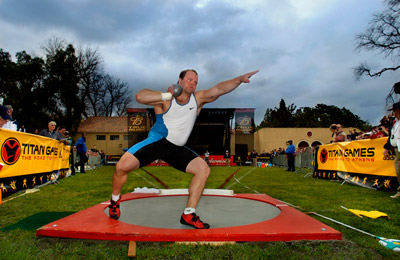
This example, taken at the Titan Games, shows a good situation to use fill flash. If I had set my exposure for the subject and do not use flash, the subject would look fine but the sky would have been over exposed and white with no detail. So, I set the exposure for the sky and let the flash “FILL” the subject with light. I choose to DIAL DOWN the intensity of the Nikon Speedlight, in this case -1.5. I used a Nikon14mm lens and therefore I used the diffuser on the strobe to spread the light evenly. |
 Here I set my exposure for the sky. This is an obvious example of fill flash. I used a Nikon17mm-35mm lens, set the Nikon Speedlight at TTL and dialed down to -0.7 and Zoomed the Speedlight to 85mm( this narrows the spread of light to hit only the bicycle rider and let the Velodrome track fade to black). I also swiveled the flash head to aim at the right side of the frame( were the subject would be in the frame). |
|
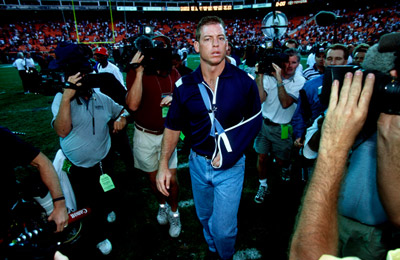
Classic fill flash. Troy Aikman coming of the field after suffering a shoulder injury earlier in the game. I used a Nikon 17mm-35mm lens, set the camera to expose for ONE STOP UNDER a perfect exposure for the scene, set the Nikon Speedlight at TTL , dial down the Nikon Speedlight to -1.3( Troy is only a few feet away and I do not want to “FLASH” him with to much light), and use the diffuser to spread the light evenly around the media circle. I would have wise to swivel the flash head slightly to the left so as not to “FLASH” the arm of the TV camera man. |
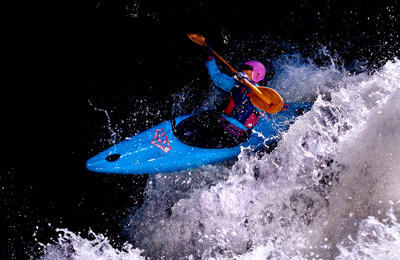 This kayaker was going over a waterfall in a cave like setting. I used fill flash to help light him rather than pushing to a higher ISO. Same principle as always, add enough light but not too much. Subject is far away( 20-30feet) so I ZOOMED the Speedlight to 85mm to concentrate the light on the subject, and DIAL DOWN, -1.5 in this case. |
|
Indoor events can force you to push the ISO to 800 or 1600. If you can use a flash and FILL in just a little you can usually keep your ISO down in the 400-500 range and improve the quality of the image. Here the light in the arena would have been ISO1600 at 500th/sec shutter speed so I set the exposure on the camera at ISO640 and dialed down the Nikon Speedlight -2.0 so as to clean up the image just enough to look natural while achieving a 500th/sec shutter speed. |
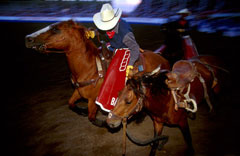
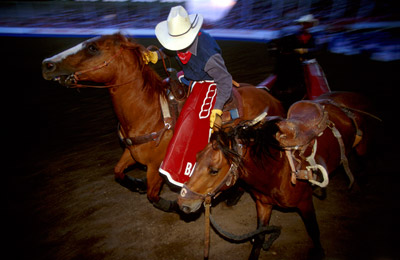 Now that we know the basics, lets play a little. REAR CURTAIN SYNC is used when you want to show some motion in the scene and freeze your subject. I will set my Nikon D1X for rear curtain flash sync. Here I exposed the camera setting to be 2stops under a perfect exposure(ISO200, 15th/sec shutter , f5.6) The Nikon Speedlight lights the subject and freezes the action of only the rodeo pickup man while the exposure for the scene is also visible as I PANNED to show the motion. |
|
Here at the Daytona 500 I am again panning with the subject, the flash freezes the action and the slightly under exposed scene that is shot at 10th/sec shutter speed creates a feel of movement. With the rear curtain setting activated in my camera, the flash will to go off at the end of the 10th/sec shutter release. This creates an image were the subject has the motion(panned movement) behind them and not in front of them. |
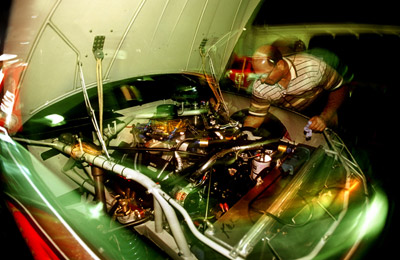 At the Daytona 500 mechanics and engine designers work night and day so the fill flash is very useful. Here I used rear curtain sync,dialed down -2, exposed 1stop under a perfect exposure, used the diffuser, and at a shutter speed of 1 second I quickly swung the camera from left to right while taking the picture. This is one of my favorite techniques. Swing the camera for plenty of motion with the 1 second exposure and fill flash with rear curtain freezes the subject. |
|
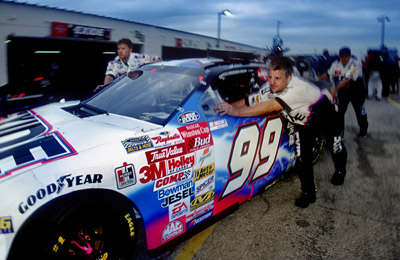
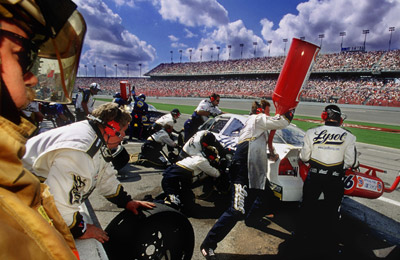
In this last example I turned the Speedlight head to the left just enough to have the light hit the fireman. I dialed down the Nikon Speedlight to -3 because he is so close. The diffuser spreads the light enough to slightly light up the pit crew. I exposed the camera at 3/4 of a stop under a perfect exposure to hold the exposure of the sky. The flash from the Speedlight is visible in the gas can. |
I hope you have enjoyed this edition of Workshop at the Ranch. Fill Flash is a great tool. A digital camera will help you learn quickly by seeing the results immediately after taking the picture and then making corrections. The settings I have mentioned are to help guide you in learning this technique. Each situation and the “look” you want for your picture is up to you. More or less dial down, more or less exposure will change the look of each image. Experiment and find out what makes a picture you like. See you next time at Workshop at the Ranch. Adios, Dave
![]() This first image is in response to the high number of questions via email with regards to February’s Workshop at the Ranch. Many of you wanted to see how the shaft of light was created on the basketball court. First of all, clamping the strobe to the catwalk and using a safety cable is best, but to achieve the perfect angle for the light I received clearance from the athletic department to secure a light stand with strobe and reflector to shoot the game. I used the flags as ” GoBos”(short for go between) the strobe and the court. This images shows how the space between the flags allowed the light to hit the court in a shaft like angle. Hope this helps you understand the technique.
This first image is in response to the high number of questions via email with regards to February’s Workshop at the Ranch. Many of you wanted to see how the shaft of light was created on the basketball court. First of all, clamping the strobe to the catwalk and using a safety cable is best, but to achieve the perfect angle for the light I received clearance from the athletic department to secure a light stand with strobe and reflector to shoot the game. I used the flags as ” GoBos”(short for go between) the strobe and the court. This images shows how the space between the flags allowed the light to hit the court in a shaft like angle. Hope this helps you understand the technique. 

