Workshop at the Ranch – May 2008 – Learn Something New
![]() Hi and welcome to this edition of Workshop at the Ranch. I’m always trying to expand my photographic knowledge. I think it is healthy to do so. Although I am best known for sports imagery and have made my living for more than 28 years in the sports photography market place I have always tried to learn new techniques and challenge myself by photographing new subjects. This past year my business crossed into a new era. For the first time in my photographic career the majority of my annual income was not generated from sports related photography, and this came in one of the best business years of my career. I have successfully diversified my portfolio/talent to the point where sports coverage is not my only source of income and in fact I now have multiple avenues to work with.
Hi and welcome to this edition of Workshop at the Ranch. I’m always trying to expand my photographic knowledge. I think it is healthy to do so. Although I am best known for sports imagery and have made my living for more than 28 years in the sports photography market place I have always tried to learn new techniques and challenge myself by photographing new subjects. This past year my business crossed into a new era. For the first time in my photographic career the majority of my annual income was not generated from sports related photography, and this came in one of the best business years of my career. I have successfully diversified my portfolio/talent to the point where sports coverage is not my only source of income and in fact I now have multiple avenues to work with.
Hi and welcome to this edition of Workshop at the Ranch. I’m always trying to expand my photographic knowledge. I think it is healthy to do so. Although I am best known for sports imagery and have made my living for more than 28 years in the sports photography market place I have always tried to learn new techniques and challenge myself by photographing new subjects. This past year my business crossed into a new era. For the first time in my photographic career the majority of my annual income was not generated from sports related photography, and this came in one of the best business years of my career. I have successfully diversified my portfolio/talent to the point where sports coverage is not my only source of income and in fact I now have multiple avenues to work with.
Some years back I saw that the sports photography market place was changing and at the same time I was changing too. My interest in sports imagery did not diminish, it was my interest in photography that increased. It came to my mind that I was becoming more than a sports photographer and that my collective talents could allow me to photograph new subjects if I really applied myself. The old saying goes, “Never give up your day job.” Well, I still shoot sports. Some say better than ever, but, I have declined some high profile job offers, including the Summer Olympic Games in Beijing, in order to concentrate on other photographic endeavors that I equally enjoy and, as was very evident in 2007, make good income with.
This Workshop at the Ranch article is not so much a tutorial about photographing landscapes or using Photoshop to make panoramas, although we will discuss those topics in detail. I do not profess to be and expert in these areas like John Shaw or Mattias Klum. This month’s article is two fold and is also written to bring to mind that accumulated knowledge over time, when applied, can create new and rewarding avenues in one’s career in the future. I’m not suggesting that everyone should abandon their field of expertise and embark in a completely new direction, but what I want to promote is learning something new. New skills and techniques when learned and applied over time tend to produce results, and those results tend to produce a broader base of photographic expertise that you can offer a client, and that tends to result in more income.
This month’s side kick article in On The Road illustrates a photo road trip from Colorado Springs to Las Vegas and back. It features southwest landscape images and a brief recount of the sites across northern Arizona and south-central Utah. The 7 day excursion became a very valuable and productive “site survey” that revealed many potential Lightpainting locations that I hope to return to and make large scale landscape Lightpaintings in the very near future. The images in this Workshop at the Ranch are a byproduct of that same trip to where I applied some simply learned techniques and made some images that are far from the normal sports venues I frequently work at. I feel confident that I will reap some benefits of my labors from this recent southwest tour and hope this article and images promotes that idea of Learning Something New ……..
Simply put, these PANORAMAS are made by stitching, or “merging” multiple images together in Photoshop (I use CS2) by using the Photomerge function. By making these multiple image panoramas I can greatly increase the file size, detail and quality of the final print over merely cropping out a long narrow panorama format from a single image and enlarging the file size. After opening the images you want merged into a panorama in Photoshop … click “File” on the tool bar … then place the cursor on “Automate” and an extension box will open … then click Photomerge and the Photomerge box will appear with your individual images listed. Click OK and the Photomerge window opens with the images arranged and merged together in a panorama. Then check the box marked Advance Blending, click Preview and see if the images have blended into a panorama efficiently, then click Exit Preview and click OK. The merged panorama is then opened into Photoshop. Then, I Flatten the layers that comprise the one panoramic image by clicking “Layer” on the tool bar which drops a long box of options, and then click “Flatten” near the bottom of the list. I save the panorama as a Tiff. As we all know, any task, function or action in Photoshop can be made very complicated if one desires. There are third party panorama making programs that can be bought separately and plugged into Photoshop. There are also many individuals who have books and teach seminars on Photoshop. Tony Corbell and Scott Kelby come to mind as experts in this field. All I’m trying to do is get those who have not done this before a starting point that produces good results. The method I’m using is simple and easy to do. The individual pictures that form the panorama can sometimes be detected in some areas of the final panorama image. If the image has an expanse of sky you might see where the images are blended together. The blended area might require some Patch Tool or Clone Stamp Tool work to make the blended merged areas of the panorama perfect and undetectable, but in a nut shell, the procedures I have described will work. With all this said, let’s move onto the images themselves. Each image text will feature a KEY POINT along with other suggestions that help when making your individual images acceptable to be merged together as a PANORAMA.
|
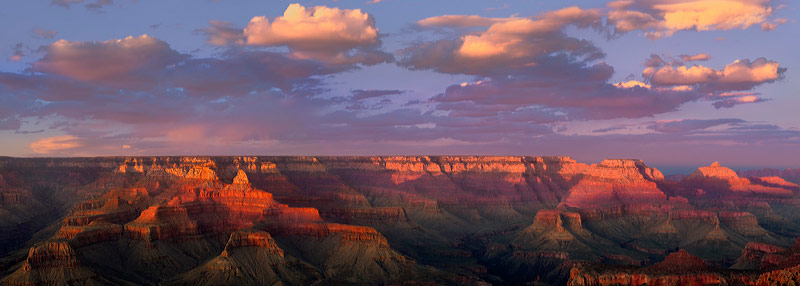
Image #1 Grand Canyon Sunset … This finished panorama is comprised of 3 horizontal images and measures 28 inches X 10 inches. I used a Nikon D3 camera which produces an image with a file that measures 14.187 inches in length by 9.44 inches in height. This panorama utilizes 3 horizontal images thus giving the vertical measurement of 9.44 inches. As when making any panoramic image from multiple images I make sure to overlap the individual images by 30% to insure a seamless blend when merged. Although 3 horizontal images were used, the final merged length is less than 42.5 inches (3 images x 14.187, the long measurement of the D3 file) because of the overlapping of the individual images. After the merge process was complete the file measured 31 inches X 9.44 inches. A file this size is so large and detailed that I can now enlarge it and crop it for a panorama print measurement of my choosing or clients request, in this case, 28 inches X 10 inches without loosing quality. KEY POINT #1, LEVEL THE HORIZON so that each sequential image is in perfect horizontal and vertical alignment from the first image of the sequence to the last image. If your camera is tilted causing the horizon to be sloping down or rising up, the tilted result will be greatly increased as the sequence of images move from left to right. There are many ways to accomplish a perfectly level horizon line. I made good use of the Virtual Horizon feature in my Nikon D3 camera. When this mode is activated the LCD screen displays a virtual horizon indicator similar to that found in aircraft instrumentation. I also use a very solid tripod and a ball head that has a bubble level. Again, there are many products on the market to help you achieve a perfectly level horizon, but I keep it simple and efficient with my Gitzo Ball Head with bubble level and the Nikon D3 Virtual Horizon feature. Nikon D3, ISO500, 1/160 at f5.6 set manually, Single Point Auto Focus and then I turned off the auto focus, Nikon 24-70mm Lens (at 70mm), WB 7690K, Picture Control VIVID, Gitzo Carbon Fiber Tripod with Gitzo Ball Head, Kirk “L” Bracket, Lexar 8G Flash Card. Keeping the horizon perfectly level when making a multiple image merged panorama can take some practice. Once my tripod was leveled using the bubble level on the Gitzo Ball Head I connected the camera with Kirk “L” Bracket to the ball head and activated the D3’s Virtual Horizon display. I loosened the base plate of the ball head so it could freely pivot the camera horizontally. I watched the Virtual Horizon display while pivoting the ball head from left to right and made slight adjustments to the ball head joint until a perfectly level horizon line was achieved when pivoting the ball head from left to right while aimed at my subject. (NOTE: It was windy during the making of this picture so I used an ISO of 500 in order to achieve a shutter speed of 1/160 to ensure a sharp image without an movement.) |
|
Image #2 Spring Shadows at the Grand Canyon … This finished panorama is comprised of 5 horizontal images and measures 48in X 10in. In short I have photographed 5 horizontal images in a row moving from left to right of the Grand Canyon as seen from the South Rim. KEY POINT #2, OVERLAP each successive image by 20-30% so that when Photomerged the edges of the pictures are not butted up side by side but overlapping each other. This will greatly increase the potential of a perfectly blended merge. Nikon D3, ISO320, 1/500 at f13, this is a manual exposure. Remember one of the biggest downfalls of photomerging images together is the use of auto exposure. The exposure must remain consistent in each individual picture that is to be merged. Using a Program or Auto exposure mode will not work because the slightest variance in exposure will cause the individual pictures to be distinguishable when made into a panorama. I used Single Point Auto Focus on the Canyon then I turned off the auto focus switch on the front of the camera. I do this so the focus does not change for the sequence of pictures (NOTE: Manual Focus could also be used), I used a Nikon 70-200mm VR Zoom Lens, and WB 6250K which is a manual White Balance setting using the Kelvin Scale. Using an Auto WB mode will produce similar results as an auto exposure with variances in each pictures WB. I set the Picture Control on VIVID, used a Gitzo Carbon Fiber Tripod with Gitzo Ball Head , and Lexar 8G Flash Card. (NOTE: With multiple images being used to make the panorama the final file size is quite large. The large file provides great quality and detail within the image which allows the freedom to do some file enlarging and cropping to fit specific dimensions for the making of a specific print size.) |
|
|
|
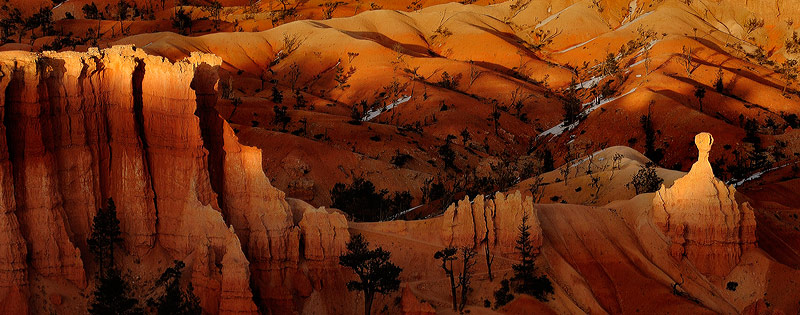
Image #4 Bryce Canyon Hoodoos … This finished panorama is comprised of 3 horizontal images and measures 36in X 10in. By now you should have a good idea of the procedures that are helpful in making a photomerged panorama. Make sure you have a LEVEL HORIZON (bubble and, or Virtual Horizon), OVERLAP your images by 20-30%, MANUAL EXPOSURE, MANUAL WHITE BALANCE (Kelvin or other), then AUTO FOCUS and Turn Off the auto focus on the camera or lens (or Manual Focus), and take your sequence of images moving from left to right. Now, KEY POINT #5, make a BLANK FRAME after each sequence of pictures. By simply holding your hand over the front of the lens and taking a picture you will cause a blank frame in between each sequence of multiple pictures. I don’t just shoot 3 sequential images, then pack up and leave. I tend to make several clusters of sequential images. The light might change or I might recompose the scene slightly. A blank frame between clusters is very helpful when editing the day’s shoot. With so many multiples of similar looking images it is sometimes difficult to tell when one sequence starts and ends. These Hoodoos in Bryce Canyon all looked alike when I was viewing the thumbnails on the computer, but because I shot a BLANK FRAME at the end of each sequence of 3 images I was able to distinguish each cluster of 3 from one another. Nikon D3, ISO200, 1/200 at f14 set manually, Single Point Auto Focus then turn off the auto focus, Nikon 70-200mm VR Zoom Lens, WB 6670K, Picture Control VIVID, Gitzo Carbon Fiber Tripod with Gitzo Ball Head, Lexar 8G Flash Card. |
|
Image #5 Sunset Hoodoo … This finished panorama is comprised of only 2 horizontal images and measures 24in X 10in. The sun was setting fast and clouds were moving in as I approached this landscape in Bryce Canyon. I had no time to set up my tripod. I just ran to the edge of the canyon and made a 2 image sequence before the light vanished. My experience over the first 5 days of the trip paid off and I was able to move from left to right making only 2 sequential images that merged perfectly in Photoshop. As you can tell by the final measurement of the image the overlap of the two sequential images was slightly less than my normal 30%. I had intended on photographing this scene with 5 vertical images using all the Key Points and information explained in the previous images. Although the rapidly vanishing light made me bypass some of our Key Points, this panorama is still a much larger file and contains more detail and quality than if I had made only one single frame of the entire scene and blown it up and cropped it into a panorama format. The idea of using only 2 images is perhaps a good representation of a starting point for those of you who have never made a sequence of individual images into a photomerged panorama. As with learning something new, start small and manageable, then work your way up to something bigger. Nikon D3, ISO200, 1/60 at f13, Single Point Auto Focus on the sunlit Hoodoo, then I pressed the AF Lock Button on the back of the D3 to lock the focus and take the 2 sequential images, this time from right to left as the light was running out, Nikon 70-200mm VR Zoom Lens, WB 6670K, Picture Control VIVID, Lexar 8G Flash Card. |
|
Image #6 Storm Cloud … This finished panorama is comprised of 9 horizontal images and measures 75in X 10in. With so many individual images it will could be enlarged and cropped to 12 feet X 18 inches and hold excellent quality. This panorama marks the end of a long road trip that put 2,250 miles on my truck over 7 days. Approaching home I noticed this storm cloud building up during sunset. It looked like 10 separate rain showers were falling along its massive horizontal spread over the Colorado Landscape. Just for fun, and I’m glad I did it, I wanted to make a giant horizontal panorama and see how photomerge in Photoshop would handle it. Very well indeed. Nikon D3, ISO250, 1/200 at f5.6, Single Point Auto Focus then turn off the auto focus, Nikon 300mm Lens, WB 4550K, Picture Control VIVID, Gitzo Carbon Fiber Tripod with Gitzo Ball Head, Lexar 8G Flash Card. |
I hope this information helps some of you get started on making beautiful panoramas. The file size, quality and detail is incredible when multiple sequential images are merged together to form one big picture. The prints produced from files of this size are remarkable. Keep in mind that when you Learn Something New it’s always a benefit to your existing business, and it may lead to new market places and additional possibilities for income. Just think, all this came from a sports photographer.
See you next time here on Workshop at the Ranch. …….Adios, Dave


