2016 November WATR… How Was That Shot Made?
 Hi and welcome to the November edition of my Instructional BLOG (WATR). I get a lot of emails simply asking “How was that shot made?” So, here are a few details of how some of my portfolio images are accomplished.
![]()
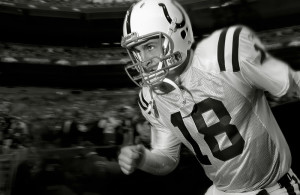 Image 1 Manning Takes the Field … Nikon D2h, ISO200, 1/125, at f8, Nikon 24-70mm lens, Nikon Speedlight REMOTE setting … B&W conversion in post.
For this image of Peyton Manning running out of the tunnel back in 2003 I underexposed the scene by -2.0 stops and slowed the shutter speed down to 1/125 so as to have motion blur in the background (stadium) Then, I simply held the Nikon Speedlight in my left hand and extended my arm out to create an “Off-Camera” studio lighting scenario … a Triangle: Camera (me), Subject (Manning), and Off-Camera Speedlight.
The difficulty was to find Peyton as the entire Colts offense rushed by me onto the field. I just kept saying to myself … “18”, “18”, “18” as a mob of white&blue Indianapolis uniforms sprinted by me … and suddenly #18! FLASH! … and he was gone.
Funny thing is, if I hadn’t been looking through the camera and intensely concentrating on seeing #18 I might not have been so brave … or “nuts” as a fellow photographer said after the team had taken the field.![]()
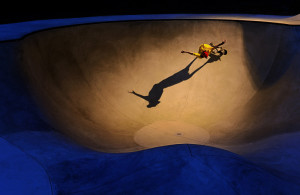 Image 2 Super Bowl Skate Boarder … Nikon D700, ISO1000, 1/1000 at f6.3, WB 3030K, with 2 Speedlights and High Speed Sync.
I’ve been using Nikon Speedlights for over 15 years to light-up my SPORTS Action with High Speed Sync. From my SPORTS archives in 2008, here is an image using 2 Nikon Speedlights and High Speed Sync.
I used 2 Nikon Speedlights each zoomed to 200mm and taped together to provide 1 source of light. The 2 Speedlights are then placed on a 15 ft. lightstand located Off-Camera to the right just out of the frame and above my athlete.
I set my camera WB at 3030K making the twilight ambient light a cool blue. Next I placed the Nikon Orange warming gels over the front of each Speedlight. The results is a stylized image of the sport.
It is the combination of the cool blue ambient and the warm Speedlight “spotlighting” my athlete that makes this Skate Boarder unique. ![]()
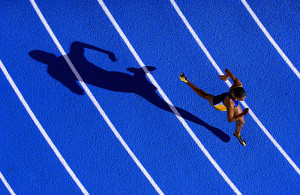 Image 3 Shadow Sprinter … Nikon D2x, ISO250, 1/250 at f5.6, WB 5500K, Nikon 70-200mm lens, 1 Elinchrom 600 RX power pack and strobe head with Long Throw Reflector.
Finding a different location to shoot SPORTS from often times requires using a REMOTE camera secured to the arena catwalks.
For this image of a sprinter during the 200m final at the Indoor Track and Field Championships I used only 1 Elinchrom 600 RX strobe secured to the arena catwalks above the competition floor.
It is the Off-Camera angle of light that creates the long shadow of the athlete and thus, a strikingly graphic picture.
Timing the shot is critical as with a strobe system of any significant power. You only have 1 shot, and then the strobe will take 2.3 seconds to recharge. So make the shot when the athlete’s stride is airborne.
NOTE: Here are some tips for those interested in using Remote cameras at SPORTS events:
* Get permission from the arena-sports info dept.-event media person in charge.
* You should have liability insurance of 2.5 million dollars …standard amount for this kind of work… (roughly $500 for a year)
* Remove anything from your shirt or vest that could fall out while working in the catwalks … keys, glasses, hat, etc. do not belong in the catwalks.
* Install the Remote camera when no one is on the arena floor below you.
* Use 2 Manfrotto Magic Arms and Super Clamps to secure the camera.
* If the lens is long telephoto and has a foot mount secure that to the catwalks as well with Magic Arm and Super Clamp.
* Use double safety cables.
* I will use a Manfrotto 410 Geared Head for large lens Remote cameras.
* Use a lite camera if you have one … ex: Nikon D750 or D500
* I use the PocketWizard Multi MAX Transceiver to trigger my Remote.
* You’ll need a “Pre-Release” cable between the camera and PocketWizard (it keeps the camera turned on continually.)
* Estimate focusing where the athletes face will be at “peak action”
* Tape down the focus ring.
* Shoot-TEST the system during practice, then replace the battery and card.
* Remove the Remote camera after everyone has cleared the competition floor … that could mean you come back the next day to do so.![]()
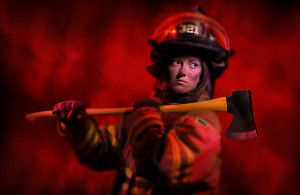
 Image 4 The Fire Fighter … Nikon D500, ISO200 at 30 seconds, Nikon 24-70mm lens, WB 10,000K, Manfrotto Tripod and 410 Geared Head … Lightpainting.
This Lightpainting portrait of a female Fire Fighter makes use of a 30 second exposure time during which I used a small white LED penlight to illuminate her face, helmet, ax and torso in about 7 seconds.
For the next 12 seconds of exposure time I manually unfocused the lens to infinity AND resumed Lightpainting using a small red LED penlight to feather in additional Lightpainting to edge areas of her arms and helmet so as to “SoftFocus” Lightpaint those areas.
Finally, with about 11 seconds remaining I Lightpainted the backdrop with red LED flashlight while the backdrop was being “fluttered” slightly by an assistant, thus creating a “SoftFocus” – motion blur that simulates red smoke behind her.
This Lightpainting portrait is one of my portfolio favorites.
Here is a list of my Lightpainting Gear:
Small Table Top size display and up to Full Body Portrait Lightpaintings:
Stylus white LED Penlight (uses AAAA batteries): http://www.streamlight.com/product/product.aspx?pid=207
Stylus colored LED Penlights (uses AAAA batteries): http://www.streamlight.com/product/product.aspx?pid=52
Scene with Live Subject and up to Car size Lightpaintings:
ProTac 2AA LED Flashlight: http://www.streamlight.com/en-us/product/product.html?pid=201
NOTE: These Stylus LED Penlights can usually be ordered by Batteries Plus … I have also ordered different colors of the Stylus Penlights as well (blue, green, and red).
If Batteries Plus is not in your area, LOOK at the bottom Right-hand corner of the Streamlight website pages I have listed above and you will see a box: FIND a DEALER. Type in your zip code, click SEARCH, and a list of Streamlight product dealers will come up.
NOTE: Any LED flashlight of about 120 Lumens will do nicely for small to life size Lightpaintings … simply Google search.![]()
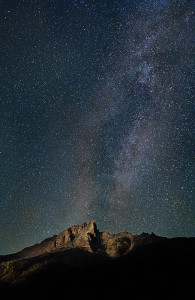
Image 5 Star Summit … Nikon D5, ISO8000, 15 seconds at f3.2, Nikon 24-70mm lens (at 30mm), WB 3030K … Lightpainted using 3 Larson Electronics RL-85 rechargeable 5 million candle powered spotlights.
OK, here’s my idea … to Lightpaint Mt. Teewinot in the Teton Mountain Range of Wyoming … (elevation: 12,326 ft. elevation gain: 5,580 ft.)
Now, here’s my plan … First: position my Nikon D5 camera with NPS legend Ron Taniwaki 1.5 miles from the summit of Mt. Teewinot … Second: position myself and my assistant Julio Aguilar 1.2 miles west of my D5 camera (Ron). Julio and I will Lightpaint Mt. Teewinot which is 1.5 miles away from us.
Just after midnight with the Milky Way roaring above Mt. Teewinot I radio Ron to “OPEN” the D5 shutter for 15 seconds (no star movement), ISO8000, at f3.2 … Ron radio’s back “OPEN.”
Julio assists me in aiming my 3 RL-85 at Mt. Teewinot summit. From a distance of 1.5 miles away we Lightpainted as much of the mountain peak region as possible during the 15 seconds exposure time.
NOTE: Why only 15 seconds? … at a focal length of 30mm a shutter speed of longer than 15 seconds would show star movement.
With the application of Lightpainting complete, Julio and I wait for Ron to radio-back with news of what the image looks like on the camera’s LCD screen.
Then we hear Ron’s excited voice over the walkie-talkie “ IT’S UNBELIEVABLE !!! … Make another one !!!” … we made several more Lightpaintings of Mt. Teewinot that night, here is my favorite.
Here is information on the RL-85 spotlight by: Larson Electronics:
Larson Electronics RL-85 … 5 million candlepower rechargeable spotlight with 7 inch lens: http://www.larsonelectronics.com/p-1919-5-million-candlepower-handheld-rechargeable-spotlight-100w-halogen-spot-flood-57-lens.aspx
NOTE: the RL-85 spotlight by Larson Electronics is replacing my Brinkmann Max Million II and III spotlights that I have used for years. The Brinkmann spotlights are no longer available but I am loving the RL-85 by Larson Electronics. ![]()
I hope you have enjoyed this WATR … Come FOLLOW me on Instagram @daveblackphoto and learn about photography.
I’ll see you here next month on WATR.
“There’s always more to learn” …Adios. Dave


