2015 July WATR: My Photoshop World Workbook DAY 1
Welcome to this unique edition of WATR. My July and August WATR articles will feature my PSW Workbook of instructional content for my classes at Photoshop World 2015 in Las Vegas. Use this special PSW link: Photoshop World and Discount Code: DaveBlack50 to save BIG money when you register for this year’s largest Photography, Lightroom, and Photoshop event of the year.
![]()
My 2015 Photoshop World class schedule is:
August 10 … Lightpaint the Town …a PSW Workshop SOLD OUT
August 11 …11:00am – 12:00pm Lightpainting: “Let There Be Light”
August 11 …6:00pm – 7:00pm: Shark Tank Critique
August 12 …9:30am – 10:30am: Speedlights: OFF Camera Flash on Location
August 12 …10:45am – 11:45am: Sports Action with Speedlights and High Speed Sync
August 12 …7:30pm – 9:30pm: Art of Digital Panel
August 13 …1:00pm – 2:00pm: Sports Photo Lab
Monday August 10 at 5:30pm – 10:30pm
Workshop at PSW 2015 … Lightpaint the Town
![]()
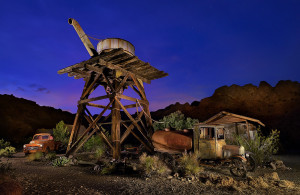
 Image 1 Nelson Sundown … Nikon D800, ISO800, 30 seconds at f8.0, 24-70mm lens, WB 4000K, Manfrotto Tripod and 410 Gear Head, Brinkmann Max Million II (2 million candle powered rechargeable spotlight), SanDisk 32GB Extreme Pro Flash Card.
This pre-conference PSW workshop is already SOLD OUT. For those who are signed up to attend this pre-conference PSW Workshop please make sure that you bring:
* 35mm DSLR camera that is capable of changing lenses,
* Short Zoom lenses (example zoom range lenses: 24-70mm, 16-35mm),
* Compact Flash Card or SD Card,
* Sturdy Tripod, and a Head Lamp or LED flashlight (125 Lumens or more)
* Your Imagination!
(NOTE: small pocket cameras or cameras that cannot change lenses are not suitable for this workshop)
If you want to bring your own portable spotlight I recommend the Max Million II …2 million candle powered rechargeable spotlight made by Brinkmann: http://www.brinkmann.net/all_lighting/specialty_lighting/spotlights/details.aspx?item=800-2655-2
Good Walking-Hiking shoes are recommended. This class is mostly desert terrain, there is gravel, and there are cactus, and it will be dark after sunset. Sandals and Flip-Flops do not work well for this class.
Also, please read the following class instructional content for my class on
Day 1 Tuesday August 11, 11:00am – 12:00pm Lightpainting: “Let There Be Light” …I advise each of you to come to this class/LIVE demonstration to learn even more about Lightpainting.
DAY 1 Tuesday August 11, 2015 … 11:00am – 12:00pm
Lightpainting: “Let There Be Light”
This class is for anyone at any photographic level who wants to learn how to illuminate a Still Life, a LIVE model (demonstration during class), or even a large Landscape. …So, let’s learn how to Lightpaint…step-by-step.
“Light is the Greatest Influence” …Sometimes a flash or strobe just isn’t graceful enough for my artistic vision. That’s when I turn off the studio lights and delve into the most creative lighting technique of all. Lightpainting …it’s the perfect combination of photography and artistic expression.
The word photography in the Greek means “light writing.” Simply said, Lightpainting is the revealing of the subject from darkness with light. In general, Lightpaintings make use of long exposure times like 3 seconds, 10 seconds, 30 seconds, 2 minutes, or more.
Let’s begin with some basics and Lightpaint a small Still Life that fits on a table-top. I will need a dark environment for my little subject …my old Fishing Gear. I will use a Manual Exposure of which I have a basic starting exposure that I begin many of my Lightpaintings with: I use a Manual exposure: ISO500, 30 seconds at f8.
During the 30 seconds exposure time I will use a small mobile light source (LED penlight) to illuminate the subject in the scene and reveal it from the dark with Lightpainting.
For my Table-Top Still Life and LIVE model Lightpaintings I use a small Stylus penlight with a single LED bulb made by Streamlight: http://www.amazon.com/Streamlight-65018-Stylus-4-Inch-Penlight/dp/B00008BFS5/ref=sr_1_5?ie=UTF8&qid=1431293035&sr=8-5&keywords=stream+light+stylus+pro
First I arrange my subject and compose the scene. Then, like with all Lightpaintings, I secure the camera on a sturdy tripod. With the studio lights turned “on” I use Auto Focus on the subject and then turn “off” the auto focus. This is so the auto focus does not activate or “search” in the dark when I turn off the lights, open the shutter, and begin to Lightpaint.
I use the Auto Focus (AF) back button on my Nikon camera. By simply releasing my thumb from the AF button on the back of the camera it stops activation of the Auto Focus operation. Or you can also simply turn OFF the AF switch on the barrel of the lens or on the camera body.
I will use a Manual WB of 10,000 Kelvin when Lightpainting with any LED flashlight. This setting helps add a warm color tone to the overall picture. And I will also activate the Long Exposure Noise Reduction mode in the camera found in the Photo Shooting Menu. This prevents any noise speckles from appearing due to the long exposure time that generates heat inside the camera.
With my usual Manual exposure: ISO500, 30 seconds at f8.0
I’m now ready to turn OFF the room lights and make my first “TEST SHOT” without adding any Lightpainting to the subject …I just want to see if there is any unwanted ambient light creeping in from a window or the door.
With my TEST shot made, a dark or “Blank” image appears on the LCD screen. Now I’m now I’m ready to add some Lightpainting during my second shot.
![]()
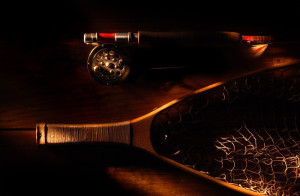 Image 2 My Fishing Gear (one of my very first Lightpaintings) … Nikon D1, ISO500, 30 seconds exposure at f8, Nikon 17-55mm lens,
WB 10,000K, Gitzo Tripod and Ball Head, Stylus penlight, SanDisk Flash Card.
“If I want a picture to look interesting I only light part of it” …I like to apply the light from off camera angles to create a dramatic lighting effect. My Stylus penlight is only 10 inches away from my subject. It is coming into the scene from a variety of angles. I paint about 3 seconds of light to each object in the scene …the fly, the reel, the net, the net handle and the fly line. Gee, that’s only 15 seconds, why have a 30 second exposure time? The other 15 seconds is taken up while I walk around the table between Lightpainting from different angles on each object in the scene.
The closer the light source is to the subject, the brighter the subject becomes. Also said, the longer time I spend illuminating my subject the brighter the subject becomes. Too much light or too much time spent applying light can overexpose portions of the image…and vise verse.
I try to keep the light source (Stylus) moving while applying the light, usually in a swirling or brushing motion. This helps soften the transitional edges between light and shadow, which is key in creating a painterly quality to the picture. You are in effect “painting with light.”
My basic Manual Exposure setting of ISO 500, 30 seconds at f8 is a good way to begin, but it can vary depending on intensity of your own flashlight and the distance from flashlight to subject, and also how large is your subject. Don’t give up, I sometimes make 10-15 Lightpaintings before I get 1 that I like.
![]()
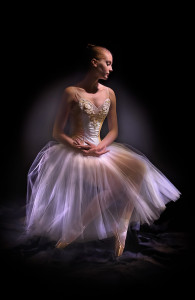 Image 3 Ballet Romantica … Nikon D810, ISO1000, 30 seconds at f5.6, Nikon 24-70mm lens, WB 10,000K, Manfrotto Tripod with 410 Gear Head, Stylus penlight, SanDisk 32GB Extreme Pro Flash Card.
Lightpainting people is a lot of fun and can produce a very lovely portrait …as long as the model remains perfectly still during the long exposure time of 30 seconds. My advice is to find a very patient subject to Lightpaint.
I used ISO1000 and my Stylus penlight for this Lightpainting of a Ballerina. I Lightpaint the models face with the Stylus about 2 feet away and only for 2 seconds. Any longer or any closer and the subject will probably blink, thus causing their eyes to blur.
Because there is no light on me during the exposure time I can actually be “inside the picture” but not be seen. This enables me to Lightpaint her arms, torso, the “Romantica” costume and Point Shoes precisely and artistically from only 2-3 feet away. For some artistic flair I purposely made some “brush strokes” of Lightpainting on the Romantica costume.
NOTE: When applying Lightpainting from “inside the picture” the LED bulb will likely be seen by the camera. The Stylus comes with its own snoot. If you use another brand of penlight you will need to make your own snoot. It should extend about 1 inch out from the LED bulb.
![]()
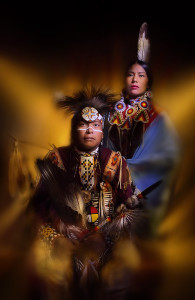 Image 4 Lakota Portrait … Nikon D800, ISO1600, 30 seconds at f14, Nikon 24-70mm lens, WB 10,000K, Manfrotto Tripod with 410 Gear Head, Stylus penlight, SanDisk 32GB Extreme Pro Flash Card.
I still used the same Stylus penlight to Lightpaint my two distinguished Native American subjects, but I also used a larger 125 Lumen LED flashlight with an Amber color gel taped over the front to Lightpaint the background.
For this Lightpainting I incorporated a NEW technique that I simply call “Soft Focus.” I used only 15 seconds of the 30 seconds exposure time to Lightpaint my subjects in focus. Then I purposely “unfocused” the lens by manually turning or “throwing” the focus ring about half way to infinity, and resumed Lightpainting the outer edges of the scene and the background for the remaining 10 seconds.
The results is unique, as my subjects are in perfect focus, while my background and outer edges of the scene are out of focus. This “Soft Focus” technique has become my favorite stylization addition to many of my Lightpaintings. Adding Gaussian Blur in post doesn’t look the same…”Soft Focus” Lightpainting takes time to master, but is truly unique.
![]()
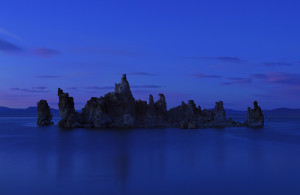
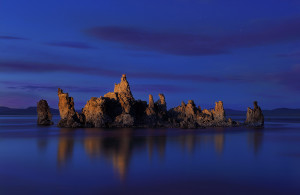 Images 5A and 5B Tufa Twilight Reflection … Nikon D4s, ISO500, 30 seconds at f8, Nikon 24-70mm lens, WB 4000K, Manfrotto Tripod with 410 Gear Head, Brinkmann Max Million II (2 million candle powered rechargeable spotlight), SanDisk 32GB Extreme Pro Flash Card.
Twilight is a perfect time to Lightpaint out door landscapes. A big gear difference is my light source …I use the Max Million II rechargeable 2 million candle spotlight made by: Brinkmann. http://www.brinkmann.net/all_lighting/specialty_lighting/spotlights/details.aspx?item=800-2655-2
These 2 images illustrate a “Before” (no Lightpainting) and “After” (with Lightpainting) comparison. At twilight the Tufa formation becomes a silhouette, which is the perfect time for me to reveal it with Lightpainting. The WB of 4000K makes the twilight sky a beautiful pastel blue. I add the warm “Golden Hour” light from my Brinkmann Max Million II spotlight from my Off Camera location to the left of the Tufa.
I’m standing on the shore of Mono Lake about 70 yards from the Tufa formation. I am just about profile to the Tufa when applying Lightpainting. To narrow the beam from the Brinkmann down to a “thin brush” of light I simply held a 20 degree Honey Comb Grid over the front of the spot light. http://www.honeycombgrids.com/
![]()
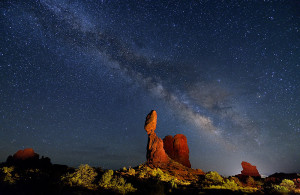 Image 6 Balanced Universe … Nikon D800, ISO4000, 25 seconds at f8, Nikon 14-24mm lens, WB 4000K, Manfrotto Tripod with 410 Gear Head, Brinkmann Max Million II (2 million candle powered rechargeable spotlight), SanDisk 32GB Extreme Pro Flash Card.
Balanced Universe breaks the mold of basic Lightpainting with its unusual exposure settings of ISO4000, 25 seconds at f2.8. The extremely high ISO and wide open aperture enable the Milky Way and cosmos to be seen over Arches National Park.
I used the exposure time of 25 seconds to Lightpaint the iconic Balanced Rock formation from my OFF Camera location with my Brinkmann Max Million II spotlight. While my WB of 4000K kept the Universe a “deep space” blue, I used a Red Gel over the front of the Max Million II to Lightpaint the Balanced Rock and then removed the red gel to Lightpaint the bushes and scrub oak.
![]()
Well, I hope you have enjoyed this step-by-step class teaching how to Lightpaint. My next class during Day 1 is Shark Tank Critique.
Day 1 Tuesday August 11, 2015 …6:00pm – 7:00pm
Shark Tank Critique
This is a new class for PSW 2015. It is a panel of photography instructors (Dave Black, Moose Peterson, Lindsay Adler, Joe McNally and Cliff Mautner) who will critique images submitted by the audience. Each attendee may only submit ONE image.
Anyone can submit an image…everyone can attend …and everyone will learn from the insightful critiques and comments from the panel.
Your Image for Shark Tank Critique must be submitted by July 24th to: http://photoshopworld.com/sharktank/.
Categories are as follows: Landscape, Portrait, Sports-Action, Wedding, Wildlife, Photojournalism, Fashion and Lightpainting. The photographer whose image is being critiqued must be present to participate and will join the distinguished panel on stage and sit in the HOT SEAT in front of the LIVE audience during their critique.
Well, that wraps up my class instructional content for DAY 1 of Photoshop World 2015 in Las Vegas, Nevada.
My Day 2 and Day 3 classes for the PSW 2015 Workbook will be featured in next month’s August Workshop at the Ranch article:
August 12 …9:30am – 10:30am: Speedlights: OFF Camera Flash on Location
August 12 …10:45am – 11:45am: Sports Action with Speedlights and High Speed Sync
August 12 …7:30pm – 9:30pm: Art of Digital Panel
August 13 …1:00pm – 2:00pm: Sports Photo Lab
I hope to meet many of you at this year’s PSW conference. Please come up after class time to say hello. Adios. Dave


